Road bike saddle height formula: How to set it accurately at home
Calculate your road bike saddle height using the LeMond formula (0.883 × inseam), the heel-to-pedal method, and knee extension angle checks for optimal power and comfort.
 Field guide / road-bike-saddle-height-formula
Setting your road bike saddle height starts with a simple mathematical formula: multiply your cycling inseam in centimetres by 0.883. That number gives you the distance from the centre of the bottom bracket to the top surface of your saddle along the seat tube.
The short answer: measure your bare-foot cycling inseam firmly against a flat wall using a hardcover book, multiply that measurement by 0.883 (the Greg LeMond formula), and set your saddle from the centre of the bottom bracket spindle to the top middle of the saddle. Confirm the result dynamically with the heel-on-pedal test: your knee should lock straight at bottom dead centre with zero hip tilting.
Why saddle height is your most critical setting
Saddle height dictates your pedalling mechanics, power transfer, aerodynamic stability, and joint health. A saddle set just 10 millimetres too high or too low alters your knee flexion angle by roughly 8 to 12 degrees, forcing your body to compensate through pelvic rocking, strained Achilles tendons, or overloaded patellar cartilage.
Getting saddle height right provides three immediate benefits:
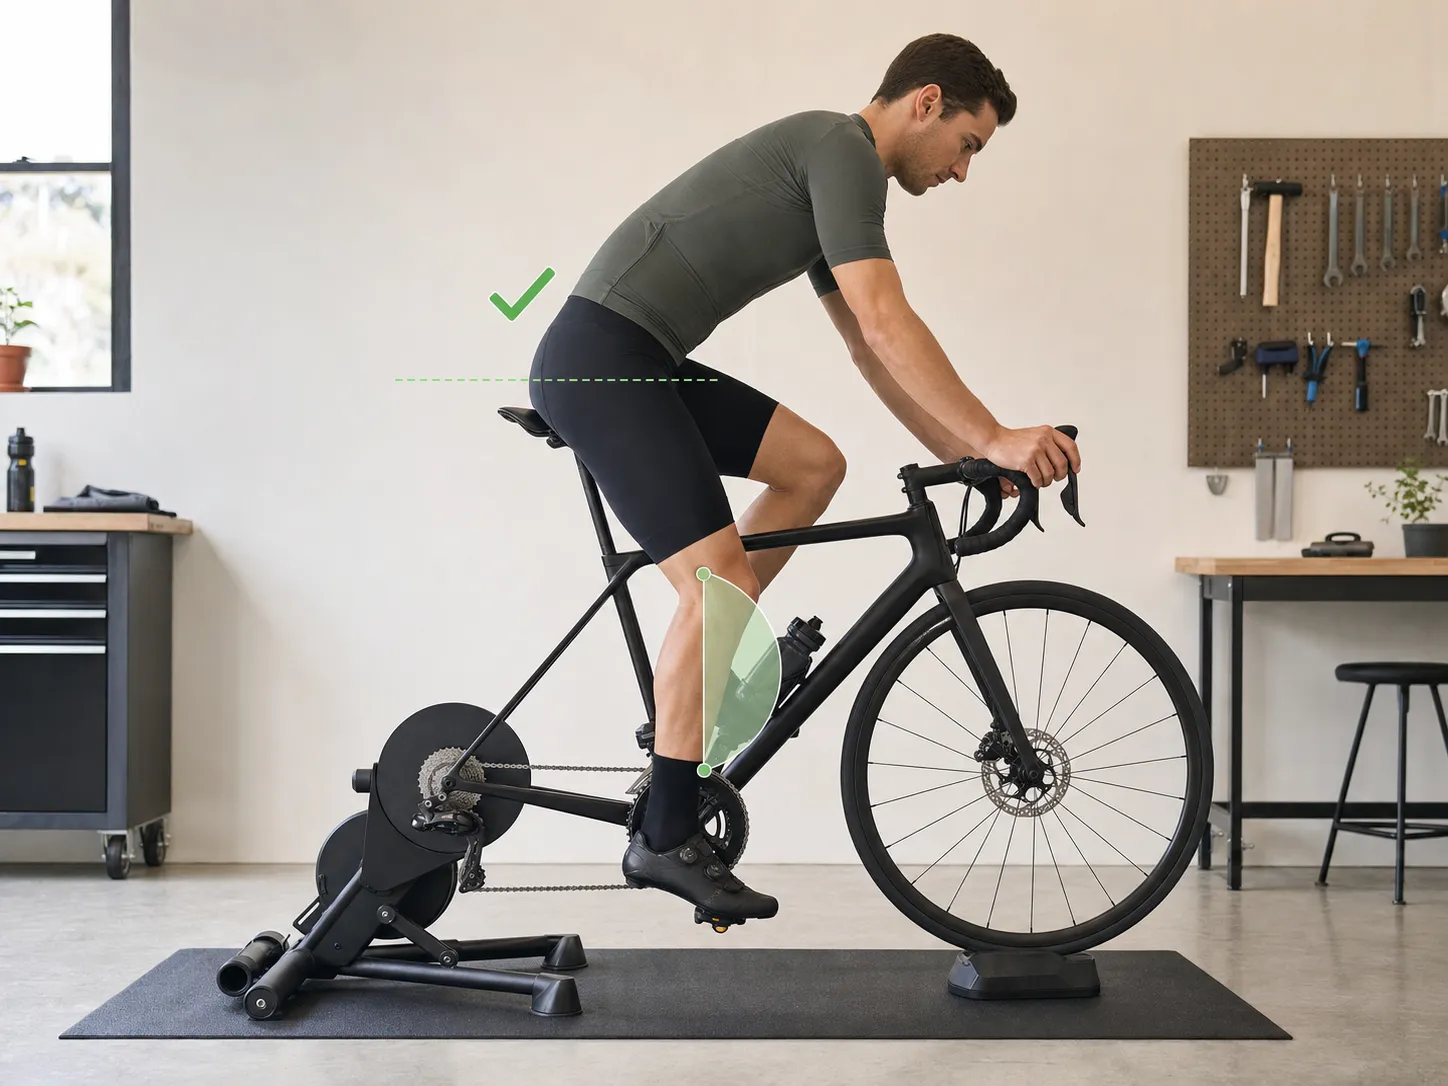
- Protects your knees: Keeps joint flexion within a safe physiological window (typically 25° to 35° bend at maximum extension).
- Maximises muscular efficiency: Engages glutes, hamstrings, and quadriceps in balance rather than overworking a single muscle group.
- Stabilises your pelvis: Eliminates side-to-side rocking on the saddle, preventing saddle sores, friction, and lower back fatigue.
If you are setting up a newly acquired bike, pair this calculation with our comprehensive beginner road bike fit and comfort guide and ensure you understand your frame geometry from how to choose your first road bike.
Step 1: Measure your true cycling inseam
Your cycling inseam—also known as pubic bone height (PBH)—is not your trouser inseam. Trouser inseams measure fabric length to your ankle and are typically 3 to 6 cm shorter than your actual skeletal pubic bone height.
Tools required
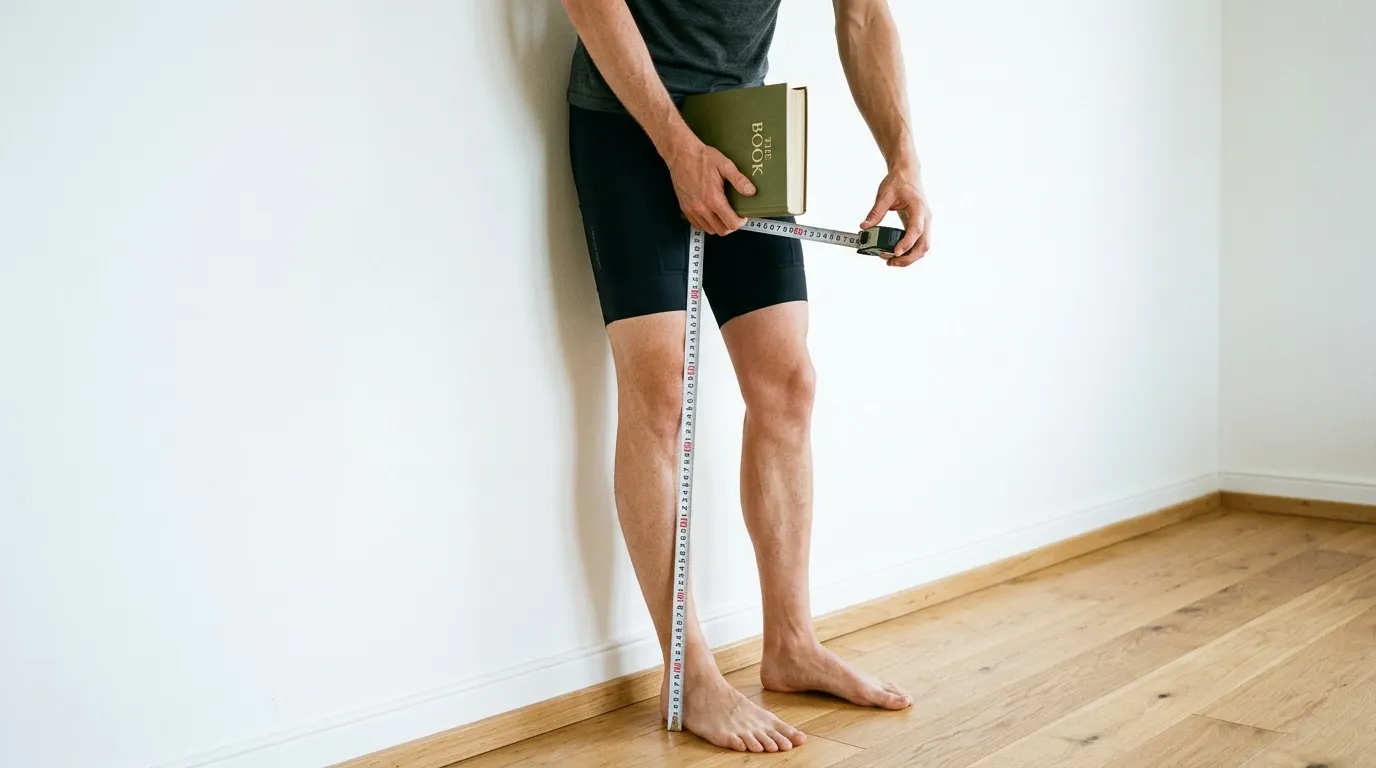
- A sturdy hardcover book (at least 20 to 25 cm deep with a spine thickness of 2 to 4 cm).
- A metal tape measure with millimetre markings.
- A pencil or light painter’s tape.
- A flat, uncarpeted floor against a plumb, vertical wall.
- Your standard cycling bib shorts or lightweight cycling socks (no shoes).
Measurement procedure
    [ Plumb Wall ]
         │
         │  ◄── Top edge of hardcover book (kept perpendicular)
     ┌───┴───┐
     │  BOOK │  ◄── Pulled upward firmly with 15–20 kg equivalent force
     └───┬───┘
         │
         │  ◄── Measure vertically from book top edge down to floor
         │
═════╧═════ [ Flat Uncarpeted Floor ]- Stand barefoot or in thin cycling socks on a hard floor with your heels, shoulder blades, and back flat against the wall.
- Position your feet 15 to 20 cm apart (roughly 6 to 8 inches), mimicking your natural pedalling stance width (Q-factor).
- Place the hardcover book between your legs, spine facing upwards against your perineum and short edge flush against the wall to guarantee a 90-degree right angle.
- Pull the book firmly upward toward your pelvis using two hands. Apply substantial pressure (equivalent to sitting on a firm road saddle). This compresses the soft pelvic tissue so you measure skeletal bone height.
- Mark the wall along the top edge of the book with a pencil, or hold the book steady while a helper measures straight down to the floor with the tape measure.
- Repeat the measurement three times. If your three readings are 82.4 cm, 82.6 cm, and 82.5 cm, your recorded inseam is 82.5 cm.
Step 2: Calculate using the LeMond formula
Developed in the 1980s by legendary French cycling coach Cyrille Guimard and three-time Tour de France winner Greg LeMond, the 0.883 formula remains one of the most reliable and widely tested starting baselines in bike fitting.
The formula
Saddle Height (cm) = Cycling Inseam (cm) × 0.883
Saddle Height (mm) = Cycling Inseam (mm) × 0.883
Calculation examples
| Cycling Inseam (cm) | Cycling Inseam (mm) | Formula Calculation | Recommended Saddle Height |
|---|---|---|---|
| 74.0 cm | 740 mm | 74.0 × 0.883 | 65.3 cm (653 mm) |
| 78.0 cm | 780 mm | 78.0 × 0.883 | 68.9 cm (689 mm) |
| 82.5 cm | 825 mm | 82.5 × 0.883 | 72.8 cm (728 mm) |
| 86.0 cm | 860 mm | 86.0 × 0.883 | 75.9 cm (759 mm) |
| 90.0 cm | 900 mm | 90.0 × 0.883 | 79.5 cm (795 mm) |
| 94.0 cm | 940 mm | 94.0 × 0.883 | 83.0 cm (830 mm) |
Where to measure on the bike
Measure in a straight line from the centre of the bottom bracket spindle (the centre circle of the crank axle bolt) along the angle of the seat tube to the top surface of the saddle.
Important: Measure to the saddle midpoint—typically 12 cm to 14 cm from the rear tail, where your sit bones naturally rest—rather than the extreme rear lip or front nose.
       [SADDLE] ◄── Top surface at sit-bone contact zone (midpoint)
         ╱
        ╱   ◄── Measurement line parallel to seat tube angle
       ╱
      ╱
     [BB] ◄── Centre of bottom bracket spindle / crank axle
Step 3: Compare standard estimation methods
The LeMond formula is not the only traditional calculation. Understanding the alternative approaches helps you see why different fitters suggest slight variations:
| Method | Formula / Technique | Measurement Points | Pros | Limitations |
|---|---|---|---|---|
| LeMond / Guimard | Inseam × 0.883 | BB centre to top of saddle along seat tube | Fast, mathematically repeatable, independent of crank length | Assumes standard 170–172.5mm cranks and traditional pedal stacks |
| Hamley & Thomas (109%) | Inseam × 1.090 | Pedal spindle (at bottom dead centre) to saddle top | Accounts directly for total leg reach to the pedal | Harder to measure accurately at home without the pedal moving |
| Heel-on-Pedal (Holmes) | Heel on pedal axle (straight leg) | Dynamic rider posture on bike | Requires no measuring tape; adapts to shoe sole thickness | Subject to rider posture and whether pelvis tilts unconsciously |
| Kinematic Knee Angle | 25°–35° knee flexion at bottom dead centre | Video analysis / goniometer | Clinically validated biomechanical standard | Requires video capture, trainer, or fitter analysis |
Step 4: The dynamic heel-on-pedal confirmation check
No formula accounts perfectly for your personal ankle flexibility, shoe sole thickness, cleat system, or saddle padding density. You must confirm your calculated saddle height with a dynamic physical check on an indoor trainer or supported in a doorway.
The 4-step dynamic test
- Put on your actual cycling shoes and cycling bibs. Mount your road bike on an indoor trainer, or lean securely against a sturdy wall or doorway.
- Place your bare heels directly over the pedal axles (not clipped in).
- Pedal backward slowly. Rotate the cranks in reverse for 10 to 15 full revolutions.
- Observe your knee and pelvis:
- Correct height: Your knee locks completely straight at the lowest point of the pedal stroke (6 o’clock position), and your pelvis remains perfectly level and stable on the saddle without rocking from side to side.
- Too high: Your hips rock side to side or you lose contact with the pedal at the bottom. Lower the seatpost 3 to 5 mm.
- Too low: Your knee retains a noticeable bend even with your heel planted on the pedal. Raise the seatpost 3 to 5 mm.
- Clip in / place the ball of your foot over the pedal axle: With your cleat engaged, the 1.5 to 2.5 cm offset from your heel to the ball of your foot will naturally introduce the ideal 25° to 35° knee bend at bottom dead centre.
Real-world variables that modify the formula
The LeMond formula was developed around standard road racing equipment: 170 mm to 172.5 mm cranks, traditional Delta/Look pedals, and medium-firm saddles. If your bike differs, apply these minor adjustments:
1. Crank arm length
The LeMond formula measures from the bottom bracket, but your foot reaches down to the pedal spindle.
- If you switch to shorter cranks (e.g., from 172.5 mm to 165 mm—a 7.5 mm reduction), your pedal is 7.5 mm closer to your saddle at the bottom of the stroke. You must raise your saddle by approximately 5 to 7 mm to preserve your knee extension angle.
- If you use longer cranks (e.g., 175 mm), lower your saddle by 2 to 3 mm.
2. Pedal and cleat stack height
Different pedal systems position your foot at different distances from the pedal axle:
- Speedplay / Wahoo: Ultra-low stack (~8.5 mm to 11.5 mm).
- Shimano SPD-SL: Standard stack (~13.7 mm to 15.5 mm).
- Look Keo: Standard stack (~14.8 mm to 17.1 mm).
- Flat pedals with running shoes: Thick rubber soles often add 20 mm to 30 mm of stack height, requiring a higher seatpost setting.
3. Saddle fore-aft position
Moving your saddle backward along its rails also increases its distance from the bottom bracket. If you slide your saddle backward by 10 mm, you effectively increase saddle height by roughly 3 mm. Always re-measure your BB-to-saddle distance whenever you adjust saddle fore-aft or tilt.
If component terminology is unfamiliar, explore road bike anatomy for beginners to identify every clamp, bolt, and frame component.
Troubleshooting: High vs. low saddle symptoms
After setting your calculated height, ride for 15 to 30 minutes on a familiar, flat road. Your body will give you immediate feedback:
| Symptom / Sensation | Likely Cause | Biomechanical Mechanism | Adjustment |
|---|---|---|---|
| Pain behind the knee (popliteal fossa / hamstrings) | Saddle is too high | Over-extension strains the hamstring tendons and posterior joint capsule | Lower saddle by 2–3 mm |
| Pain in front of the knee (patellar tendon / kneecap) | Saddle is too low | Excessive knee flexion increases compressive patellofemoral load | Raise saddle by 2–3 mm |
| Hips rocking side to side / lower back fatigue | Saddle is too high | Pelvis dips on each downstroke to reach the bottom of the stroke | Lower saddle by 3–5 mm |
| Toe pointing down at bottom of stroke (plantarflexion) | Saddle is too high | Calf muscles over-extend to compensate for excessive distance | Lower saddle by 2–4 mm |
| Quadriceps burning quickly on moderate flats | Saddle is too low | Quadriceps remain under constant concentric tension without extension relief | Raise saddle by 3–5 mm |
| Perineal numbness or heavy saddle pressure | Saddle too high or nose tilted up | Over-extension drives excessive pelvic pressure into the saddle nose | Lower saddle 2 mm and check level |
If discomfort persists after multiple micro-adjustments, refer to soreness versus pain on a new bike to distinguish normal adaptation from injury risks.
How to adjust your seatpost safely
Adjusting a seatpost is straightforward, but improper torque or exceeding insertion limits can permanently damage your frame or seatpost.
       ┌───────────────────────────────┐
       │     MAXIMUM EXTENSION LINE    │ ◄── MUST NEVER BE VISIBLE ABOVE CLAMP
       │  ═══════════════════════════  │
       │                               │
       │   MINIMUM INSERTION SECTION   │ ◄── Minimum 8–10 cm inside frame tube
       │                               │
       └───────────────────────────────┘
Safety checklist
- Never exceed the minimum insertion mark: Inspect your seatpost barrel for a laser-etched “Minimum Insertion” line. At least 8 to 10 cm of post must remain securely inside the frame seat tube at all times.
- Use a torque wrench: Most modern seatpost clamps require 4 to 6 Nm of torque (clearly marked on the clamp collar). Over-tightening crushes carbon fibre or pinches aluminium; under-tightening causes gradual slipping during rides.
- Use carbon assembly paste: If your frame, seatpost, or clamp is carbon fibre, always apply carbon friction paste (grit compound). Never use standard lithium grease on carbon interfaces, as grease promotes slippage and encourages over-torquing.
- Make micro-adjustments: When refining fit on the road, adjust in increments of 2 to 3 millimetres. Never move your seatpost by centimetres in a single adjustment.
Before rolling out, verify your setup with the five-minute pre-ride bike check and ensure your tyre pressure is correctly set.
Common saddle height mistakes
- Using casual trouser length instead of pubic bone height: Trousers understate your true cycling inseam by several centimetres, resulting in an overly low saddle and acute anterior knee pain.
- Copying a professional racer’s seatpost height: Pro riders possess extraordinary flexibility, high pedalling cadence, and customised crank setups. A dramatic, sky-high seatpost looks aggressive in photos but causes severe pelvic instability for everyday riders.
- Adjusting height in large 2 cm jumps: Your musculoskeletal system is sensitive to millimetre-scale changes. Adjust in 2–3 mm steps and test each change across several rides.
- Ignoring saddle tilt when adjusting height: A saddle tilted nose-down forces you to slide forward, effectively shortening your saddle height while overloading your triceps, wrists, and shoulders. Keep your saddle level (0° to -1°) using a digital spirit level app.
- Assuming one measurement lasts forever: Changes in cycling shoes, pedal models, saddle models, winter bib thickness, and physical conditioning all influence your ideal saddle height over time.
Your next step
Take 15 minutes today to calculate your baseline: grab a hardcover book and tape measure, record your pubic bone height, and calculate your LeMond saddle height (Inseam × 0.883). Set your seatpost to this distance from your bottom bracket spindle, torque the bolt to specification, and complete the heel-on-pedal test on an indoor trainer or doorway.
Once your saddle height is locked in, explore beginner road bike fit and comfort to align your handlebar reach, brake lever angle, and saddle fore-aft for a completely balanced, fatigue-free ride.
Sources and further reading
- LeMond, Greg, and Gordis, Kent. Greg LeMond’s Complete Book of Bicycling. G.P. Putnam’s Sons, New York.
- Hamley, E.J., and Thomas, V. (1967). Physiological and biomechanical considerations in the selection of saddle height in cycling. Journal of Physiology, 191(2), 55–57.
- Holmes, J.C., Pruitt, A.L., and Whalen, N.J. (1994). Lower extremity overuse in cycling. Clinics in Sports Medicine, 13(1), 187–203.
- Pruitt, Andy. Andy Pruitt’s Complete Medical Guide for Cyclists. VeloPress.
- British Cycling Knowledge Hub. DIY Road and Mountain Bike Fit: Saddle Height Guidelines.
- Bini, R.R., Hume, P.A., and Croft, J.L. (2011). Effects of bicycle saddle height on knee injury risk and cycling performance. Sports Medicine, 41(6), 463–476.