Road bike anatomy for beginners
Identify every key part of a road bicycle, understand what each component does, and learn simple pre-ride checks for confidence.
 Field guide / road-bike-anatomy
Learning the names and functions of your bike’s parts makes maintenance easier, shop conversations clearer, and riding safer. A road bicycle may look complex, but every component belongs to one of four main systems.
The short answer: break the road bike into four major systems—the cockpit & controls, the frame & contact points, the drivetrain & gears, and the wheels & brakes. Learn what each part does and how to inspect it, then use the interactive visual below to explore your bike step by step.
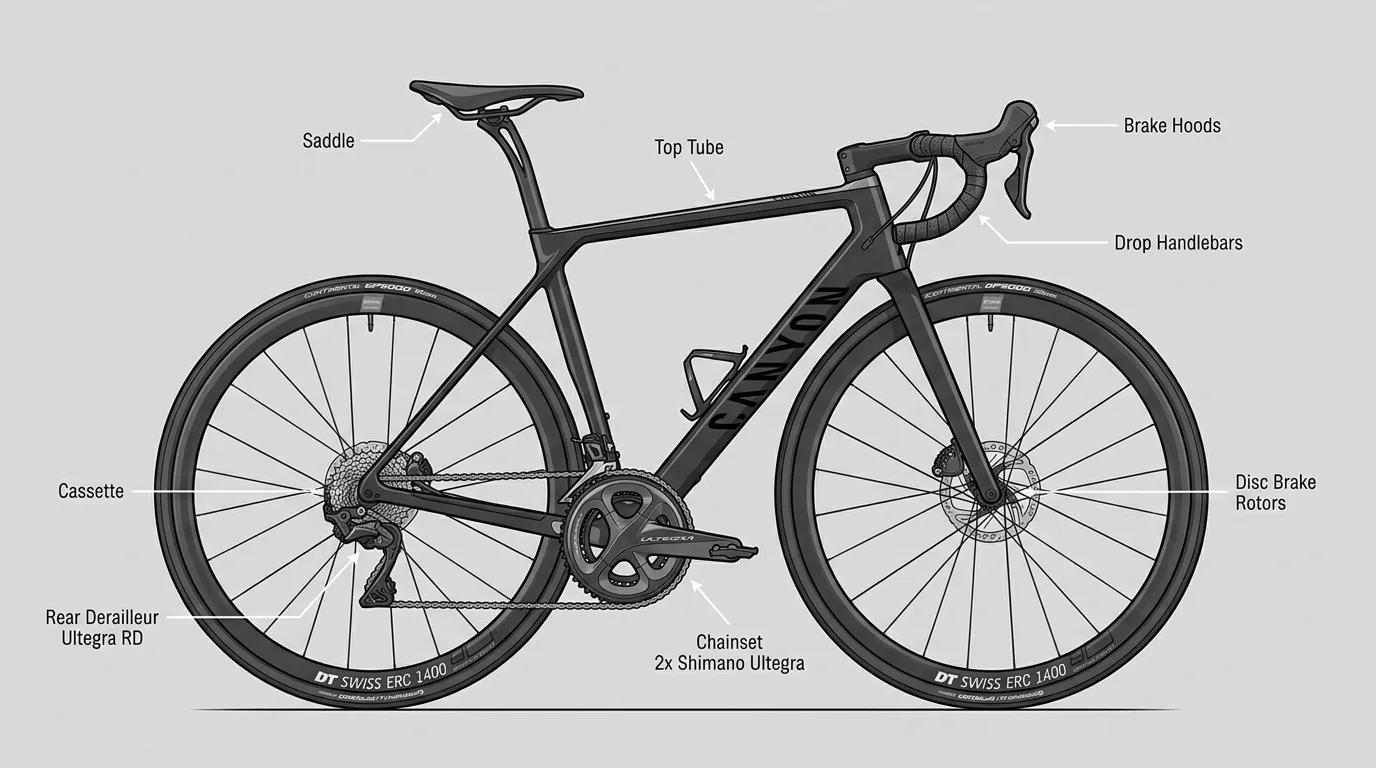
Explore your bike interactively
Select any numbered pin or category tab below to reveal the part name, plain English definition, primary function, and pre-ride inspection check.
Explore Road Bike Anatomy
Click or tap any pin on the bike diagram below to inspect part names, functions, and safety checks.
Brake Hoods & Shift Levers
The rubber-covered housings where your hands rest most of the time.
View Full Anatomical Index (13 Parts List)▼
1. Cockpit and steering controls
The cockpit includes everything attached to the front of the bicycle that you hold, steer with, and use to control speed and gearing.
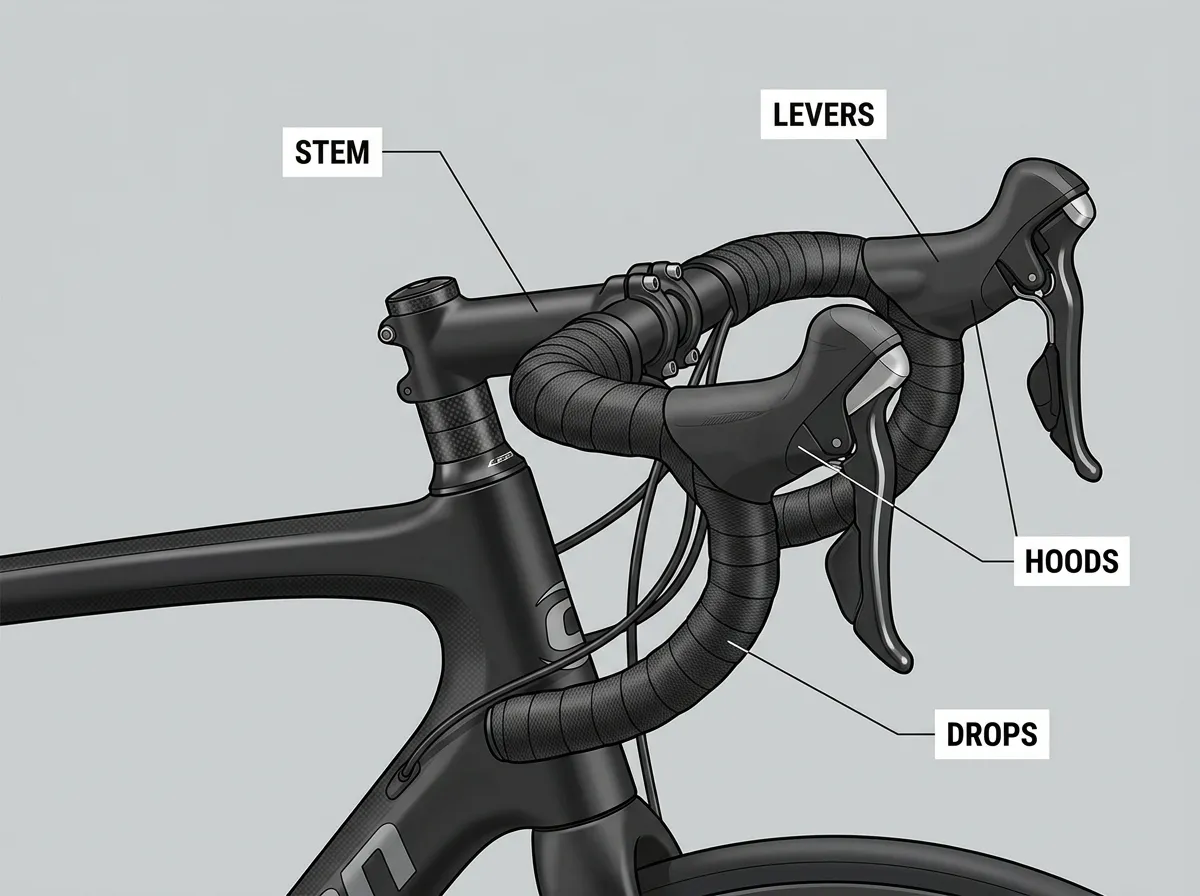
Drop handlebars, hoods, and drops
Road bikes use curved drop handlebars offering three distinct hand positions:
- The Hoods: The rubber-covered lever bodies on top of the handlebar curve. This is your primary position for 80–90% of riding, giving comfortable access to both brake levers and gear shifters.
- The Tops: The flat central bar area next to the stem. Useful for relaxed upright climbing on quiet roads away from traffic.
- The Drops: The lower curved loops. This position lowers your body to reduce wind resistance and gives maximum leverage on the brake levers during fast descents.
Stem and headset
The stem connects the handlebar to the fork steerer tube inside the frame’s head tube. Inside the head tube are bearings called the headset, which allow the fork and front wheel to turn smoothly when you steer.
+-------------------------------------------------------------+
| COCKPIT CHECKLIST                                           |
| 1. Squeeze brake levers to verify firm engagement.          |
| 2. Straddle front wheel; twist handlebar to check tightness. |
| 3. Ensure handlebar end-plugs are securely fitted.          |
+-------------------------------------------------------------+
2. Frame geometry and contact points
The frame is the structural heart of the bicycle. Contact points are the three places where your body touches the bike: hands, feet, and pelvis.
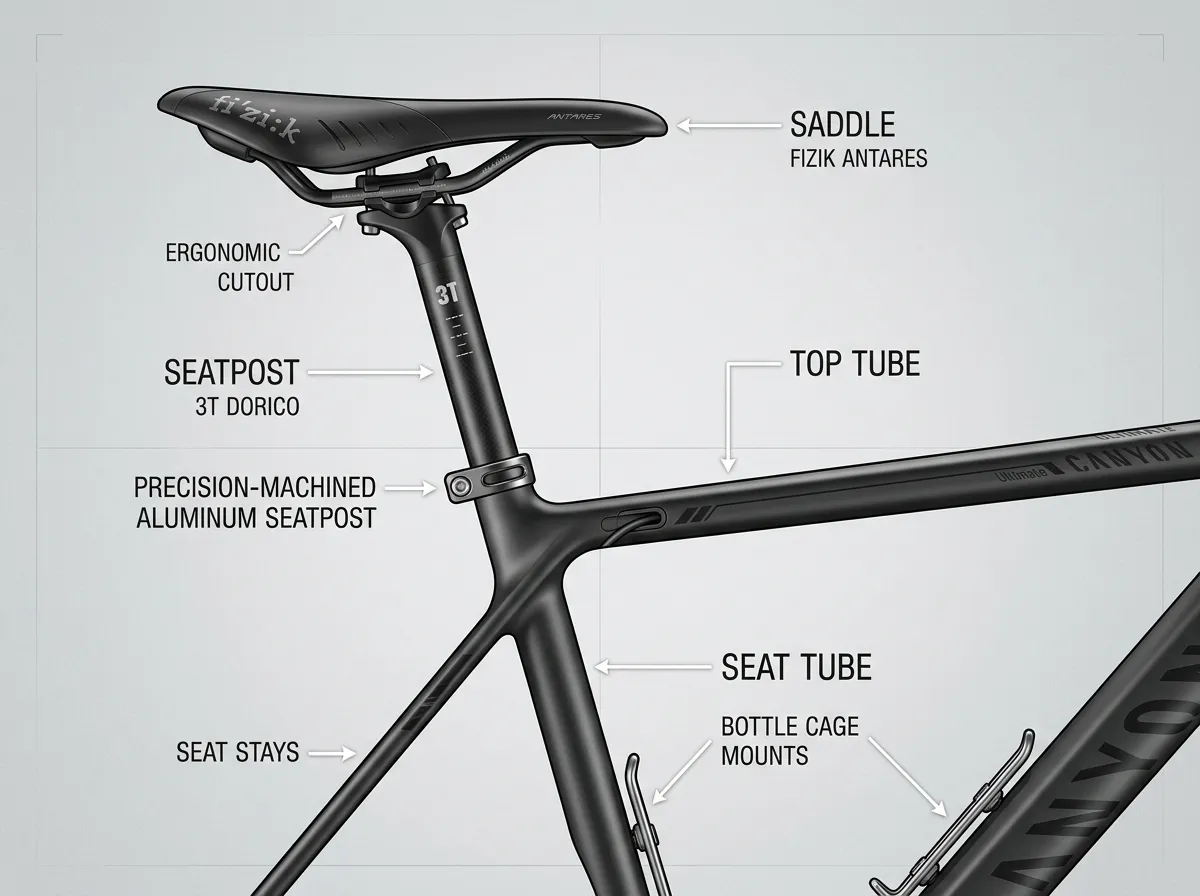
The frame tubes
Most modern road frames use two main structural triangles:
- Top Tube: Runs horizontally or with a slight slope between the head tube and seat tube.
- Down Tube: The thick diagonal tube connecting the steering head to the pedal axle area.
- Seat Tube: The vertical tube holding the seatpost and saddle.
- Seat Stays & Chain Stays: The rear frame tubes supporting the back wheel.
- Fork: The two-legged front blade that holds the front wheel axle.
Saddle and seatpost
The saddle supports your sit bones. It rests on a metal or carbon shaft called the seatpost, which slides into the seat tube to adjust saddle height. Correct saddle height keeps a slight 25–35 degree knee bend at the bottom of pedal strokes, preventing hip rocking and knee strain.
3. Drivetrain and gear shifting
The drivetrain converts your leg muscle power into forward motion.
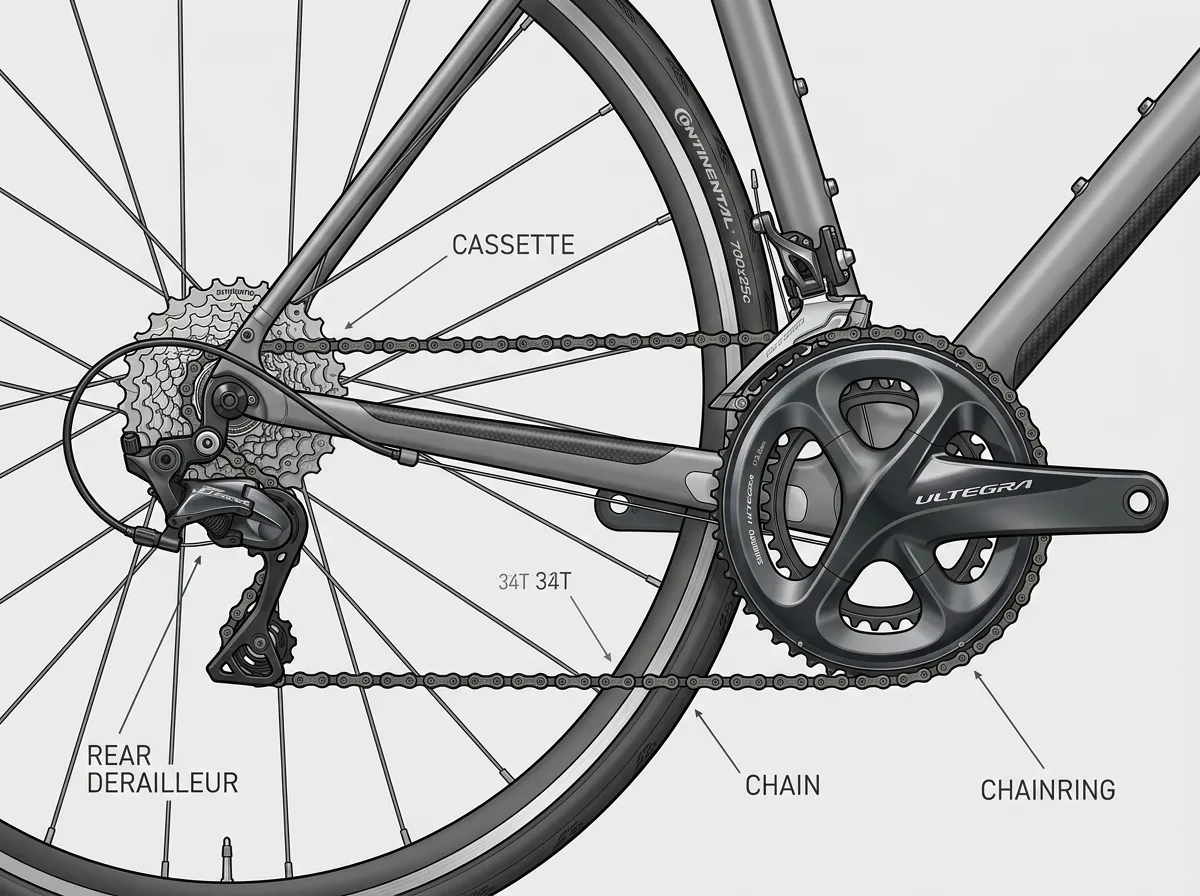
| Component | What it is | Function on the ride |
|---|---|---|
| Crankset & Chainrings | Front pedal arms & chain gears | Transfers pedal force to the chain. Small ring = easier climbing; big ring = higher speed. |
| Cassette | Rear gear cog cluster on back wheel | Provides 10 to 12 gear steps (e.g. 11-34T). Larger rear cogs make climbing easier. |
| Chain | Flexible steel roller link loop | Connects front chainrings to rear cassette cogs. |
| Front Derailleur | Metal cage over front chainrings | Shifts chain sideways between front gears when operating the left shifter. |
| Rear Derailleur | Spring-loaded arm under back wheel | Shifts chain across rear cassette cogs when operating the right shifter. |
Safety note: Never touch or lubricate the chain while the pedals or wheels are turning. Keep fingers well clear of teeth and derailleur pulleys.
4. Wheels, tyres, and brakes
Your wheels and brakes control traction, comfort, and stopping distance.
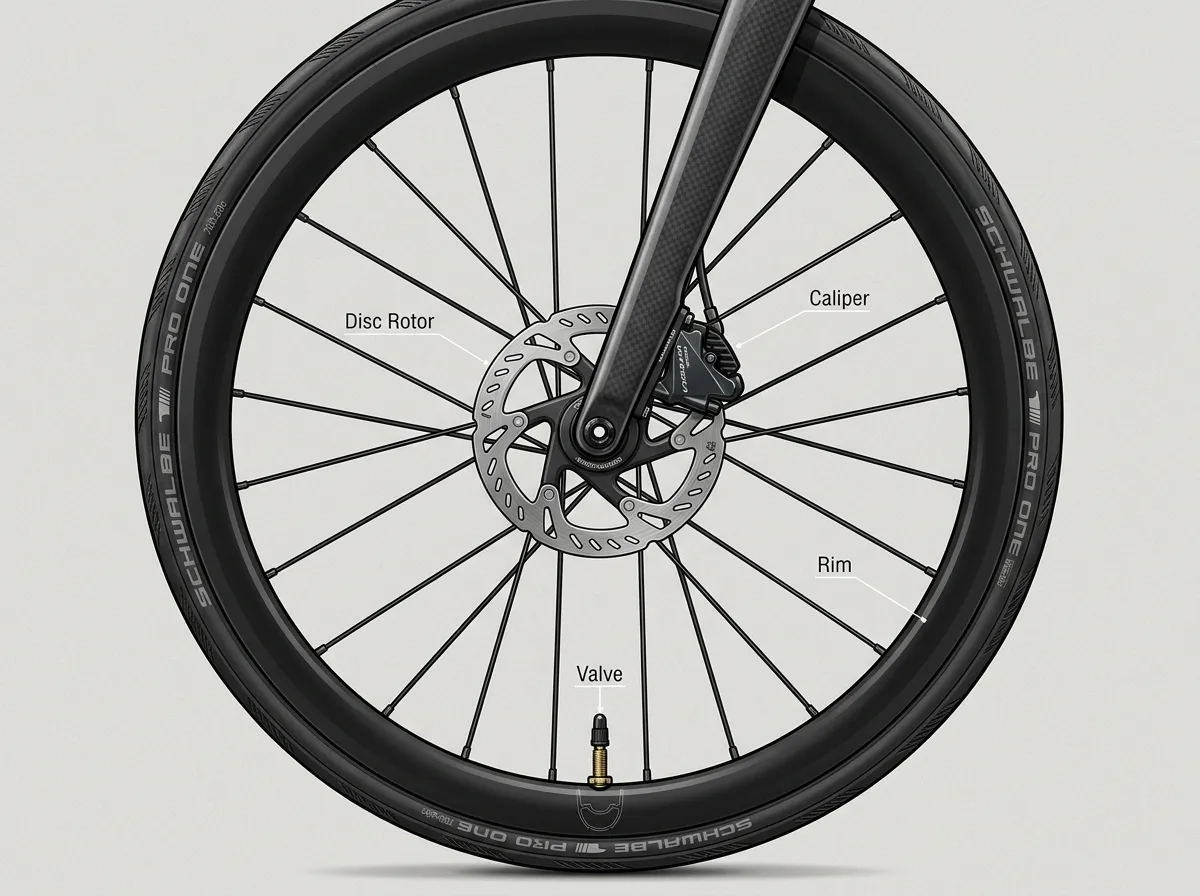
Wheels and tyres
- Rims & Spokes: The circular metal/carbon wheel rim supported by tensioned wire spokes.
- Tyres: Rubber casing (typically 28mm to 32mm wide on modern road bikes) providing grip and cushion.
- Valve Stems: Presta valves (slender with a threaded top nut) used on road inner tubes and tubeless setups to inflate tyres.
Brakes: Disc vs. Rim
- Disc Brakes: Metal rotors mounted at the wheel hubs clamped by hydraulic or cable calipers. Provide powerful, consistent stopping in wet weather.
- Rim Brakes: Calipers mounted above the tyre that squeeze rubber pads directly against the wheel rim.
How parts work together on a ride
Knowing individual part names helps you understand real-world riding actions:
- Before a steep hill: You operate the right shifter to move the rear derailleur, pushing the chain onto a larger cog on the cassette to make pedalling lighter.
- Approaching a junction: Your hands rest on the brake hoods, squeezing the levers to actuate the calipers, slowing the rotors smoothly before coming to a stop.
- Over rough tarmac: Inflating your tyres to an appropriate pressure cushions impacts through the fork and frame, reducing vibration at your saddle and handlebar.
Your next step
Now that you know your road bike’s main components and terminology, deepen your practical skills with these step-by-step guides:
- Learn how to choose a bike that fits these exact dimensions in How to choose your first road bike.
- Build a smooth routine for your first rides with Your first month of road cycling.
- Review pre-ride safety checks for wheels, chain, and brakes before heading out.