Freshly waxed bicycle chain is noisy: break-in or installation problem?
Separate normal fresh-wax stiffness and flaking from incorrect chain routing, poor indexing, contamination, and a chain that needs attention.
 Field guide / freshly-waxed-bike-chain-noisy
A freshly hot-waxed chain can feel stiff, sound dry, and shed flakes for the first part of a ride. That can be normal. Grinding, repeated clicking in one gear, skipping, or a chain rubbing the derailleur cage is not something to dismiss as “wax break-in.”
The short answer: articulate the links, verify the quick link and chain route, then turn the drivetrain by hand. If it shifts cleanly and the sound is an even rustle in every gear, follow the wax maker’s stated break-in process. If noise follows one gear, one link, or one cage contact point, fix that mechanical cause before riding hard.
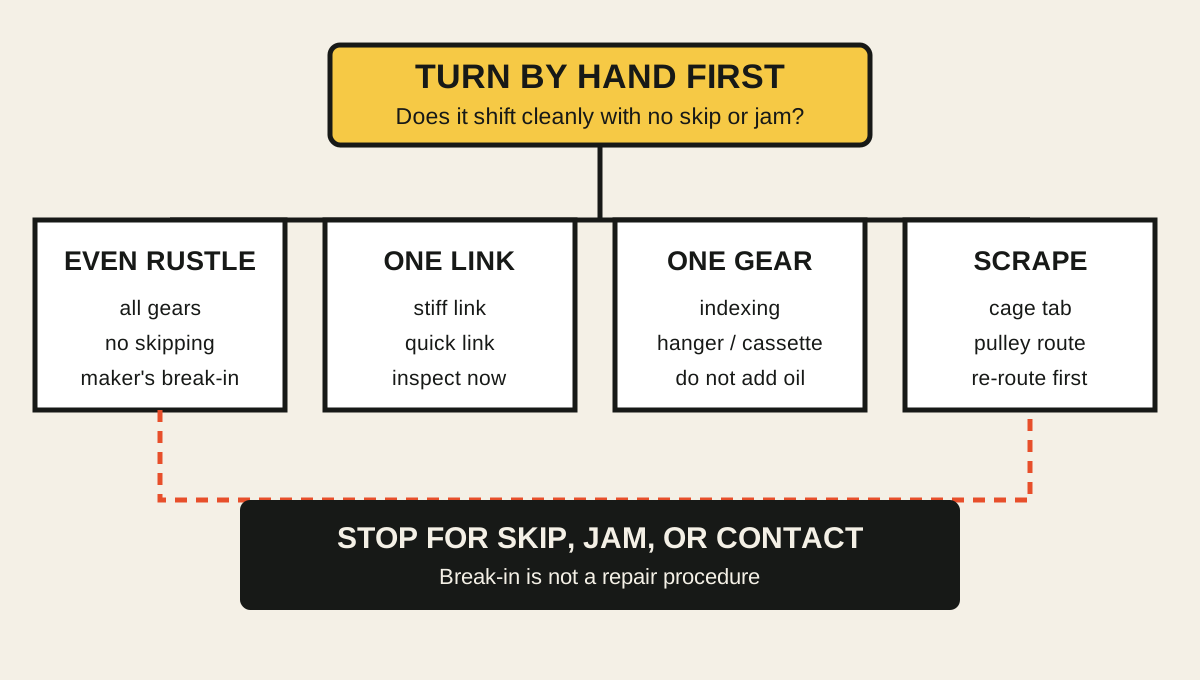
First identify the noise pattern
Lift the rear wheel securely and rotate the cranks by hand. Do not put fingers near a moving chain.
Even rustle in every gear
Fresh wax fills spaces and hardens around the links. The chain may be stiff immediately after cooling, and surface wax can contact the sprockets before it flakes away. SILCA says its freshly hot-waxed chain normally needs a 20–30 minute break-in and that excess exterior wax can flake during early rides.
That time belongs to SILCA’s named product and process. Use the instructions for your wax rather than turning it into a universal distance or duration.
Click once per chain revolution
Mark the link when the click occurs. Look for:
- a stiff link that does not articulate around a pulley;
- a quick link not fully locked;
- a quick link or directional chain fitted contrary to its instructions;
- a damaged plate, pin, or roller;
- a clump of wax at a link that was not articulated.
Do not try to “ride out” a partly connected quick link.
Repeated tick in one cassette gear
This points more toward indexing, a bent derailleur hanger, cassette installation, or cable tension than wax. View the chain from behind while turning it slowly. It should run centrally on the selected sprocket rather than leaning toward the next one.
Use the rear-derailleur reset order before moving limit screws. Limit screws do not normally correct a click in one middle gear.
Scrape through the derailleur cage
Check the route around both pulley wheels and the small cage tab between them. It is possible to route a reinstalled chain on the wrong side of that tab. The chain can still move while scraping continuously.
The jockey-wheel chain guide explains the cage path and when pulley alignment needs attention.
Do a zero-load inspection
Before the first ride:
- Confirm every link bends around both pulley wheels.
- Verify the quick link by the chain maker’s installation method.
- Check any directional marking on the chain and quick link.
- Confirm the chain passes on the correct side of every derailleur-cage tab.
- Shift one gear at a time across the cassette while turning gently.
- Watch that the chain settles on each sprocket without trying to climb onward.
- Check that the rear wheel and cassette are secure and have no unexplained play.
- Wipe loose exterior flakes; do not scrape wax out of the rollers.
If you removed the derailleur, wheel, cassette, or cable during preparation, treat each as a separate changed variable. Wax does not cause a loose cassette or misinstalled wheel.
Run a controlled break-in
When the inspection passes, ride a short, clean, dry route close to home. Start in moderate gears and low torque. Shift through the cassette without sprinting or climbing hard.
Listen for the sound to become smoother rather than expecting silence. Drivetrain sound varies with chain model, sprocket size, frame resonance, indoor walls, and the wax itself. A chain can be correctly waxed and still be more audible than another chain.
Stop the test if:
- the pedals jump forward under load;
- the chain climbs between sprockets without a shift;
- one link continues to knock;
- the quick link changes appearance or position;
- the derailleur cage moves abnormally;
- noise becomes harsher rather than settling.
Afterward, inspect the chain and wipe flakes from the frame, floor, and trainer. Flaking is not proof that the rollers are dry.
Do not silence it with random lubricant
Adding wet oil can make the noise disappear while contaminating a wax-only system. It also hides whether the original preparation or installation was correct. If the wax maker approves a compatible drip-wax top-up, use that product only in the stated situation and amount.
Do not reheat the pot to a higher temperature just because the chain sounded stiff. The chain-wax temperature guide explains why activation, immersion, and removal temperatures are product-specific.
If it stays noisy after break-in
Work through the causes in this order:
- Local contact: cage tab, pulley, front-derailleur cage, chainstay, or adjacent sprocket.
- Link condition: stiff link, damaged roller, directional installation, or quick link.
- Gear alignment: indexing and hanger alignment.
- Component match: chain speed, cassette, chainring, and quick-link compatibility.
- Wear: a new chain on a worn cassette or chainring can sound rough or skip.
- Preparation: remaining factory grease or cleaner, incomplete drying, wrong wax process, or water exposure.
If the chain skips under load, use the load-only skipping guide rather than applying more wax.
Choose the maintenance system you will actually sustain
Hot wax rewards a clean, controlled workflow. It is not mandatory. If removing chains, tracking quick-link reuse, drying after wet rides, and keeping oil away from the system are poor matches for your riding, a careful drip lubricant routine is valid.
Compare the workflows in the chain lube, drip wax, and hot wax guide. The best system is the one you can apply correctly and repeat before the chain runs dry.
Your next step
Turn the drivetrain by hand and classify the noise as even, once per chain revolution, one gear only, or direct cage contact. Fix any local pattern first. Only an evenly operating drivetrain should proceed to the wax maker’s break-in ride.
Sources and further reading
- SILCA Secret Chain Blend: stated break-in, flaking, and rewax signals
- SILCA support: articulating a cooled chain and breaking it in
- SILCA: cleaning a chain completely before wax
- r/bikewrench reader context: recurring uncertainty about normal fresh-wax noise versus an adjustment problem — used as a repeated maintenance-question signal; times and diagnoses in comments were not treated as universal instructions.