What should you do if a bike pedal falls out of the crank?
Stop safely, inspect pedal and crank threads, understand repair versus replacement, and prevent another pedal from backing out or cross-threading.
 Field guide / pedal-fell-out-of-crank-arm
Before you buy
Check the starter kit first
Print the one-page buying brief for helmet, lights, water, phone, and repair compatibility before comparing upgrades.
If a pedal becomes crooked or falls out, stop riding. A loose steel pedal spindle can move inside a softer aluminium crank and remove the remaining thread with every stroke. The crank may need replacement, but a qualified workshop can sometimes install a purpose-made threaded insert after measuring the damage.
The short answer: walk or arrange transport, keep every loose part, and inspect both the pedal and crank threads without forcing them together. Do not decide from one photo that the crank is reusable. The safe result may be correct reinstallation, a professional thread insert, or a replacement crank arm.
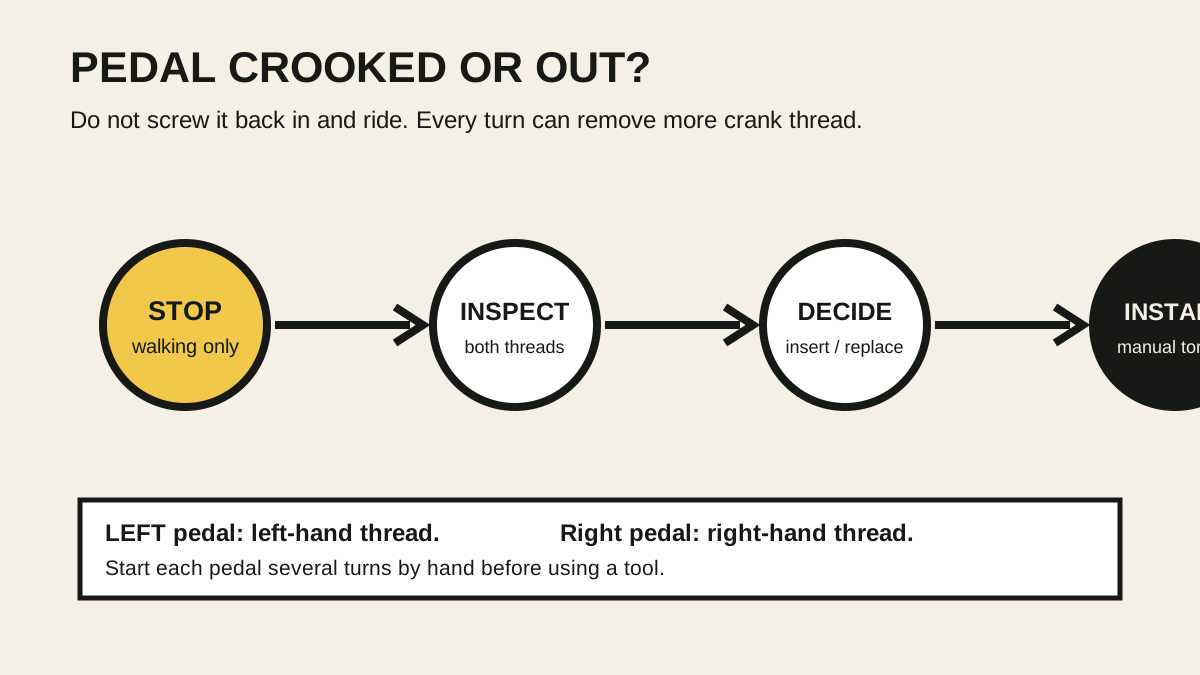
Stop at the first warning sign
A pedal backing out may first feel like a click, side-to-side movement under the foot, an uneven circle, or a pedal platform that no longer sits square to the crank. Look down only when it is safe; prioritise braking and stopping clear of traffic.
Once stopped:
- get off the bike and do not apply body weight to that pedal;
- remove the loose pedal by hand only if it is already free and doing so will not force damaged threads;
- keep any washer, dust seal, or loose part;
- photograph which side failed and how the pedal sat;
- walk, call for pickup, or use another safe transport option.
Do not try to limp home using the other pedal. Standing, mounting, a bump, or accidental pressure can load the damaged side. Do not install the pedal from the back of the crank as a roadside “thread repair.”
Why a pedal works loose
Common installation causes include:
- the pedal was not fully tightened to its specified torque;
- it started at an angle and was cross-threaded;
- the left and right pedals were swapped;
- the threads were dirty, corroded, dry when grease was specified, or previously damaged;
- a washer required by the crank or pedal maker was missing;
- the pedal spindle or crank thread was the wrong standard or damaged.
Impact damage, a failing pedal axle, or a crack around the crank’s pedal eye can produce similar symptoms. The fact that a pedal can be threaded back in does not prove it will hold riding load.
The right pedal normally uses a right-hand thread: it tightens clockwise when viewed from the outside. The left pedal normally uses a left-hand thread: it tightens anticlockwise from the outside. This is why each pedal is marked R or L.
Inspect without making the damage worse
Clean loose dirt and metal flakes with a rag. Under bright light, inspect the pedal spindle and the threaded hole in the crank.
Stop and take the bike to a workshop if you see:
- flattened, missing, torn, or spiralled crank threads;
- silver aluminium swarf on the pedal spindle;
- the hole visibly oval or the pedal having run crooked;
- a crack, bulge, deep gouge, or delamination around the pedal eye;
- damaged pedal-spindle threads;
- the pedal going tight after less than several smooth hand turns.
Never chase uncertain threads with the pedal itself. A correctly matched pedal should start square and turn several rotations by hand with minimal resistance. Tool force at the start can convert a recoverable first-thread problem into a stripped crank.
Carbon crank arms, bonded inserts, power-meter crank arms, and unusual vintage cranks need model-specific assessment. Surface appearance alone cannot show the condition of a bonded or concealed insert.
Can the crank arm be repaired?
There are three realistic outcomes.
The threads are intact
If a competent inspection finds complete, undamaged threads and the pedal spindle is sound, the pedal may be reinstalled using the exact maker procedure, lubrication, washer, tool, and torque. Do not infer this outcome merely because the pedal came loose rather than falling completely out.
A professional insert is appropriate
A bicycle workshop with the correct pedal-thread tooling may drill and tap a damaged aluminium crank, then install a threaded bushing. Park Tool describes this as a specialist repair and notes that replacement is often the better option. Alignment and thread direction are critical; this is not an ordinary hardware-store helicoil job.
Ask the workshop:
- whether the crank material and design are suitable for an insert;
- whether it can hold the repair square to the crank face;
- whether the repair affects the maker’s warranty;
- how repair cost compares with a correct replacement arm;
- whether both pedal and crank will be checked before return to service.
The arm or crankset needs replacement
Replacement is the safer answer when damage is extensive, the arm is cracked, the insert area is unsuitable, the part maker prohibits repair, or the labour approaches the price of the correct component. The replacement must match crank model, length, spindle interface, chainline, fixing system, and—where relevant—power-meter or chainring requirements.
Do not buy a crank arm based only on its printed length and colour.
How to prevent a repeat failure
For installation, use the complete procedure in how to remove and install bike pedals. The essentials are:
- identify the right and left pedals before they touch the crank;
- clean and inspect both thread sets;
- apply the lubricant or anti-seize specified by the maker;
- start the pedal square and turn it multiple full rotations by hand;
- fit any required washer;
- finish with the specified tool and torque;
- recheck according to the manufacturer or bike assembler’s instructions.
Shimano’s current road-pedal dealer manual, for example, specifies grease, identifies the opposite thread directions, and gives a 35–55 N·m range for the pedals covered by that manual. That is evidence that pedals need meaningful tightening; it is not a universal value for every pedal, crank, tool interface, or repaired thread. Use your exact documentation.
A torque wrench helps only when the procedure, range, socket or crow-foot setup, and thread condition are correct. Read when a bicycle job needs a torque wrench before treating a number as the whole repair.
Add pedal security to your checks
Before a ride, hold each crank and try to move the pedal body laterally. Some pedal bearings have a tiny amount of maker-permitted play, but movement between the spindle and crank is not normal. Look for a widening gap, metal dust, a crooked spindle, or a new click under load.
After pedal installation, pay attention during the first rides. Stop immediately if the pedal feels loose. The five-minute pre-ride check is a better habit than discovering movement while standing on the pedals.
Your next step
Label the loose pedal left or right, photograph both thread sets, and do not reinstall it for a test ride. Take the bike, pedal, washers, and any loose fragments to a workshop. Ask for a clear verdict—intact threads, professionally repairable threads, or replacement—and the torque and follow-up check for the final installation.
Sources and further reading
- Shimano: road-pedal installation instructions
- Park Tool: stripped pedal-thread bushing repair procedure
- r/bikewrench discussion: a pedal that became crooked and came out while riding — used as an editorial question signal, not as a diagnosis for another crank.