Why do mechanical disc brakes feel weak from the hoods?
Diagnose weak cable disc brakes on a drop-bar bike by checking lever reach, cable pull, housing compression, pad adjustment, bedding, contamination, and compatibility.
 Field guide / mechanical-disc-brakes-weak-from-hoods
Mechanical disc brakes should not require moving your hands into the drops just to achieve an ordinary controlled stop. If the lever feels firm yet braking is weak from the hoods, investigate hand access, cable and housing losses, caliper leverage, pad position, bedding, contamination, and system compatibility before blaming all cable discs.
The short answer: stop testing on hills. Confirm you can wrap and squeeze the lever correctly, then separate a soft or long lever from a firm lever with poor friction. Those two symptoms lead to different fixes.
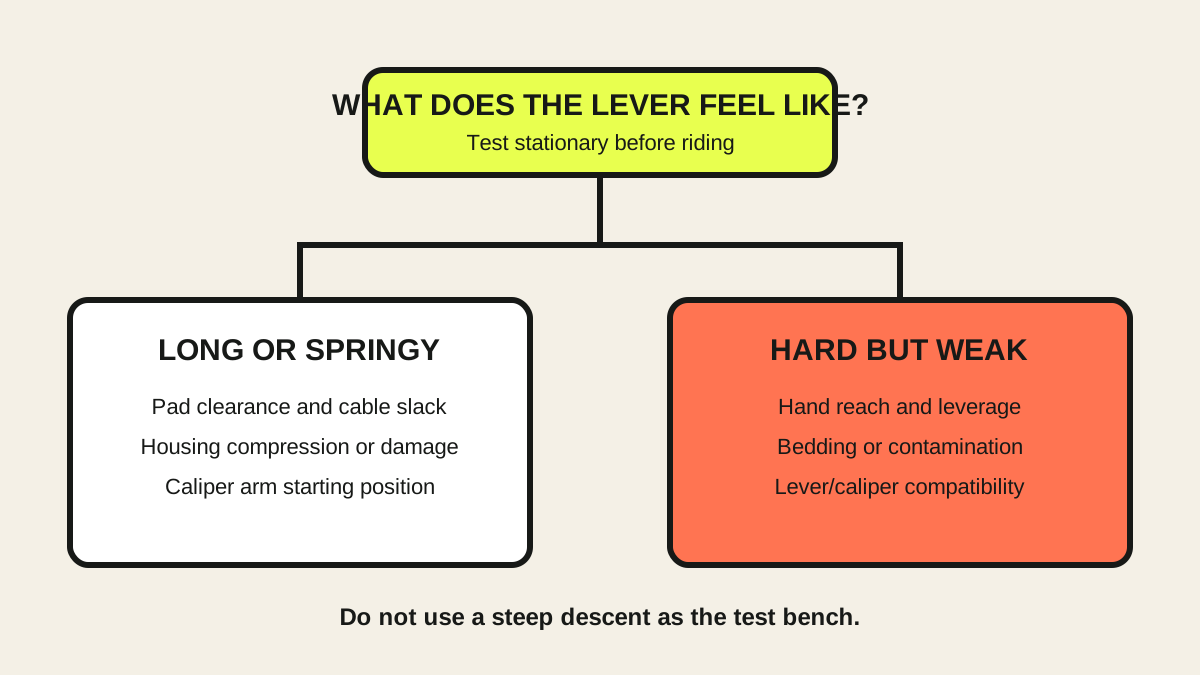
First classify the lever feel
A recent r/bicycling discussion described mechanical disc brakes that felt hard but weak when used from the hoods. That combination is useful evidence.
Use a stationary squeeze first:
| Symptom | Inspect first |
|---|---|
| Lever approaches the bar | Pad clearance, cable slack, housing seating, caliper arm position |
| Lever feels springy or spongy | Housing compression, damaged housing, poor end preparation, cable routing |
| Lever becomes hard early but stopping is weak | Hand leverage, glazing, contamination, incomplete bedding, lever/caliper mismatch |
| Brake pulses or grabs once per wheel turn | Rotor condition, uneven friction layer, hub or rotor mounting |
Do not prove braking power by trying to lock a wheel. A skid is not a useful quality standard; predictable deceleration and control are.
Check whether your hand can use the lever
From the hoods, your fingers start farther from the lever’s end than they do in the drops, so reach and hand position matter. You should be able to keep the hand secure on the hood while curling one or more fingers around the lever with a useful bend at the knuckles.
If you can touch only the lever tip, review the lever’s approved reach adjustment and hood position. Do not rotate the entire handlebar or lever upward as a shortcut that creates a poor wrist angle or excessive drop reach. Use our hood-position and lever-reach guide.
Small hands do not automatically require hydraulic brakes, but the complete lever and caliper system must be operable from the rider’s normal position.
Restore the caliper’s useful travel
Park Tool’s mechanical-disc procedure warns that the barrel adjuster is for cable slack as the system settles, not a substitute for moving worn pads inward. If barrel adjustment holds the caliper arm partly through its stroke, the arm can reach the caliper body before the pads clamp the rotor. The lever then feels hard without producing the expected braking.
Follow the exact caliper manual. Depending on design, one pad moves, both pads move, and one or two pad adjusters may exist. A generic “turn this knob” instruction can be wrong for another caliper.
Check that:
- The wheel and rotor are fully seated.
- The caliper arm returns to its designed rest position.
- Housing ends are fully seated in every stop.
- Pad clearance is adjusted at the pads as the manual specifies.
- The caliper is aligned so the pads meet the rotor squarely.
- The arm, cable pinch bolt, and mounting fasteners use the maker’s procedure and torque.
Inspect cable and housing losses
Every bend, dirty cable, damaged housing end, and compressing section consumes hand movement. Long loops and ordinary spiral-wound housing can make some mechanical-disc installations feel vague; some caliper makers specify or recommend compressionless brake housing.
Do not substitute gear housing. It is not a safe brake-housing replacement. Confirm the housing type approved for the brake, inspect it for cracks, corrosion, kinks, split ferrules, or movement at the frame stops, and have questionable parts replaced.
The inner cable should move smoothly and be free from fraying at the lever, frame, and pinch point. A frayed brake cable is a replacement, not an lubrication experiment.
Separate bedding from contamination
New pads and rotors need a controlled bed-in process to establish a consistent transfer layer. If they were never bedded, the lever can feel normal while friction remains disappointing. Follow the brake maker’s procedure in a traffic-free area; our disc-brake bed-in guide explains the principle without inventing one routine for every brand.
Contamination can also produce poor power, squeal, or inconsistent bite. Do not spray general brake cleaner, degreaser, chain lubricant, or polish near the rotor unless the brake manufacturer explicitly approves it. SRAM instructs riders to clean appropriate rotors with isopropyl alcohol and to replace contaminated pads; follow your own maker’s instructions.
Sanding pads can hide a symptom without removing absorbed oil and can take material below its limit. Measure and inspect with the disc-pad wear guide.
Verify compatibility before buying upgrades
Mechanical road brake levers and calipers must have compatible cable pull. Rotor diameter, minimum thickness, pad material, adapter, mount, and housing requirements also matter. A caliper bolted to the frame is not proof that the system is matched.
Record the exact model of:
- brake/shift lever;
- front and rear caliper;
- rotor and diameter;
- adapter;
- pad compound;
- cable and housing.
Use manufacturer compatibility documents, not marketplace descriptions. If the bike was bought used, assume nothing about prior substitutions.
Use a controlled test after service
After a qualified adjustment or repair, test on flat, clean, traffic-free ground while seated. Begin at walking pace, then increase gradually. Test each brake separately enough to confirm function, then both together. The lever should build force before reaching the bar, release cleanly, and give repeatable deceleration from the hoods.
Stop if the lever changes between attempts, the cable slips, a rotor rub becomes severe, or braking remains weak. A steep descent is not a test bench.
When upgrading makes sense
If the complete system is compatible, correctly installed, clean, bedded, and still demands more hand force than you can comfortably provide, a different approved mechanical caliper or a hydraulic system may be appropriate. Price the entire conversion: integrated road levers, calipers, hoses, labour, drivetrain compatibility, and bar tape can make it a large project.
For a bike purchase, compare that total with the cost of a suitable hydraulic-brake bike using our hydraulic versus mechanical guide.
Your next step
Write down whether the lever is long, springy, or hard, and identify the lever and caliper models. Give that symptom map to a mechanic or work through the exact manuals. Do not buy pads, housing, or a new brake until compatibility and the current failure mode are known.