Why does an inner-tube valve stem keep tearing?
Stop repeat flats at the valve base by checking valve-hole size, rim tape and edges, installation angle, rim nut tension, tyre creep, and pressure.
 Field guide / inner-tube-valve-stem-keeps-tearing
Before you buy
Check the starter kit first
Print the one-page buying brief for helmet, lights, water, phone, and repair compatibility before comparing upgrades.
An inner-tube valve that tears where it joins the tube is usually being pulled sideways or cut—it is rarely just a streak of bad tubes. Common causes are a Presta valve unsupported in a larger Schrader-size rim hole, a sharp or poorly taped hole, a valve installed under tension, or a tyre creeping around the rim and dragging the tube.
The short answer: stop replacing tubes until you inspect the rim and tyre. Match the valve to the hole, remove sharp edges from service, install the tube without tension, tighten a rim nut only by hand, and use an appropriate pressure. A second identical failure means the system still has a fault.
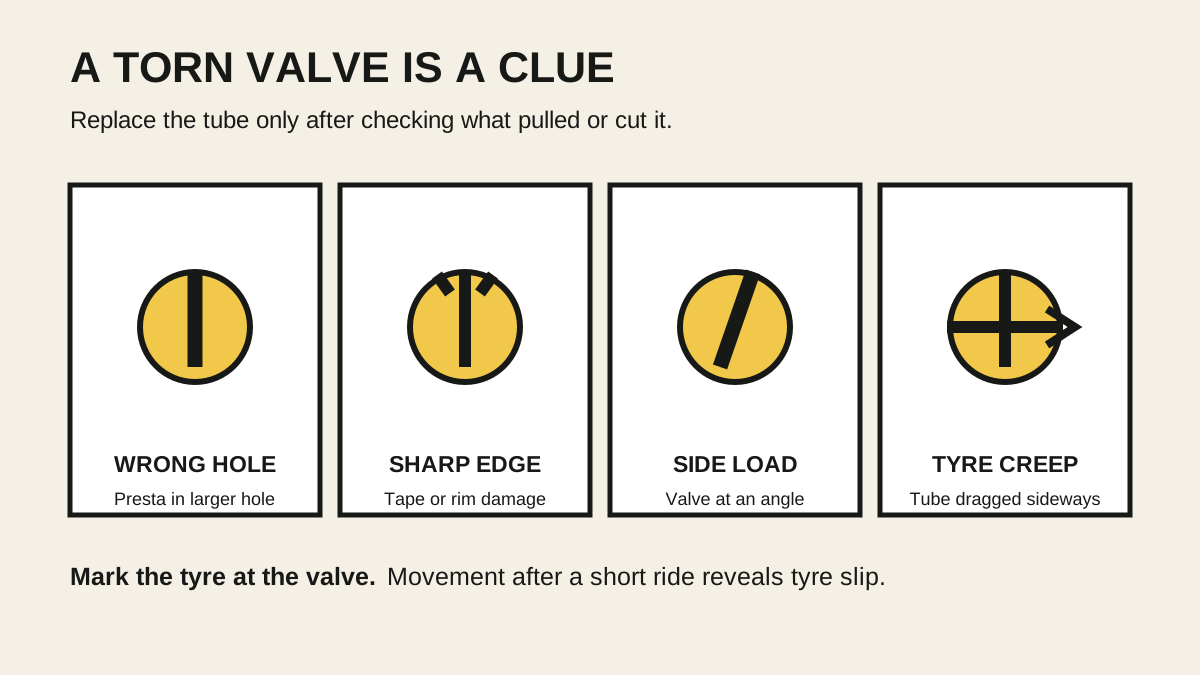
Identify a valve-base failure correctly
Remove the tube and add only enough air to give it shape. Do not stretch a damaged area close to your face. A valve-base tear appears where the rubber tube joins the metal or rubber-covered valve stem. It may look like a crescent split, a cut on one side, or a stem pulling away from its circular reinforcement.
This differs from:
- a hole beside the valve caused by a spoke hole or failed rim tape;
- a pinch flat with two parallel cuts farther around the tube;
- a puncture through the tyre tread;
- a leaking removable valve core;
- a cut made while levering the tyre on.
Mark the valve position on the tyre before removing everything. That lets you align the tube, rim, and tyre during inspection. The guide to repeated punctures in the same place explains this mapping method.
1. Match the valve diameter to the rim hole
A Presta valve is narrower than a Schrader valve. Schwalbe lists approximate valve-hole diameters of 6.5 mm for Presta and 8.5 mm for Schrader, and warns that a narrow Presta stem in the larger hole can be cut by the metal edge.
Look at both sides of the rim. Some holes are smaller on the outside but larger inside the rim cavity. Do not assume the visible outer opening tells the whole story.
The clean options are:
- use a tube with the valve type intended for the rim; or
- use a purpose-made reducing sleeve when the rim and tube maker permit it.
Do not improvise a hard-edged washer, a loose stack of tape, or a 3D-printed part whose material and fit are unknown. A reducer must support the stem without pinching it, damaging the tube, or interfering with the rim tape.
2. Inspect the valve hole and rim tape
Use bright light and carefully inspect the complete hole. Do not drag a bare fingertip over an edge that may be sharp. Look for burrs, corrosion, a crack, a displaced eyelet, or tape that exposes metal.
Rim tape should be the correct width, centred, intact, and suitable for the rim and pressure. It should protect spoke holes without bunching into the valve opening. If it is split, narrow, brittle, or shifted, replace it with the rim maker’s specified type and width.
A structural crack, loose eyelet, badly distorted hole, or damage to a carbon rim needs professional assessment. Tape is not a repair for structural damage.
3. Install the tube without pulling the valve sideways
Fit one tyre bead, insert the valve straight through the rim, and place the tube evenly inside the tyre. Add just enough air for the tube to hold a round shape. Then seat the second bead while checking that no tube is trapped beneath it.
Before full inflation:
- push the valve briefly upward into the tyre so the reinforced tube base is not trapped under the bead;
- pull it back only until it sits naturally and straight;
- inspect both sides of the tyre around the rim;
- inflate in stages while watching the bead’s mould line.
Choose the tube by wheel diameter, tyre-width range, and valve length. The inner-tube size guide covers all three.
4. Treat the rim nut as a helper, not a clamp
The small nut on a threaded Presta valve can hold the valve while a pump head is attached and stop a rattle. It should not be used to pull the tube hard against the rim.
Schwalbe says to tighten the nut by hand and warns that excessive tightening worsens valve tear-off. Leave it off during initial inflation if that makes correct seating easier. Once the tyre is inflated, a gently finger-tight nut is enough if you use one. Never use pliers.
If the valve starts straight but leans after riding, the nut did not solve the cause. It may instead be hiding tyre movement while increasing stress at the valve base.
5. Check whether the tyre is creeping on the rim
Hard braking, low pressure, incompatible or contaminated bead surfaces, and some tyre–rim combinations can let the tyre rotate slightly on the rim. Friction carries the tube with it, but the valve is held at the hole. The result is a leaning stem and eventually a tear.
Use a removable paint marker or small piece of tape to place matching reference marks on the tyre and rim beside the valve. After a short, gentle, traffic-free ride with controlled braking, compare the marks. Stop immediately if the valve begins leaning or pressure changes.
If movement is confirmed:
- verify the tyre and rim are compatible and undamaged;
- clean the bead and rim seat using the maker’s method;
- check that the bead is fully and evenly seated;
- use a pressure appropriate to rider, tyre, rim, and load;
- have a mechanic inspect an older, damaged, or persistently slipping combination.
Do not simply inflate to the largest number printed on the tyre. That number is not a target and may exceed the rim’s limit. Use the lower of all component limits and start with the beginner tyre-pressure guide.
Rule out pump damage
A pump head pulled sideways can bend a narrow Presta stem or loosen its core, but a pump problem more often damages the upper valve than tears the base from the tube. Support the head while attaching and removing it, use the correct gasket setting, and release any locking lever before pulling straight off.
If the stem is too short for the rim, buy the correct valve length. Do not wrench a pump head sideways to reach it.
Can the torn tube be patched?
Ordinary patches work on clean, flat tube material. The valve base flexes, carries load, and has multiple bonded materials, so a repair there is not a dependable road fix. Replace the tube after correcting the cause.
Cutting the old tube open can be useful for inspection, but never reuse it as a safety-critical liner around a sharp or damaged rim hole.
Your next step
Keep the failed tube, align it with the tyre and rim, and inspect the exact valve location. Measure or identify the rim hole, correct the tape or edge fault, fit the right tube without tension, and inflate within the tyre and rim limits. If a second tube shows a leaning valve or the reference marks move, stop and have the tyre–rim system inspected.
Sources and further reading
- Schwalbe: valve types, rim nuts, tyre slip, and valve tear-off
- Schwalbe: Presta tubes in larger valve holes and reducing sleeves
- r/bikewrench discussion: repeated flats where the valve separated from the tube — used as an editorial problem signal, not as proof of the cause on another wheel.