How to route a bike chain through the rear derailleur correctly
Check the chain's path around both derailleur pulleys and the cage tab before diagnosing chain length, indexing, or drivetrain noise.
 Field guide / how-to-route-chain-through-rear-derailleur
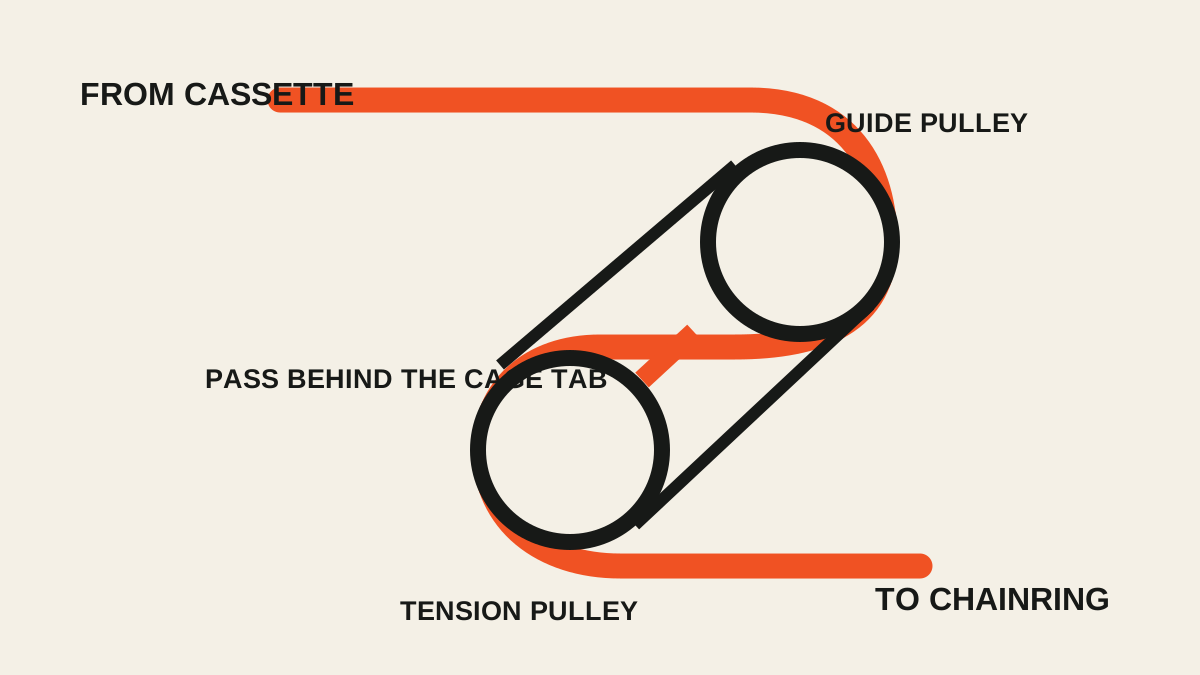
A derailleur chain normally makes an S-shaped path: from the cassette it passes over the upper guide pulley, down inside the cage and on the correct side of the cage tab, around the lower tension pulley, then forward to the chainring. One missed tab can make a correctly sized chain look too short and sound terrible.
The short answer: stop pedalling, shift to create slack, and compare the chain with the exact derailleur diagram. It must engage both pulleys and pass inside the cage without scraping the small bridge or tab between the plates.
Why this mistake looks like a different fault
A current repair thread asked whether a chain was too short when it was routed incorrectly. Similar questions recur after chain cleaning, replacement, derailleur removal, or transporting a bike with the wheel out.
Incorrect routing can create:
- constant scraping or a rhythmic metallic sound;
- an unusually stretched derailleur cage;
- slack in some gears and excessive tension in others;
- poor shifting despite barrel adjustment;
- a chain that appears to miss a pulley;
- fresh wear marks on the cage tab;
- resistance when turning the crank by hand.
Do not correct those symptoms by adding chain links or turning limit screws until routing is proven. That can turn one simple assembly error into wrong chain length or unsafe derailleur travel.
First inspect without turning the drivetrain
Stabilise the bike and keep it stationary. Use a bright light from the side.
Trace the chain in this order:
- Cassette to upper pulley. The chain should leave the selected rear sprocket and wrap around the guide pulley in the documented direction.
- Upper pulley to cage. It should run between the two cage plates.
- Cage tab or bridge. Many derailleurs have a small metal bridge between the plates. The chain must pass on the side shown in the manual, usually without touching it.
- Lower pulley. The chain wraps around the tension pulley, producing the S-shape.
- Forward run. It leaves the lower pulley toward the lower side of the chainring.
Look from both sides. A chain can appear plausible from the drive side while sitting outside a plate on the back.
Use the exact manual, not this sketch alone
Rear derailleurs differ. Some use offset pulleys, directional pulley markings, clutch mechanisms, unusual cage architecture, or model-specific chain paths. Shimano’s current dealer manuals explicitly show the route relative to the plate and warn that incorrect routing can damage the chain or derailleur.
Find the full model code stamped on the derailleur, not merely the series name printed on the outside. Search the manufacturer’s service library for that code and match the cage length and generation.
Do not assume:
- both pulleys are interchangeable;
- a pulley can face either direction;
- every cage tab sits in the same place;
- the clutch should be forced while routing;
- a photo of a different derailleur proves your path.
If the chain is on the wrong side of the tab
The clean correction is usually to open the chain at its approved joining point, route it correctly, and reconnect it using the chain maker’s specified method. That may require a new connecting pin or an approved quick link.
Do not:
- bend or cut the cage tab;
- pry the cage plates apart;
- twist the chain sideways around the tab;
- remove a pulley without its service instructions;
- reuse a one-time joining part;
- push out a random chain pin and press it back in by guesswork.
Some chains and links are directional. Photograph their markings before separating anything. If you do not have the correct joining tool and part, a shop can reroute the chain without sacrificing the cage.
Check chain length only after routing is correct
A correctly routed chain can still be too long or too short, but routing comes first. Then use the derailleur, drivetrain, and chain maker’s sizing method.
Warning patterns include:
- Too short: the derailleur is near its travel limit in the large chainring and largest sprocket, or that combination cannot be selected without extreme tension.
- Too long: the cage cannot maintain tension in small combinations and the lower chain run hangs slack.
- Wrong capacity or setup: chain length appears acceptable at one extreme but the derailleur cannot manage the full tooth difference.
Avoid selecting the large chainring and largest sprocket solely as a road test. Perform the manufacturer’s stationary sizing check. The dedicated chain-length guide explains the next diagnosis.
Recheck the rest of the installation
Once the path is corrected, confirm:
- the chain is the right speed and model for the drivetrain;
- any directional markings face correctly;
- the joining link or pin is fully seated;
- every link articulates freely;
- both pulleys turn and their fasteners were not disturbed;
- the derailleur is mounted correctly against its stop;
- the hanger is not bent;
- the chain cannot overshift into spokes or frame;
- shifting is tested across the cassette on a stand before riding.
Keep hands clear while turning the crank. Stop immediately for binding, skipping, a stiff link, or contact with the cage.
Why indexing will not fix routing noise
The barrel adjuster changes the derailleur’s lateral position relative to the cassette. It cannot move a chain from the wrong side of a cage tab. Limit screws restrict end travel; they do not tune ordinary gear spacing.
If the chain runs quietly through the cage but hesitates between sprockets, proceed to rear-derailleur indexing. If the chain skips under pedal load, use the skip-under-load diagnosis instead of adding cable tension blindly.
Your next step
Do a stationary fingertip-free visual trace from cassette to chainring and compare it with the exact derailleur manual. If the chain crosses a tab or misses a pulley, keep the bike parked until it is opened, routed, rejoined, and function-tested correctly.