How to index a rear derailleur with the barrel adjuster
Correct slightly hesitant mechanical shifting with small cable-tension changes, while knowing when indexing is not the real fault.
 Field guide / how-to-index-rear-derailleur-barrel-adjuster
Before you buy
Check the starter kit first
Print the one-page buying brief for helmet, lights, water, phone, and repair compatibility before comparing upgrades.
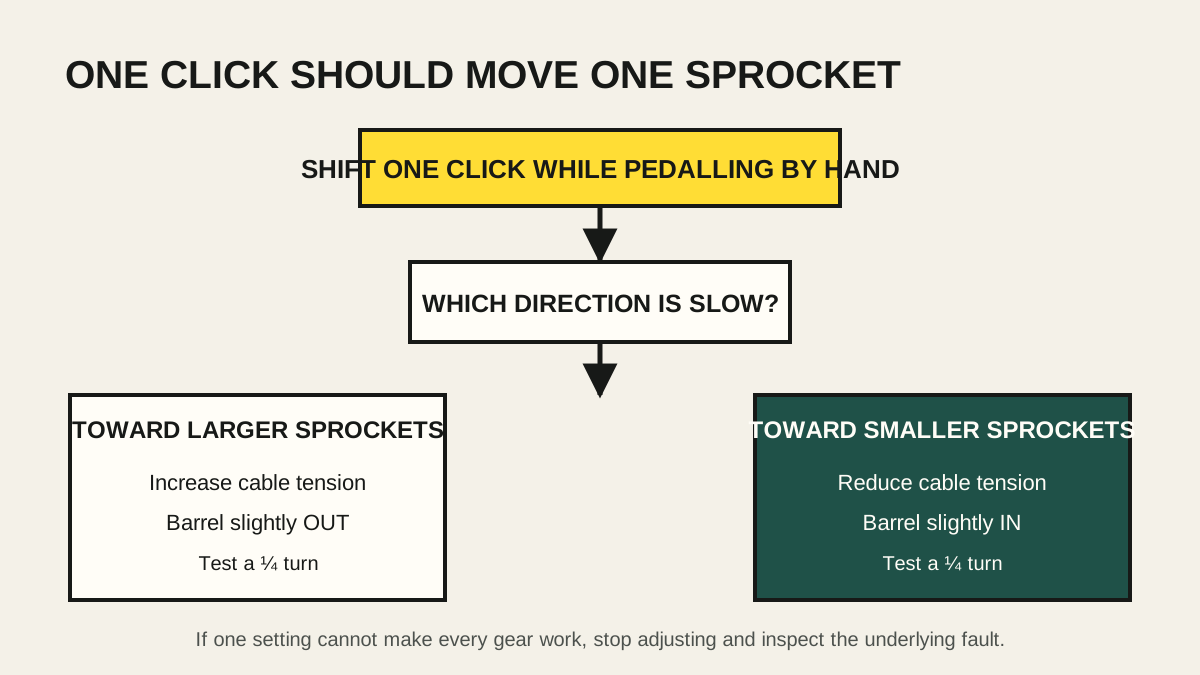
If a mechanical rear derailleur shifts one click at a time but hesitates consistently in one direction, the barrel adjuster may need a small change. Turn it out slightly to add cable tension for slow shifts toward larger sprockets; turn it in slightly to reduce tension for slow shifts toward smaller sprockets.
The short answer: mark the starting position, adjust only a quarter-turn, then test every rear gear in both directions. Do not touch the H or L limit screws to cure ordinary hesitation. If one barrel position cannot make all gears work, indexing is probably not the whole problem.
First confirm that this is an indexing problem
Recent r/bikewrench questions ask how far a barrel adjuster should be threaded and even which viewpoint makes a turn clockwise. Both reveal the same underlying confusion: the barrel changes cable tension; it is not a general-purpose derailleur repair knob.
Indexing is a likely candidate when:
- the system is mechanical, not electronic;
- it previously shifted correctly;
- one shifter click still corresponds to one intended sprocket;
- shifts are consistently slower toward larger sprockets or consistently slower toward smaller ones;
- there was no impact, wheel change, cable damage, or drivetrain replacement;
- the chain, cassette, derailleur, and hanger are compatible and in serviceable condition.
Indexing is less likely when only one or two heavily used sprockets skip under pedal force, the derailleur was struck, the hanger looks bent, the cable sticks, or shifting changes with wheel position. Use the under-load chain-skipping guide for a symptom that appears only when pushing hard.
What the barrel adjuster actually does
A barrel adjuster changes the effective length of the cable housing:
- Turn the barrel out to increase cable tension. On most conventional mechanical rear derailleurs, this encourages the derailleur toward the larger sprockets.
- Turn the barrel in to reduce cable tension. This lets the derailleur spring pull toward the smaller sprockets.
“Out” means more of the threaded barrel becomes visible; “in” means less is visible. Viewed straight at the end where the cable housing enters the adjuster, out is normally counter-clockwise and in is clockwise. Use movement, not memory, to confirm.
Some bikes have an adjuster at the derailleur, an inline adjuster near the handlebar, or both. Electronic systems use their own adjustment mode. Internal-gear hubs and friction shifters follow different procedures.
Make one controlled adjustment
Support the bike securely with the driven wheel clear of the ground. Keep fingers, clothing, and tools away from the moving chain, cassette, wheel, and chainrings.
- Clean and lubricate the chain if it is visibly dry or dirty.
- Inspect the derailleur and hanger from behind without trying to bend either part.
- Photograph or mark the barrel’s starting position.
- Put the chain on the large front chainring if your model’s manual specifies it, then begin near the smallest rear sprocket.
- Turn the cranks by hand and shift exactly one rear click.
- If the chain hesitates toward the next larger sprocket, turn the barrel out one quarter-turn.
- If it hesitates returning toward the next smaller sprocket, turn the barrel in one quarter-turn.
- Test the same shift again before making another change.
Do not pedal backward while evaluating indexed shifts, and do not shift a stationary drivetrain. Apply only light hand force while testing.
Test the entire cassette in both directions
A correct result must work beyond the single gear used for adjustment.
Shift one click at a time from the smallest sprocket toward the largest, then return one click at a time. Listen for persistent chain contact and watch whether each shift completes promptly. Repeat in the normal front-chainring positions allowed by the component maker.
A small amount of drivetrain sound does not justify chasing an endlessly quieter setting. Chain angle, front-ring choice, lubrication, and sprocket size all change sound. The test is clean, repeatable engagement without overshifting or hesitation.
Use a low-speed, traffic-free road test only after the stand test succeeds. The load of real pedalling can expose a cable, hanger, or wear problem that hand rotation does not.
If the adjuster reaches the end of its travel
Do not leave a barrel hanging by a few threads. If correct indexing would require the adjuster nearly all the way out, the cable baseline may need resetting at its pinch bolt. If it will not thread in normally, it may be cross-threaded, damaged, dirty, or incorrectly seated.
Resetting the cable involves model-specific routing, clamping, torque, and sometimes a prescribed starting position. Find the printed derailleur model number and follow its dealer manual from the beginning, or ask a mechanic to reset it. Do not improvise cable routing or clamp harder to stop slipping.
Why one adjustment may never fix every gear
If some gears improve while others become worse, inspect for:
- a bent derailleur hanger;
- sticky, corroded, damaged, or badly routed cable and housing;
- a loose or mis-seated wheel;
- incorrect cassette spacing or component compatibility;
- worn chain, cassette, pulley, or derailleur pivots;
- a bent derailleur cage;
- a B-gap that does not match the exact model;
- chain-length or installation errors.
A barrel adjuster moves all indexed positions together. It cannot straighten a hanger or make unequal sprocket spacing equal. Shimano’s instructions explicitly note that a rear derailleur will not shift properly if the hanger is not straight.
Leave the limit screws alone unless doing the full procedure
The H and L limit screws prevent the derailleur travelling beyond the outermost and innermost sprockets. They help keep the chain out of the frame and spokes. They do not fine-tune the spacing between ordinary indexed positions.
If the chain approaches the spokes, refuses the outermost sprocket, or overshifts either end, stop. Follow the exact full adjustment sequence—including limit verification—or use a mechanic. Randomly turning a limit screw can hide the clue and remove a safety boundary.
Your next step
Write down which direction is slow: toward larger or smaller sprockets. Make one quarter-turn in the matching direction and test every gear twice. If the symptom is inconsistent, confined to one worn gear, or unchanged after a half-turn total, return to the marked starting point and inspect the cable, hanger, wheel, and drivetrain rather than continuing to turn.