How to measure bicycle hub spacing correctly
Measure a quick-release or thru-axle bicycle hub at the dropout contact faces, distinguish OLD from axle length, and avoid ordering the wrong wheel.
 Field guide / how-to-measure-bicycle-hub-spacing
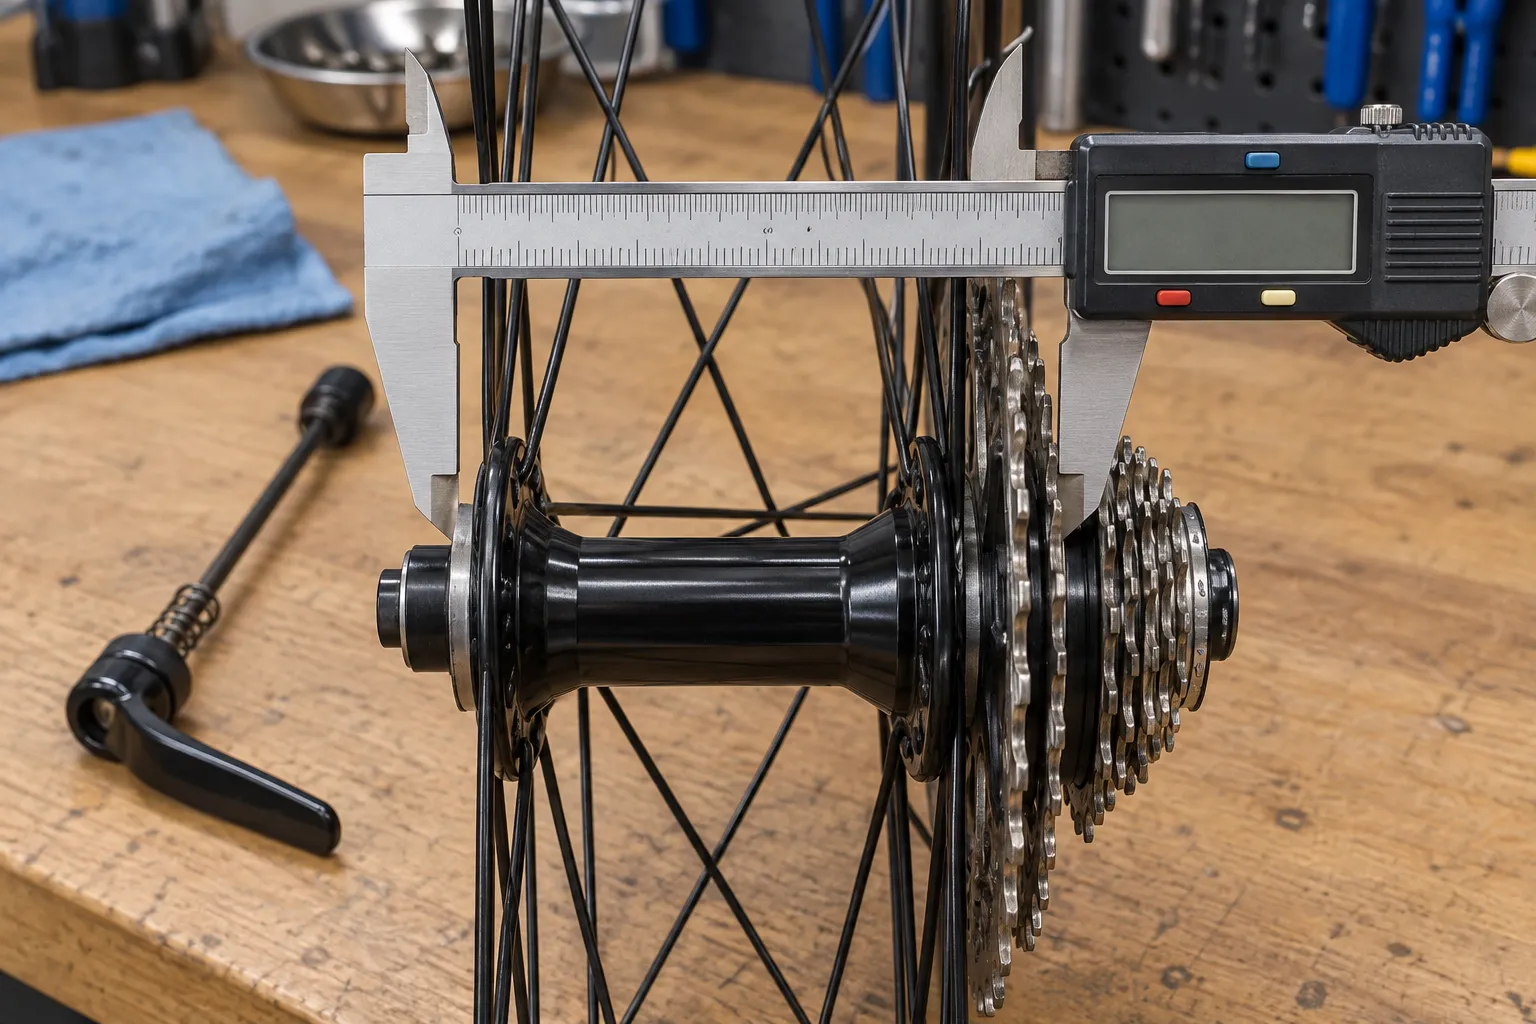
Measure bicycle hub spacing between the two faces that contact the inside of the frame or fork dropouts. On a quick-release hub, those are normally the outer locknut faces. On a thru-axle hub, measure end cap to end cap. This is the over-locknut dimension, commonly shortened to OLD—not the length of the skewer, solid axle, or thru-axle.
The short answer: remove the wheel and removable axle, identify the two dropout-contact faces, hold a metric calliper square to them, and repeat the reading. Record front or rear, OLD, axle standard, brake type, and freehub type together. A bare number such as “142 mm” is not a complete wheel specification.
Why hub-width measurements go wrong
A current r/bikewrench question asking how to measure hub width exposes a common shopping trap: several nearby dimensions look plausible.
- A quick-release skewer is longer than the hub spacing because it passes through both dropouts.
- A threaded solid axle normally protrudes far enough for washers and nuts.
- A thru-axle has its own diameter, overall length, usable length, thread pitch, and thread length.
- Hub-flange spacing is used for wheel building, not frame fit.
- Rim width and tyre width describe different parts of the wheel.
Calling all of those “hub width” creates expensive mistakes. Use the part’s formal dimension and state where you measured it.
Measure the hub in six steps
1. Remove and clean the wheel
Shift to a small rear sprocket if that makes wheel removal easier. Remove the wheel using the bicycle maker’s procedure. Take out the quick-release skewer or thru-axle. Wipe the end caps so grit does not hold the calliper away from the true face.
If an end cap is loose, missing, or pulls off unexpectedly, stop. Confirm the parts diagram before measuring or reinstalling it.
2. Identify the contact faces
Imagine the hub clamped in the bike. The two faces pressed against the inside surfaces of the dropouts define OLD.
- Quick release: usually locknut face to locknut face, behind the skewer springs and lever hardware.
- Thru axle: outer end-cap face to outer end-cap face.
- Solid axle: locknut face to locknut face, not axle-tip to axle-tip.
Park Tool uses exactly this definition in its frame-alignment and spoke-length procedures.
3. Measure squarely
Use the outside jaws of a calliper. Keep them parallel to the contact faces and perpendicular to the hub axle. Do not rest one jaw on the cassette lockring or brake rotor.
If spokes block the jaws, use two straight edges against the contact faces and measure between them. A ruler can identify a nominal family, but a calliper is better for documenting the actual hub.
4. Repeat the reading
Remove and replace the calliper twice. If the readings differ, you are probably touching a bevel, dust seal, protruding axle, or removable cap rather than the flat contact surface.
Record the measurement in millimetres without forcing it to the nearest familiar standard. Then compare it with the hub and frame documentation.
5. Measure the frame separately only when appropriate
With the wheel removed, the inside distance between dropout faces can be a useful diagnostic measurement on an undamaged metal frame. It is not permission to bend the frame, spread a carbon structure, or declare compatibility from one dimension.
Park Tool notes in its frame-alignment procedure that hub and frame widths should generally be close. If a wheel is difficult to install, first check for misplaced end caps, paint, debris, a bent hanger, damaged dropout, or the wrong hub standard. Do not pull a frame into place with the axle.
6. Write the complete compatibility line
Record something like:
rear / measured OLD / quick release or thru axle / axle diameter and thread / rim or disc brake / rotor mount / freehub body
Add the frame model and year. That line is far more useful to a shop than “I need a 142 wheel.”
OLD is not enough to order a wheel
Two hubs can share an OLD while differing in:
- axle diameter and closure type;
- thru-axle thread pitch or required length;
- disc rotor mount and rotor position;
- cassette or freewheel interface;
- freehub standard and supported speeds;
- wheel dish and frame clearance;
- rim diameter, internal width, tyre system, and pressure limits;
- dynamo wiring or proprietary end caps.
Use cassette or freewheel: how to tell before ordering a rear wheel. If you are replacing only a worn older hub, compare servicing the hub with replacing the wheel and identify every interface first.
Do not “cold set” from a search result
Some steel frames can be realigned by an experienced mechanic under suitable conditions. That does not make frame spreading a normal wheel-installation step. Aluminium, carbon, bonded, suspended, and many unusual frames require different decisions.
If the measured frame and hub do not agree with the model documentation, stop and ask a qualified shop or the frame manufacturer. A bent frame, wrong end cap, incomplete axle assembly, or bad measurement can all mimic an obsolete standard.
Your next step
Remove the wheel, photograph both hub ends, and record the dropout-contact measurement plus the complete axle, brake, and drivetrain interfaces. Use the replacement-part identification workflow before spending money.
Sources and further reading
- Park Tool: frame alignment and over-locknut measurement
- Park Tool: hub measurements for wheel building
- r/bikewrench reader context: uncertainty about measuring hub width — used as an editorial question signal, not as a compatibility source.