Which bike noises mean you should stop riding?
Triage a new bicycle click, creak, scrape, clunk, or squeal by checking braking, steering, wheel retention, play, and structural damage before chasing the sound.
 Field guide / bike-noises-when-to-stop-riding
A new noise is not a diagnosis. A click that seems to come from the bottom bracket may start at a saddle rail, pedal, wheel interface, loose bottle cage, or even your clothing. First decide whether the bike is safe to move; only then try to locate the sound.
The short answer: stop immediately if the noise arrives with a change in braking, steering, wheel security, component play, chain control, or frame/fork condition. If control is normal, inspect the bike stationary and reproduce the symptom methodically. Do not replace parts based only on where the sound appears to come from.
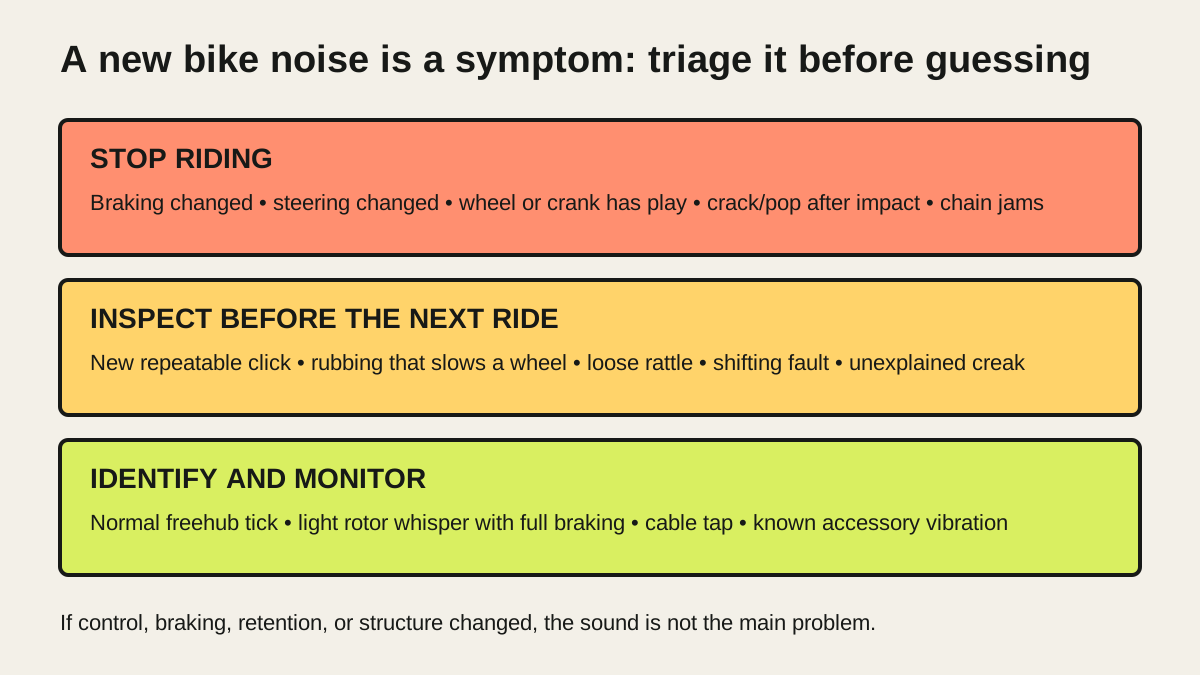
Stop when the bike behaves differently
Move off the road and stop riding if any new sound is paired with one of these signs:
- a brake lever pulls farther, pulses unusually, sticks, or no longer slows the wheel firmly;
- the handlebar, fork, headset, or wheel shifts when you brake or steer;
- a wheel, crank, pedal, cassette, chainring, or seatpost has detectable play;
- the chain jams, climbs, drops repeatedly, or pulls the rear derailleur;
- a tyre bulges, rubs the frame, loses pressure, or exposes casing;
- the sound began after a crash, pothole strike, transport incident, or component installation;
- you see a crack, separation, deep dent, broken spoke, loose fastener, or displaced part;
- pedalling or wheel rotation suddenly binds.
Do not “ride gently to see if it clears.” Walk, arrange collection, or call for help. Shimano’s pre-ride guidance tells riders to check wheel security, braking, frame condition, crank and pedal play, and unfamiliar rattles, clunks, or thuds. These checks are useful precisely because a noise can be the first clue to looseness or damage.
If a frame or fork mark is involved, use the paint crack or frame crack guide and keep the bike out of service until uncertainty is resolved.
Do a stationary control check
Before chasing a creak, perform a short safety screen.
- Secure the bike. Keep fingers, hair, and clothing away from the drivetrain and spinning wheels.
- Check both wheels. Confirm the thru-axle or quick release is correctly installed. Push each rim sideways and check for hub play. Spin it and watch the tyre, rim, and rotor.
- Check the brakes. Apply each brake separately. The lever should feel consistent and the brake should stop its wheel firmly.
- Check the headset. Apply the front brake and gently rock the bike. Investigate movement, while remembering that brake-pad or rotor movement can sometimes mimic headset play.
- Check cranks and pedals. Hold both cranks and test for side-to-side movement. Check pedals for looseness and damage.
- Look over the frame and fork. Use bright light around joints, impact areas, the underside of tubes, dropouts, and component clamps.
- Lift and gently drop the bike a few centimetres. Listen for an unfamiliar loose rattle, as Shimano’s pre-ride check recommends.
If you find play, damage, a weak brake, or insecure retention, stop the diagnosis there. Correct it using the manufacturer’s instructions or use a mechanic.
Describe the symptom before naming a part
Write down what makes the noise occur:
- pedalling or coasting;
- seated or standing;
- left, right, or every pedal stroke;
- braking, steering, or travelling over bumps;
- one gear or every gear;
- dry conditions, rain, or only after washing;
- indoors on a trainer or outdoors under load;
- immediately after a wheel, chain, pedal, saddle, or brake change.
Also describe the sound without diagnosing it: one click per crank revolution, rapid tick proportional to wheel speed, rough scrape, metallic clunk, high squeal, or irregular rattle. A short phone recording and a video of the conditions can help a shop reproduce an intermittent problem.
Use isolation tests, not a shopping list
Change one condition at a time while the bike remains safe.
Noise only while pedalling: check whether it continues when you stop pedalling at the same road speed. If it stops, the drivetrain, pedals, cleats, crank interfaces, or load on the frame and contact points become more plausible—but not proven.
Noise disappears when standing: saddle rails, saddle clamp, seatpost, and rider equipment move higher on the list. It does not automatically clear the bottom bracket.
Noise follows wheel speed: inspect tyre clearance, spoke condition, rotor and pad contact, valve hardware, wheel retention, and hub play. Do not touch a rotor’s braking surface with bare or oily fingers.
Noise only under braking: prioritise brake function and wheel/headset security. A light rotor whisper with normal braking is different from grinding, violent pulsing, or a lever that changes feel.
Noise over bumps: check bottle cages, pumps, bags, cable contact, computer mounts, lights, mudguards, and loose headset or wheel components. Remove one accessory for a stationary or controlled test only after completing the safety check.
Our guide to finding a creak while pedalling gives a fuller isolation order once the bike has passed this first screen.
Noises that often mislead riders
Sound travels through a bicycle’s tubes. The loudest apparent location may not be the source.
A saddle clamp can sound like a bottom bracket. A loose rear axle can appear to click at the crank. A cable touching the head tube can sound like a headset. A shoe cleat, zip, helmet retention cradle, or pocket item can produce a noise that disappears in workshop clothes.
That is why replacing the bottom bracket first is a poor strategy. Begin with safe, observable, reversible checks. Clean a suspect interface only when you know how it should be assembled, and use the specified grease, assembly compound, thread treatment, and torque. “Grease every metal contact” is not a safe universal rule: brake friction surfaces, some fasteners, and manufacturer-specified dry or locking interfaces are obvious exceptions.
When a squeal is urgent
Disc brakes can make noise without losing function, especially when wet. But squeal plus reduced braking, an oily appearance, persistent vibration, or a changed lever feel needs inspection before riding. Do not spray lubricant or general cleaner near a rotor or pad.
If braking is weak or contamination is plausible, use the disc-brake contamination guide. Grinding can indicate a worn pad or foreign material; check pad thickness by the brake maker’s method rather than continuing until the noise becomes louder.
What to tell a mechanic
Bring evidence that shortens the search:
- the exact bike and component models;
- when the sound began and what changed beforehand;
- whether it follows wheel speed or cadence;
- whether it occurs seated, standing, braking, or coasting;
- a recording from the ride;
- which safe isolation tests you performed;
- torque or installation work already done.
Do not conceal a crash, overtightening, home repair, or wrong-part experiment. The history is diagnostic information, not a confession.
Your next step
If the bike is noisy now, do the wheel, brake, headset, crank, and frame screen before another ride. If it passes, capture the trigger conditions and run one isolation test at a time. If control changed, play is present, or damage is possible, stop and use a mechanic rather than test-riding the uncertainty.
Sources and further reading
- Shimano Service Center: complete pre-ride check for wheels, brakes, frame, cranks, pedals, and abnormal sounds
- Shimano technical documents: inspection questions include component looseness, damage, and abnormal noises
- r/cycling discussion: recurring demand for a beginner maintenance starting point — used as an editorial demand signal, not technical evidence.
- r/bikewrench discussion: an intermittent noise a workshop could not reproduce — used as a question signal, not a remote diagnosis.