How to adjust loose cup-and-cone bicycle hub bearings
Identify the cone and locknut, preserve axle spacing, set smooth bearing clearance, and account for wheel clamping before calling a loose hub fixed.
 Field guide / adjust-loose-cup-cone-hub-bearings
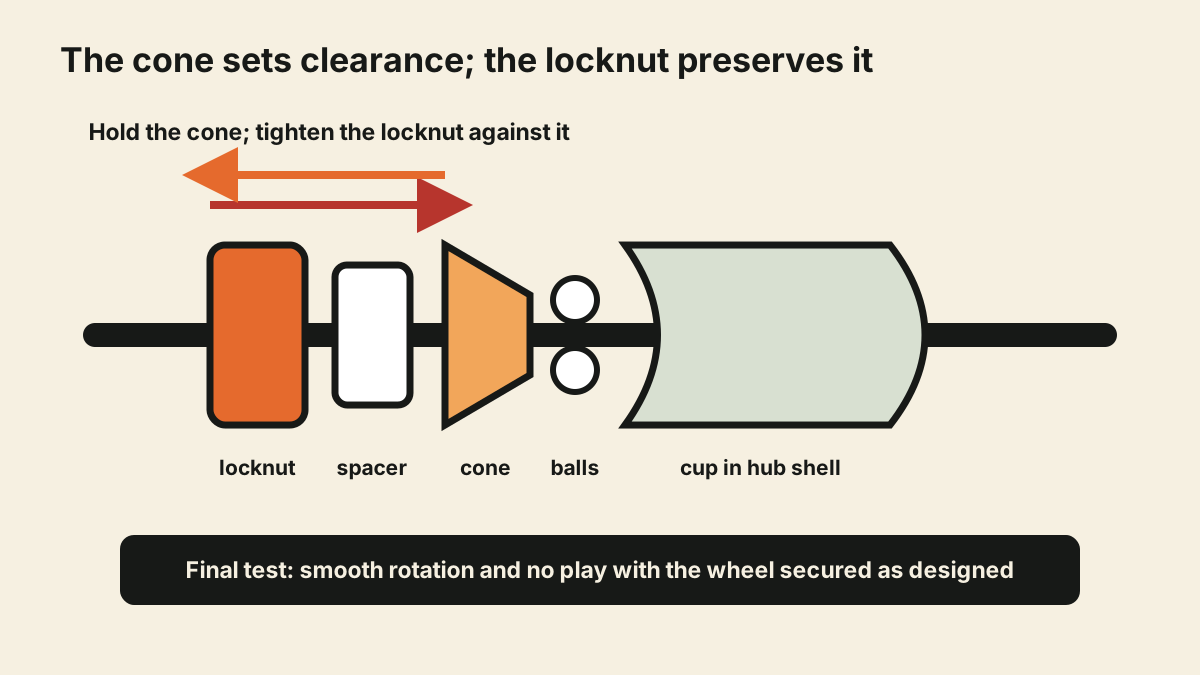
In a cup-and-cone hub, the cone sets bearing clearance and a locknut tightens against the cone to preserve that setting. Tightening the loose outer nut by itself can drag the cone inward and bind the bearing. The correct job is to identify the parts, hold the cone still, lock the two together, and judge the final result with the wheel secured as its maker intends.
The short answer: do not turn the loose nut until you have the hub’s service instructions and two correctly sized tools. Set the cone so the axle turns smoothly with the model-appropriate allowance, hold it stationary, tighten the locknut against it to the documented torque, then reinstall and test for both play and binding. Quick-release compression can change the final adjustment.
Make sure the hub is the source of the wobble
A current r/bicycling question described a six-speed rear wheel whose drive-side bearing locknut could be turned by hand. The wheel wobbled, but tightening the nut made the hub resist rotation. That is the classic reason not to treat every visible nut as an independent “tighten until snug” fastener.
Before removing the wheel, separate hub play from:
- a quick release or axle nut that is not secured;
- a wheel not fully seated in both dropouts;
- a loose cassette or threaded freewheel;
- rim movement from loose or broken spokes;
- tyre movement on the rim;
- brake-pad or rotor movement; and
- headset play felt while rocking the bicycle.
Use the installed-wheel hub-play check. If the axle or retention system is damaged or the wheel cannot be secured, stop before bearing adjustment.
Identify cup-and-cone before touching the nuts
Cup-and-cone hubs have balls running between a cup in the hub shell and a threaded cone on the axle. A locknut and sometimes spacers sit outside the cone. Thin cone-wrench flats are often visible.
Do not assume this layout from age alone. Cartridge-bearing hubs, internal-gear hubs, freecoaster designs, sealed units, and model-specific preload systems can also show nuts or flats. Find a model marking on the hub shell and obtain the service manual or exploded view.
For a rear hub, also identify which side the manual allows you to adjust. The drive-side spacing controls chainline, freewheel or cassette clearance, and axle position. Many conventional services preserve the established drive-side stack and adjust from the non-drive side. Do not copy that convention over a model-specific instruction.
Record the axle stack before disassembly
Photograph both axle ends straight-on and from the side. Measure or record:
- exposed axle length on each side;
- order and orientation of locknuts, washers, spacers, seals, and cones;
- which flats each tool fits;
- wheel dish and cassette or freewheel clearance; and
- whether the axle rotates smoothly before adjustment.
Lay removed parts in order. Reversing a spacer or changing the drive-side stack can move the rim, brake track, cassette, or axle relative to the frame. If parts are already loose and their original order is unknown, use the exploded diagram rather than guessing.
Inspect before attempting an adjustment-only repair
A locknut usually should not become finger-loose. Check for:
- damaged axle, cone, or locknut threads;
- a missing keyed washer or spacer;
- cracked, bent, or rounded hardware;
- dry, rusty, contaminated, or displaced grease;
- grinding, notches, or pitting as the axle turns; and
- a history of water entry, impact, or repeated loosening.
Adjustment is not enough when the bearing is dry or damaged. A full service removes and cleans the axle and balls, inspects cups and cones, replaces correct bearings where permitted, regreases, and restores the exact stack. Read whether to service the old hub or replace the wheel before investing labour in a worn rim and spokes.
Understand the adjustment target
The target is not “zero movement with maximum tightness.” It is smooth rotation without installed-wheel play under the clamping condition specified by the hub maker.
On some quick-release cup-and-cone hubs, closing the quick release compresses the hollow axle slightly and removes a small amount of bench play. Park Tool therefore describes leaving a small pre-clamping allowance and judging the final setup installed. That is not a universal numeric clearance for every hub.
Solid-axle, thru-axle, and model-specific assemblies may behave differently. Use the exact manual. Shimano’s current wheel instructions, for example, show model-specific cone orientation, holding methods, double-locking, and torque rather than one generic value for all hubs.
The controlled adjustment sequence
The precise side and torque come from the manual, but the mechanical relationship is:
- Secure the axle only by the approved method. Do not crush threads in an ordinary vice.
- Loosen the locknut while holding the cone so the cone does not turn with it.
- Move the cone in a very small increment toward tighter or looser clearance.
- Hold the cone stationary with the thin cone wrench.
- Tighten the locknut against the cone to double-lock the pair.
- Recheck rotation and play because tightening the pair can shift the setting.
- Repeat in small increments until the manual’s target is achieved.
- Reinstall the wheel correctly and perform the final secured-wheel test.
The common frustration is that a perfect setting seems to disappear when the locknut is tightened. Anticipate that movement; do not compensate with a large random turn.
Test the finished wheel in three ways
Axle smoothness
With the wheel out and the design permitting, turn the axle slowly by hand. It should not grind, notch, or bind. Seal drag is not the same as bearing roughness, and spin time is not a useful universal benchmark.
Installed play
Install and secure the wheel exactly as designed. Grip the rim and apply gentle alternating side pressure while watching the hub-to-frame interface. There should be no repeatable bearing knock.
Function under rotation
Spin the wheel and verify normal rim or rotor alignment, freewheel or cassette clearance, braking, and axle seating. A corrected bearing should not move the wheel off-centre. If it does, recheck the axle stack and wheel-centering diagnosis.
Do not ride if the adjustment will not remain stable, the axle binds once installed, or the locknut again loosens.
Your next step
Photograph the hub model and both axle stacks, then find its exploded view and service manual. If it is confirmed cup-and-cone and the bearing feels smooth, use two correct tools to hold the cone and lock the nut against it. If the grease is contaminated, parts are damaged, or the original stack is uncertain, book a full hub service instead of performing a hurried roadside adjustment.
Sources and further reading
- Shimano road-wheel dealer manual: model-specific bearing preload and double-locking
- Park Tool: hub overhaul and cup-and-cone adjustment
- r/bicycling reader context: loose rear-hub locknut and binding after tightening — used as an editorial question signal; replies were not treated as model-specific service instructions.