Why doesn't my road-bike crank spin freely by hand?
Separate normal bearing-seal and grease drag from chain, brake, preload, spacer, and bottom-bracket faults without judging a crank by free-spin time.
 Field guide / why-road-bike-crank-does-not-spin-freely
A road-bike crank does not need to continue spinning for several revolutions when you flick it by hand. Sealed bearings, grease, dust seals, the chain, freehub, and derailleur all create drag. The useful test is whether the crank turns smoothly through a full rotation, has no side-to-side play, clears the frame, and behaves normally while pedalling.
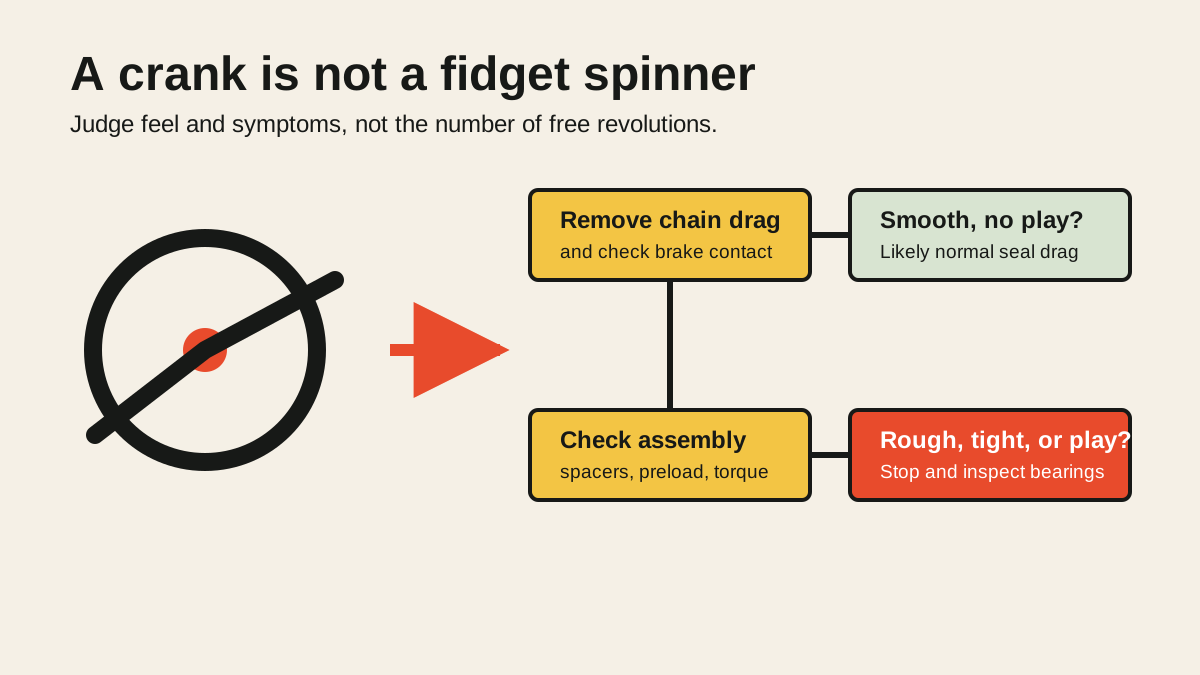
The short answer: do not diagnose a bottom bracket from free-spin time alone. Remove other sources of drag, confirm the crank was assembled with the specified spacers and preload, then feel for roughness, binding, noise, or play. A smooth crank that stops quickly can be healthy; a crank that spins impressively but rocks sideways is not.
Why the workshop spin test is misleading
A current r/bikewrench discussion asked whether a recently installed crank should continue spinning farther when flicked by hand. The question recurs because videos of fast-spinning cranks make an easy comparison, but they do not control the important variables.
Free-spin changes with:
- whether the chain is installed and which gear it is in;
- freehub-seal and derailleur-pulley drag;
- bearing and dust-seal design;
- grease type, quantity, and temperature;
- bottom-bracket alignment;
- crank preload and spacer arrangement;
- brake-pad contact if the rear wheel turns during the test.
A bearing with effective seals may stop sooner than a lightly sealed bearing. Removing seals or flushing grease to chase a longer spin sacrifices contamination protection and bearing life. The bicycle is designed to carry load, not win a no-load spinning demonstration.
Start with the symptoms that matter
Before loosening anything, ask what happens while riding.
More meaningful warning signs are:
- grinding, clicking, or a repeating tight spot;
- a crank that becomes difficult to turn after the fixing bolts are tightened;
- side-to-side movement at either crank arm;
- a chainring moving laterally enough to affect shifting;
- crank arms or rings touching the frame;
- a crank arm that loosens again after correct installation;
- a sudden change after an impact, wash, service, or component swap.
If none is present and pedalling feels normal, a short free-spin is weak evidence of a fault.
Isolate the crank from the drivetrain
Support the bicycle securely. Do not put fingers near a moving chainring or derailleur.
- Shift to a combination that gives a reasonably straight chainline.
- Turn the crank slowly through several complete revolutions and feel for a repeated tight point.
- Check that the rear brake is not rubbing if the wheel turns with the crank.
- If you know how to handle the chain safely, lift it off the chainring and rest it where it cannot scratch the frame or jam. This separates crank and bottom-bracket feel from chain, pulley, freehub, and wheel drag.
- Turn the crank again slowly rather than flicking it hard.
With the chain removed, some resistance can remain. What you want is consistent, smooth motion. A gritty feel, notch at the same angle, or abrupt binding deserves inspection.
If removing the chain changes everything, investigate the drivetrain rather than buying a bottom bracket. A stiff chain link, dirty pulley, misrouted chain, brake rub, or freehub drag can all make the original test look worse.
Check for play separately
Hold both crank arms and push one inward while pulling the other outward. Repeat at several crank positions. The frame must stay supported; do not confuse movement in the stand with movement at the axle.
Visible or tactile lateral play is not corrected by hoping the bearings “bed in.” Its cause depends on the crank system:
- incorrect or missing spacers;
- incorrect bearing or bottom bracket;
- insufficient or incorrect preload;
- loose fixing bolts;
- worn bearings or axle surfaces;
- damaged frame or bottom-bracket interfaces.
Use the side-to-side crank-play guide before changing adjustment. Do not simply tighten every fastener harder.
Verify the exact installation sequence
Identify the crank and bottom-bracket model numbers, then open the current dealer manual. Similar-looking systems can use different spacers, wave washers, preload caps, retaining plates, and torque sequences.
For Shimano two-piece road cranks, the dealer manual specifies installation order, left-arm orientation, a preload cap procedure, alternating pinch-bolt tightening, and a retaining plate check. That sequence is more reliable than copying a generic video. Other makers use different retention systems.
Audit:
- frame shell type and width;
- approved bottom bracket;
- every spacer and seal in its documented location;
- full axle insertion;
- preload method;
- fastener sequence and torque;
- frame and chainring clearance through 360 degrees.
Too much bearing preload can create drag and shorten bearing life. Too little can leave play. The correct setting is the maker’s procedure, not the longest spin.
Decide whether the bearings are actually failing
With the chain isolated and assembly verified, suspect the bottom bracket when rotation feels gritty or notchy, a tight spot repeats, play remains, corrosion is visible, or noise can be traced to the bearing under controlled load.
Do not assume every pedalling creak comes from the bottom bracket. Pedals, chainring bolts, cleats, saddle rails, seatpost, rear axle, and cable contact can transmit sound through the frame. Use the road-bike creak diagnosis order before replacing parts by guesswork.
A recently installed press-fit bottom bracket that binds may also reveal shell alignment, fit, or installation trouble. Press-fit removal and inspection can damage parts when done with improvised tools; this is a sensible shop job if you cannot measure the interface or identify the required tooling.
A practical pass-or-stop test
Treat the crank as serviceable for the next controlled ride only when all are true:
- it turns smoothly by hand through every position;
- there is no detectable axle play;
- the crank and rings clear the frame;
- the documented spacers and retention parts are present;
- fasteners were installed to the maker’s procedure;
- shifting, braking, and pedalling are normal;
- no new grinding, loosening, or repeated noise appears.
Stop when any item is uncertain. A mechanic can distinguish bearing drag from incorrect assembly much more cheaply than repairing a damaged crank interface or frame.
Your next step
Repeat the test with the chain safely isolated, then write down three observations: smooth or rough, play or no play, and correctly documented assembly or unknown. If any answer is rough, play, or unknown, identify the exact crank and bottom bracket before the next ride.
Sources and further reading
- Shimano: road and MTB crankset dealer manual
- Park Tool: bottom bracket and crank repair library
- r/bikewrench reader context: should this crank spin more? — used as a current question signal; free-spin anecdotes were not treated as specifications.