Why does a bike seatpost keep breaking?
Treat a second seatpost failure as a system problem by checking load limits, fit, insertion, clamp condition, saddle position, terrain, and the frame.
 Field guide / why-bike-seatpost-keeps-breaking
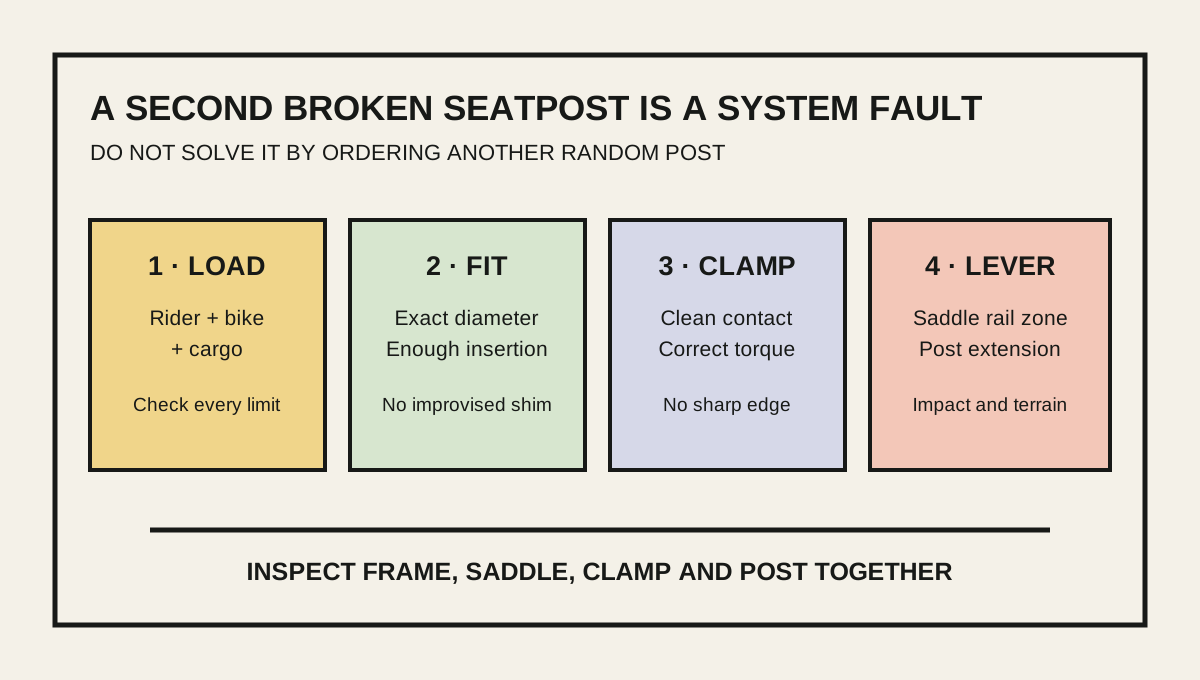
A seatpost that breaks twice is not just a shopping problem. The replacement may be unsuitable, but the underlying cause can also be total system load, too little insertion, the wrong diameter, a damaged or overtightened clamp, excessive saddle setback, repeated impacts, or damage in the frame itself.
The short answer: stop riding and keep the failed parts. Record exactly where each failure began, then have the bicycle assessed as a complete load path: saddle rails, seatpost head and shaft, clamp, seat tube, frame, wheels, tyres, cargo, and intended terrain. Buy a new post only after the required size, limits, insertion, setback, and clamp procedure are known.
Treat the failure location as evidence
A current r/bikewrench thread described repeated failures near the frame’s seatpost clamp and concern about a future break during transport. That is a useful recurring question signal, not a remote diagnosis. Similar-looking breaks can have different causes.
Before discarding anything, photograph:
- both sides of the fracture and any earlier crack marks;
- the seatpost at the top of the frame and its insertion mark;
- the frame clamp, slot, and seat-tube edge;
- the saddle rails, clamp plates, and rail position markings;
- any diameter, model, material, torque, or limit markings;
- the complete bicycle with normal cargo fitted.
Do not sand, file, bend, or reinstall the failed part. The fracture location and clamp marks may help the bicycle, frame, or component manufacturer identify the real problem.
Check the complete weight limit first
Manufacturers normally define a total limit, not merely a rider limit. Trek’s owner manual, for example, states that its listed weight limit combines rider, bicycle, and cargo. The actual limit varies by model and intended-use category; that example is not a universal Trek or industry number.
Add together:
- Rider in normal riding clothing.
- Bicycle, including battery if it is an e-bike.
- Locks, bags, racks, child seats, bottles, tools, and other cargo.
- Anything supported by the rider or bicycle during the ride.
Then find the lowest relevant limit across the frame, fork, wheels, tyres, seatpost, saddle, rack, and other load-bearing parts. A bicycle can be within its frame limit while one replacement component is not approved for the same load or terrain.
If documentation is missing, contact the manufacturer with the exact model and serial number. Do not infer capacity from tube thickness, price, material, or online reviews.
Confirm diameter, insertion, and frame fit
A stamped “27.2” or “31.6” is a nominal diameter, not permission to force a close-looking post into any frame. Verify the frame’s specified seatpost size and any required shim. An improvised or damaged shim can concentrate load or let the post rock.
Minimum insertion is also a structural requirement. Both the post’s mark and the frame maker’s minimum engagement must be satisfied; use whichever requires more insertion. Some frames also have a maximum insertion limit because the tube curves, narrows, or meets internal hardware.
Read what the seatpost minimum-insertion mark means before adjusting height. If the correct saddle height exposes the line or fails the frame’s minimum, the post or bicycle configuration is unsuitable.
Inspect the empty seat tube for:
- burrs or a sharp upper edge;
- cracks spreading from the clamp slot;
- corrosion, distortion, or an oval opening;
- an incorrect, cracked, or reversed clamp;
- debris or an old shim preventing full contact.
This inspection is especially important when failures recur at the same height. A qualified shop or frame specialist may need to measure the tube and assess damage that is not visible from above.
Check clamp condition and exact torque
More torque is not more security. Excess torque can damage a post or frame; insufficient torque can let the post move and load it repeatedly. Use the exact bicycle, clamp, and seatpost instructions, including lubrication or carbon assembly compound where specified.
The torque printed on one component may be a maximum rather than a target that overrides the frame maker. If the documents conflict, stop and ask the manufacturers or a qualified mechanic.
Check that:
- the clamp matches the frame and faces the specified direction;
- its slot aligns as the frame maker requires;
- the bolt, washer, and threads are correct and undamaged;
- the clamp closes evenly without bottoming out;
- the post holds at approved torque without slipping;
- no clamp edge creates a visible gouge or pinch line.
A post that repeatedly slips is not made safe by tightening beyond its limit. Use why a road-bike seatpost keeps slipping for that separate fault.
Reduce unnecessary leverage
The exposed post behaves like a lever. Greater extension and rearward saddle position can increase bending load near the top of the frame. That does not mean every tall or setback position is unsafe; it means the complete arrangement must be approved for the rider, frame, post, saddle, and terrain.
Verify that the saddle rails sit within their marked clamp zone. Do not clamp on a rail bend, beyond a limit mark, or with plates made for another rail shape. Trek’s fitting guidance warns that incompatible carbon-rail clamps can cause rail failure; other saddle and post makers have their own requirements.
Do not move the saddle forward solely to reduce leverage if that ruins fit. If safe saddle height and position cannot be achieved within every component’s limits, the solution may be a different post, saddle, frame size, or bicycle—not a compromised position.
Include terrain, tyres, and riding loads
Potholes, curbs, cobbles, off-road impacts, and landing seated can create much higher peak loads than smooth pedalling. The bicycle’s approved use category matters. A road, city, cargo, mountain, and e-bike are not automatically rated for the same impacts even if their static weight limits look similar.
Also check tyre condition and pressure. Repeated bottoming or harsh impacts may be a sign that tyre volume, pressure, wheel strength, speed, or route choice does not suit the total load. Do not exceed tyre or rim limits while trying to make the bike feel more supported.
If the bicycle is the rider’s primary transport, build redundancy into the plan: schedule the inspection before another failure, use a shop experienced with the bike type and total load, and identify a transport alternative while parts are assessed.
How to choose the replacement
Only shop after documenting the cause checks. Ask the bicycle and seatpost manufacturers to confirm in writing:
- exact diameter and any approved shim;
- required length and insertion range;
- approved rider/system load and use category;
- suitable setback and saddle-rail interface;
- clamp hardware, preparation, and torque;
- whether the frame needs inspection after the previous failures.
Avoid “heavy duty” as a substitute for published compatibility. Material alone is not a rating: an aluminium, steel, carbon, or suspension post can all be unsuitable if its dimensions, clamp, use, or documented limits do not match.
If the complete bike cannot support the required total load and terrain with margin, use the first-bike buying checklist to compare suitable alternatives by fit, braking, wheel and tyre capacity, serviceability, and verified system limit.
Your next step
Do not fit a third post yet. Weigh the complete riding system, find the exact bicycle and component manuals, and place both failed posts beside the frame for a qualified inspection. Ask for a written recommendation that names the post diameter, length, insertion, setback, clamp procedure, load limit, and approved terrain.
Sources and further reading
- Trek bicycle owner manual: weight limits combine rider, bicycle, and cargo
- Trek owner guidance: saddle position and rail-clamp compatibility
- Trek owner guidance: use component-specific torque values
- r/bikewrench discussion: repeated seatpost failures — used as an editorial problem signal, not a diagnosis or product recommendation.