What does the minimum insertion mark on a bike seatpost mean?
Set seatpost height safely, reconcile post and frame insertion limits, and avoid making the printed mark meaningless when shortening a post.
 Field guide / seatpost-minimum-insertion-mark
The seatpost’s minimum insertion mark must remain fully inside the frame. It marks a structural limit, not a suggested fit range. Your frame may also specify a deeper minimum, so the safe setup follows whichever requirement leaves more post inside the frame.
The short answer: if any part of the minimum-insertion line is visible above the seat collar, stop riding and lower the post. If that makes the saddle too low, the solution is a longer compatible post or a correctly sized bike—not ignoring the mark.
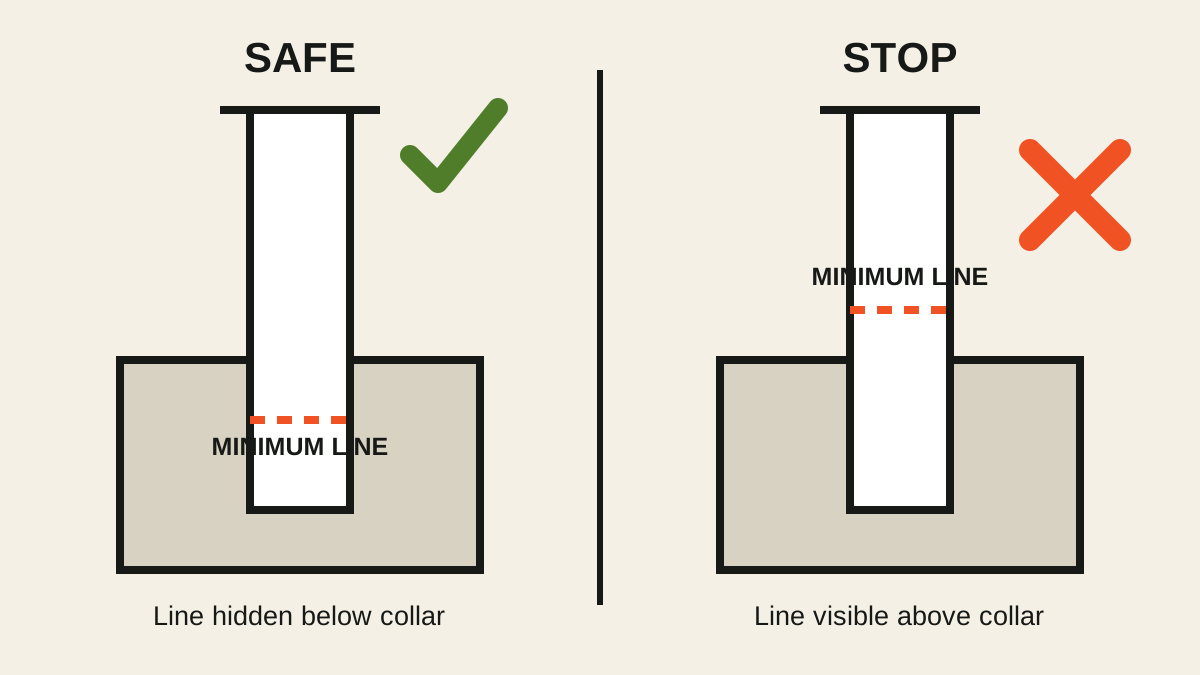
Why the mark exists
The frame has to support the leverage applied through the saddle and post. Too little post inside the seat tube can concentrate load near the top of the frame and leave too little supported post. That can damage the post, frame, or both.
Trek’s bicycle owner manual says not to position a saddle beyond the seatpost or seatmast minimum-insertion line. Model-specific frame manuals can add a separate insertion depth. Do not replace those instructions with an internet rule such as “about 8 cm is enough.” The correct depth belongs to the exact parts.
Recent Reddit questions show two recurring misunderstandings: treating the line as an optional margin, and cutting a post at the line. Both can remove the support the manufacturer intended.
Follow both the post and the frame
There can be several limits in one assembly:
- Post minimum insertion: the least length of post that must remain inside the frame.
- Frame minimum insertion: a model-specific depth needed to support the frame, sometimes deeper than the post mark.
- Frame maximum insertion: the deepest the post can physically or safely enter before a bend, bottle-cage boss, suspension hardware, or tube transition obstructs it.
- Post maximum extension: another way a maker may label the same upper-height boundary.
Use the most restrictive combination. For example, if the post requires 90 mm inside the frame and the frame requires 100 mm, keep at least 100 mm inserted. If an obstruction prevents the saddle reaching your needed height while meeting those limits, the part combination does not work.
Set the height without guessing
- Find the exact frame and seatpost manuals. Check diameter, clamp type, insertion requirements, preparation compound, and clamp torque.
- Remove the post only if the manuals allow and you know the correct procedure. Clean enough to read every mark and inspect the post.
- Measure from the post’s lower end to its minimum-insertion line. Record that number and photograph the markings.
- Check the frame’s separate minimum and maximum insertion instructions.
- Insert the post so the full minimum line is below the manual’s reference point—usually the top of the seat tube or collar.
- Set the saddle height, align it, and tighten the clamp to the specified torque with the specified grease or friction compound.
- Mark the finished height with removable tape, then confirm after a short, easy ride that it has not slipped.
If the saddle is too high or low for comfort, use the saddle-height setup guide as a starting process, then make one small change at a time. Do not use extra extension as a fit shortcut.
Cutting a seatpost does not move the safety requirement
Sometimes a long post hits an internal obstruction before the saddle can be lowered far enough. Shortening may be permitted, but never assume it is.
The dangerous misconception is: “The line is printed here, so I can cut the post at that line.” If you cut off the lower section up to the mark, you remove the very length that the mark was designed to keep inside the frame. The remaining printed line no longer proves safe insertion.
Before any cut:
- confirm that the post and frame makers allow shortening;
- record the original required insertion length from the original lower end to the mark;
- calculate the finished post length needed for saddle height, insertion, and internal clearance;
- preserve at least the original post requirement and any deeper frame requirement;
- use the material-specific cutting, edge-finishing, cleaning, and inspection method;
- add a durable new reference mark only as the manufacturer permits.
Carbon, aluminium, integrated seatmasts, aero posts, battery posts, and suspension or dropper posts need different procedures. If the manual does not explicitly allow cutting, ask the manufacturer or a qualified shop.
A longer post is not automatically compatible
If your current post cannot provide the correct saddle height while staying safely inserted, a longer post may solve the extension problem—but it still must match:
- exact diameter and frame tolerance;
- saddle-rail size and clamp type;
- offset and fit needs;
- frame maximum insertion and internal obstructions;
- post and frame material instructions;
- rider and system weight limits;
- any proprietary shape or seatmast hardware.
If a dramatically longer post is needed, revisit frame size and fit. Read how to tell if a road bike is too big or too small before buying a part to compensate for the wrong frame.
Treat slipping as a separate fault
A post that starts safely below the mark can still slide upward or downward if its diameter, surface preparation, clamp, or torque is wrong. Do not keep adding clamp torque. Follow the seatpost-slipping diagnosis and stop if there is cracking, crushing, scoring, or repeated movement.
Likewise, inserting a post much deeper does not repair a cracked collar or substitute for the correct clamp hardware.
Your next step
Look for the line now. If it is hidden, photograph the current height and check the frame manual for a deeper requirement. If it is visible, do not ride: lower the post, then decide whether a longer compatible post or a different frame is the honest fix.
Sources and further reading
- Trek bicycle owner manual: keep the saddle below the seatpost minimum-insertion limit
- Trek model-specific service manual example: follow the post maker and frame insertion requirement
- r/bikewrench reader context: why cutting at the printed line does not preserve the required inserted length
- r/bikewrench reader context: a current question about insufficient adjustment while respecting insertion depth
Reddit discussions were used to identify the misunderstanding, not to set a universal depth. No usernames or personal stories are reproduced here.