When should you replace road-bike chainrings?
Separate deliberate tooth shapes from real chainring wear, then use damage checks and drivetrain symptoms to decide whether replacement is due.
 Field guide / when-to-replace-road-bike-chainrings
Before you buy
Check the starter kit first
Print the one-page buying brief for helmet, lights, water, phone, and repair compatibility before comparing upgrades.
Replace a road-bike chainring when it is structurally damaged or when a correct, unworn chain will not engage it reliably after the rest of the drivetrain has been checked. Do not replace it just because some teeth look shorter, sharper, or differently shaped: modern shifting chainrings deliberately use varied teeth, ramps, and pins.
The short answer: clean the drivetrain, measure the chain, inspect for cracks and bent or missing teeth, then diagnose where any skipping or chain suck occurs. A clear side photo can show damage, but it cannot by itself prove ordinary chainring wear.
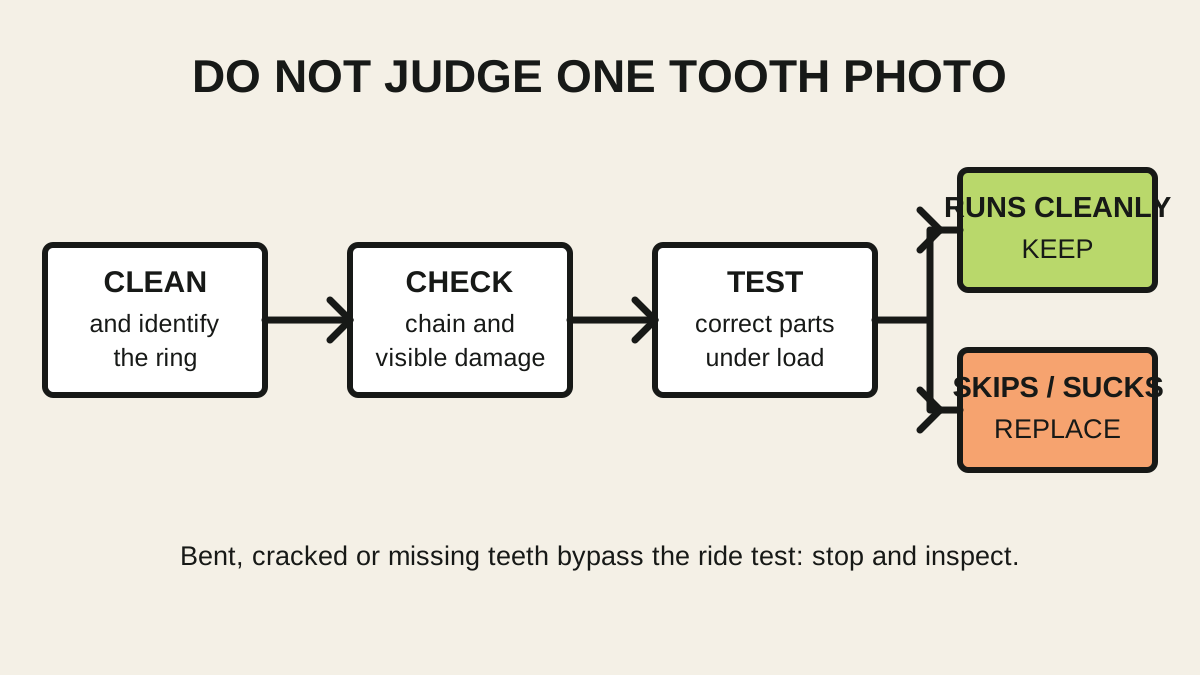
Why chainring teeth do not all look alike
On a multi-chainring road crank, tooth height and profile may change around the ring. Shifting ramps and pins help lift the chain between rings, while selected teeth are shaped to release or receive it. A narrow-wide 1x ring also alternates tooth widths by design.
That means the familiar “shark tooth” description is only a clue. Compare several load-bearing teeth around the same ring, ideally with a clear image of that exact ring when new. Do not compare a shaped shift tooth with a plain tooth and call the difference wear.
Current Reddit repair discussions repeatedly ask for verdicts from dirty or distant photographs. The useful signal is the recurring uncertainty—not the crowd diagnosis. A chainring decision needs symptoms, chain condition, compatibility, and a clean inspection.
Replace immediately for structural damage
Do not ride-test a ring with:
- a crack through the ring or around a chainring bolt;
- a loose ring or loose crank interface;
- a tooth that is broken or bent far enough to catch or release the chain unpredictably;
- deep impact damage or deformation;
- a chain repeatedly wedging between the ring and frame;
- damage covered by a manufacturer service notice or recall.
A bent ring can mimic poor front-derailleur adjustment because its side-to-side movement changes through each crank revolution. Watch it slowly from behind without putting fingers near a moving drivetrain. If the ring or crank mounting appears to wobble, stop and have the assembly checked.
Diagnose wear in the right order
1. Clean and identify the parts
Clean enough to see each tooth, model marking, bolt pattern, and the direction or position marker. Record the crank model, number of teeth, number of chainrings, drivetrain speed, and chain model.
Dirt can hide damage and create poor engagement. Identification also prevents a bad test with an incompatible chain.
2. Measure the chain first
A worn chain changes pitch as its pins and rollers wear. It can accelerate wear on cogs and chainrings, then appear to “fit” the worn parts because they developed together. Use the correct method in our chain-wear guide and follow the drivetrain maker’s replacement limit.
If the chain is past its limit, replacing it is maintenance—not yet proof that every sprocket and ring must also be replaced.
3. Map the symptom
Record exactly where the fault happens:
- Only one or two rear sprockets: investigate cassette wear or indexing first.
- Only one front ring: that ring, its mounting, or front-shift setup becomes more likely.
- Chain stays attached to the bottom of the ring: this “chain suck” can involve worn or damaged teeth, a contaminated drivetrain, a stiff link, or incompatible parts.
- Chain drops on bumps: check chain length, derailleur tension, chainring type, alignment, and damage—not only tooth wear.
- Fault began after new parts: re-check direction, routing, chain length, and complete compatibility.
Use the skipping-under-load diagnosis before buying a ring from a photograph.
4. Test a known-correct chain carefully
Once damage, setup, and compatibility have been checked, a new correctly matched chain is the practical test. In a traffic-free area, seated and in control, apply load progressively. Do not sprint or stand over the bars to “prove” a suspected slip.
If the new chain rides up, skips, or repeatedly fails to release from one ring while the cassette and setup are known good, replacement is justified. Stop the test at the first slip.
Do not automatically replace the complete drivetrain
Chains usually wear faster than chainrings, but service life depends on contamination, lubrication, load, chain replacement timing, alignment, and component design. There is no honest universal rule such as “one ring every three chains.”
A sensible sequence is:
- measure and replace an out-of-limit chain;
- test it gently;
- replace the cassette if skipping is isolated to worn rear sprockets;
- replace a chainring only when front engagement remains faulty or the ring is damaged.
Our chain-or-cassette guide explains why a new chain may reveal wear elsewhere.
Buy the exact replacement, not just the tooth count
Match all of these:
- crank and chainring model or an explicitly approved substitute;
- bolt-circle diameter or direct-mount interface;
- bolt count and mounting orientation;
- tooth count and maker-approved ring combination for 2x systems;
- drivetrain speed and chain compatibility;
- ring position: inner, outer, or single;
- chainline, offset, and frame clearance;
- required bolts, spacers, torque, grease, or thread treatment.
On some cranks the rings are riveted and the crankset is replaced as an assembly. On others, the inner and outer rings have a timed relationship: the orientation marker, catch pin, ramps, and pins must face the specified direction. Follow the exact dealer manual rather than copying a nearby bike.
Your next step
Clean the ring, measure the chain, and write down where the symptom occurs. If there is no structural damage and the bike runs cleanly with a correct chain, keep riding and re-check it during routine chain measurements. If it slips at the front, take the crank model and symptom map to a shop or order the exact approved ring.
Sources and further reading
- Park Tool: front-derailleur troubleshooting, including worn and damaged chainrings
- Park Tool: measuring chain wear and recognising chain suck or load-sensitive slipping
- Shimano: model-specific chainring replacement procedure example
- r/bikewrench reader context: recurring uncertainty about chainring wear after chain and cassette replacement
- r/bikewrench reader context: a used-bike chainring and why a photo alone produced conflicting answers
- r/bikewrench reader context: chain-drop symptoms and a suspected worn ring
Reddit discussions were used to identify the question and common uncertainty, not to determine component condition. No usernames or personal stories are reproduced here.