What to check after a tubeless bicycle tyre blows off the rim
Quarantine the wheel, preserve the evidence, and verify tyre, rim, tape, bead, width, pressure, damage, and compatibility before rebuilding.
 Field guide / tubeless-tyre-blow-off-what-to-check
Before you buy
Check the starter kit first
Print the one-page buying brief for helmet, lights, water, phone, and repair compatibility before comparing upgrades.
Do not simply reseat a tubeless tyre that blew off, add sealant, and ride it again. A blow-off means the tyre bead left the rim or the system lost containment violently. Preserve the parts, document the setup, and find the cause before either component returns to service.
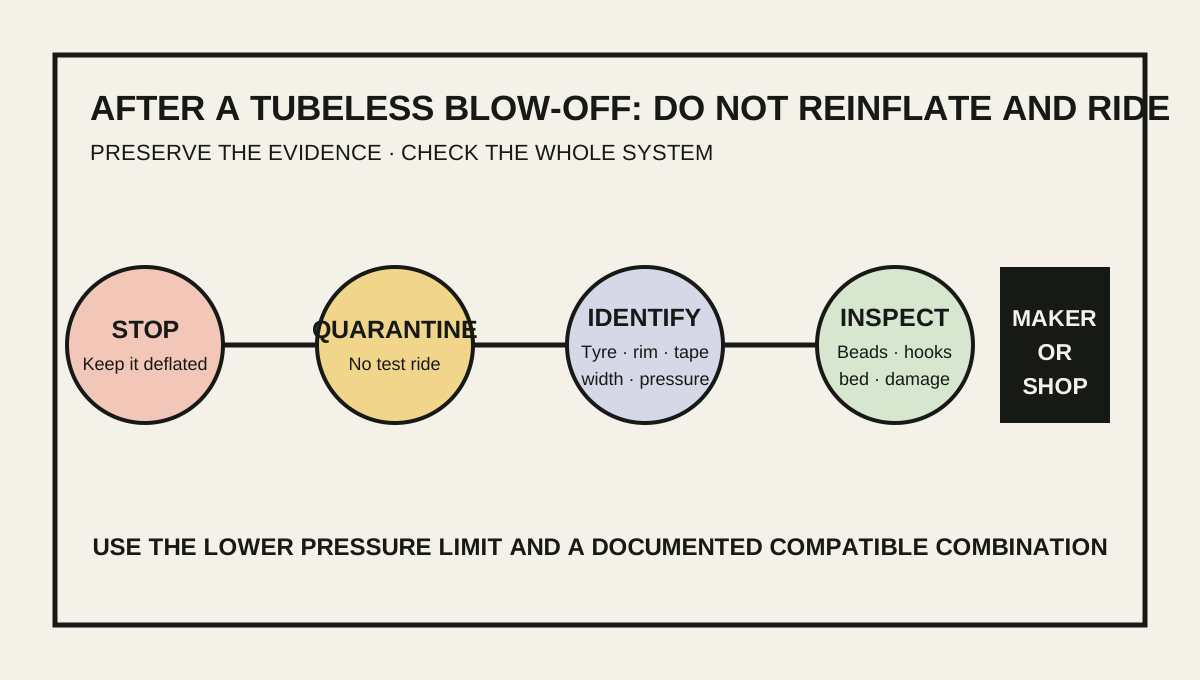
The short answer: deflate and quarantine the wheel. Record the exact rim, tyre, internal width, tape, valve, sealant, pressure, gauge, installation method, temperature, and damage. Verify the combination and the lower of the tyre and rim pressure limits. A cut bead, deformed rim, damaged hook, wrong tyre width, incompatible hookless setup, or unexplained unseating requires replacement or manufacturer assessment—not another test inflation.
First confirm what failed
A current r/bikewrench discussion described a parked tubeless wheel that appeared to have released suddenly after a tyre and sealant change. The valuable signal is not the commenters’ guesses; it is the number of variables that must be identified before anyone can explain an unseating event.
“Exploded tubeless” can describe several different failures:
- the tyre bead climbed over the rim wall;
- the bead or casing tore;
- rim tape failed and pressure entered a rim cavity;
- the rim cracked, split, or deformed;
- the valve or tape leaked quickly while sealant sprayed;
- a puncture or casing cut opened suddenly without the bead leaving the rim.
Photograph the wheel before cleaning it. Sealant spray direction, bead position, tape movement, and local damage may distinguish those events. Keep the tyre, valve, tape, and any fragments.
Make the wheel safe to handle
- Keep both beads deflated and stay clear of the sidewall while moving the wheel.
- Remove the wheel from the bicycle if that can be done without forcing damaged parts.
- Do not add air “just to see” where it leaks.
- Move it away from faces, pets, heat, and valuable surfaces; sealant can stain.
- Record the pressure used and which gauge measured it before memory changes.
If the event happened while riding, inspect the bicycle for crash or contact damage too. A tyre problem can be the first event in a larger incident.
Identify every part of the pressure system
Write down the exact model and version of:
- rim or complete wheel, including whether it is hooked or hookless;
- tyre, stated size, tubeless designation, and direction;
- measured or manufacturer-listed rim internal width;
- tubeless tape brand, width, layers, and installation date;
- valve and any shaped base or gasket;
- sealant and the approximate quantity added;
- pump, inflator, compressor, or booster used;
- pressure gauge and final cold pressure.
Also note whether a tube was fitted, whether the tyre was repaired or patched, and whether previous sealant or adhesive remained around the bead. Do not assume two tyres with the same printed width have the same approved rim range.
Schwalbe’s tubeless guidance requires a tubeless-compatible tyre and wheel, suitable tape and valve, and compliance with both tyre and rim maximum pressures. It explicitly says to obey the lower limit when they differ. Other brands may specify different combinations, mounting methods, and pressure limits.
Inspect the tyre bead and casing
Remove the tyre only as its maker allows. Clean enough sealant to see the structure, then inspect the full circumference of both beads under strong light.
Retire the tyre or obtain manufacturer assessment if you find:
- a cut, kink, stretch, flat spot, or exposed bead cord;
- local polishing or deformation where the bead climbed;
- a casing separation, bulge, or torn sidewall;
- a repair outside the tyre maker’s permitted area or method;
- damage from a lever or tool;
- an unreadable model or tubeless marking that prevents compatibility checks.
A bead can be structurally damaged without looking dramatic in a photograph. Do not ride a tyre whose bead has already escaped the rim unless the tyre and wheel manufacturers explicitly clear the parts after inspection.
Inspect the rim, hook, bed, and tape
Clean the rim without scratching it. Check the full circumference for:
- cracks, dents, spreading seams, or a deformed sidewall;
- a chipped or uneven bead hook on hooked rims;
- damage to the bead-retention shelf;
- tape that has moved, split, wrinkled, lifted, or exposed a spoke hole;
- tape too narrow to cover the bed securely or so wide that it interferes with the bead seat;
- a valve hole, valve base, or rim edge that has cut the tape;
- sealant or pressure where the rim maker says it must not enter.
Air escaping at a rim seam does not automatically mean the seam is the original leak. Air can enter a rim cavity through failed tape and emerge elsewhere. Do not seal an external seam before determining how pressure reached it.
Carbon and aluminium damage are assessed differently. Ask the wheel maker what photographs, measurements, and inspection it requires. A shop cannot safely “true out” every damaged rim.
Check width and pressure compatibility
The pressure printed on a tyre is not necessarily safe for every compatible-looking rim. The rim may have a lower limit, and hookless systems add strict tyre type, width, and pressure requirements.
Schwalbe’s hookless guidance, for example, requires an ISO/ETRTO-compliant hookless rim, a compatible TLE/TLR tyre, compliance with the wheel maker’s permitted tyre widths, and the lower applicable pressure limit. Treat that as guidance for Schwalbe combinations; use the documents for your exact brands.
Verify:
- The nominal tyre width is allowed on the actual internal rim width.
- The exact tyre model is approved for the rim type.
- A hookless rim uses a tyre explicitly approved for hookless use.
- The cold pressure was below both published maximums.
- The gauge is trustworthy and the pressure was not confused between bar and psi.
- Any seating pressure limit was followed during installation.
Do not use maximum sidewall pressure as a target. Our beginner tyre-pressure guide explains how load, tyre size, and surface change a sensible operating pressure.
Do not blame sealant mixing without evidence
Old and new sealants can react poorly, form clumps, or fail to seal, so follow both product makers’ cleaning and compatibility instructions. But sealant normally does not provide the mechanical retention that keeps a correctly matched bead on a rim.
If a bead unseated, investigate dimensions, pressure, damage, seating, and compatibility even when the sealant looks unusual. Replacing sealant alone does not clear the wheel.
When a rebuild is reasonable
A rebuild is reasonable only after the cause is understood, every structural part passes inspection, and the tyre/rim makers confirm the combination and method. Use new correctly sized tape and valve parts when required. Follow the exact mounting sequence, pressure limits, and sealant quantity.
After seating, check that the moulded witness line is even around both sides. Do not exceed the permitted pressure to force a reluctant bead into place. Keep your face and body out of the bead’s path during inflation, and release pressure immediately if the witness line becomes uneven or the bead begins to climb.
When the cause remains uncertain, replace the suspect tyre and have the wheel assessed. The cost of preserving a questionable part is not worth another uncontrolled release.
If this process feels disproportionate to your needs, a compatible tube system may be the lower-maintenance choice. Compare the tradeoffs in tubes vs TPU vs tubeless.
Your next step
Leave the wheel deflated. Photograph the bead, rim walls, bed, tape, valve, and all model markings, then send the complete setup and pressure history to both manufacturers or take it to a qualified tubeless workshop. Rebuild only after the failure mechanism and compatible limits are clear.
Sources and further reading
- Schwalbe: tubeless requirements, mounting sequence, and pressure limits
- Schwalbe: road tyre and wheel compatibility testing
- Schwalbe: hookless rim compatibility and pressure requirements
- r/bikewrench discussion: tubeless wheel released pressure suddenly — used as an editorial diagnostic signal; proposed causes in the thread were not treated as verified facts.