Tubeless sealant leaking from spoke holes? Stop and inspect the rim tape
Trace tubeless sealant or air at spoke nipples and valve holes, distinguish a tyre leak from a rim-cavity leak, and repair the system safely.
 Field guide / tubeless-sealant-leaking-spoke-holes
Before you buy
Check the starter kit first
Print the one-page buying brief for helmet, lights, water, phone, and repair compatibility before comparing upgrades.
Tubeless sealant coming from a spoke hole is usually not the sealant doing its normal puncture job. It means air or liquid has passed beneath the rim tape or around the valve into the wheel’s internal cavity, then found an exit at a spoke nipple, rim joint, or valve opening.
The short answer: stop pumping. Deflate the tyre, remove it in a controlled workspace, and inspect the entire tape and valve seal. Replace damaged, lifted, wrinkled, narrow, or heavily indented tape using the wheel maker’s specified tape and procedure. Do not try to make sealant plug a leak inside the rim cavity.
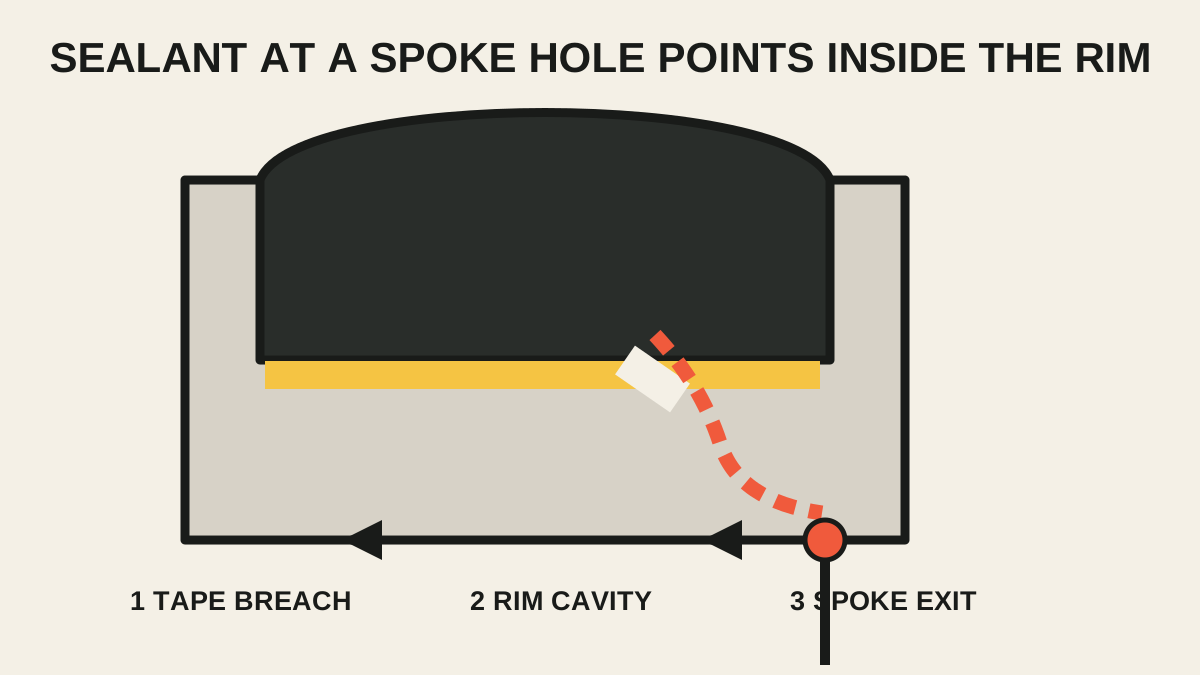
Why the leak appears far from the fault
A current repair question described sealant stains appearing at spoke holes and around the valve. The repeated answer—inspect the tape—matches wheel-manufacturer guidance, but the reason matters.
Tubeless tape seals the spoke access holes and separates the tyre’s pressurised air chamber from the hollow rim cavity. If air gets under that tape, it can travel inside the rim before escaping somewhere else. The nipple that bubbles may be nowhere near the original breach.
Zipp notes that old or damaged tape may reveal itself through sealant at spoke nipples or hissing where spokes meet the rim. ENVE warns that a compromised tape seal can pressurise a rim cavity and says to stop if air or sealant emerges at the valve-stem hole.
Separate a tyre-chamber leak from a rim-cavity leak
Usually a tyre-chamber leak
- sealant bubbles at a tread puncture;
- a wet line appears where the tyre bead meets the rim;
- air escapes through the valve core itself;
- the casing looks porous and sweats small droplets.
These faults remain on the tyre side of the tape. They still require diagnosis, but they do not automatically show that the rim cavity is pressurised.
Treat as a rim-cavity warning
- sealant at spoke nipples or spoke holes;
- hissing where a spoke enters the rim;
- air or sealant emerging around the outside of the valve hole;
- leakage at a rim joint away from the tyre bead;
- repeated unexplained pressure loss after the tyre and bead appear sealed.
Deflate rather than repeatedly topping up. A successful inflation is not proof that the hidden path is safe.
The safe inspection sequence
1. Record the wheel and tyre
Find the full wheel or rim model, tyre model and size, current tape width, valve type, and maximum pressure. Download the current wheel instructions. Some systems specify proprietary tape, valves, pressure-relief hardware, tape layers, or installation direction.
2. Deflate and contain the sealant
Move the valve near the top so liquid settles away from it. Deflate fully, remove the valve core if the maker’s procedure calls for it, and open the tyre over a tray or absorbent work surface. Wear eye protection and gloves recommended by the sealant maker.
Do not use sharp tools against the rim bed. Tyre levers can damage tape, and carbon rims may have tool restrictions.
3. Inspect the complete tape path
Look for:
- a cut from a tyre lever;
- wrinkles, bubbles, or channels;
- lifted edges or failed adhesive;
- tape too narrow to cover the rim bed securely;
- a poorly pierced or enlarged valve hole;
- deep indentations at spoke holes;
- an inadequate overlap;
- sealant beneath the tape;
- cracks, corrosion, or damage in the rim itself.
If sealant is under the tape, do not stick the loose section back down and hope. Remove the compromised tape and inspect beneath it.
4. Inspect the valve separately
Remove and clean the valve. Check its rubber or shaped base, retaining nut, valve-core seal, and the rim contact area. A valve that is overtightened, crooked, damaged, or mismatched to the rim profile may leak.
Finger-tight is a common manufacturer instruction, but use the procedure for your exact system. Pliers can damage a valve or mask a poor seal with excessive force.
5. Decide whether this is a tape job or a wheel inspection
Retape only when the rim is structurally sound and the manufacturer allows user replacement. Stop and use a qualified workshop or the wheel maker when you find a crack, delamination, corrosion, damaged spoke bed, distorted valve hole, unknown proprietary system, or repeated failure after correct installation.
What correct retaping needs
The precise procedure belongs to the wheel manual. In general, manufacturers require:
- Remove old tape and adhesive without scratching the rim.
- Clean and fully dry the rim bed with the approved product.
- Use the specified tape type, width, and number of layers.
- Apply firm, even tension so the tape conforms without wrinkles or trapped air.
- Cover every spoke hole and use the specified overlap position and length.
- Make a clean valve opening without creating a tear that can spread.
- Seat the correct valve against the rim profile.
- Install only an approved tyre and remain within both pressure limits.
- Test for air retention before adding the final sealant quantity when the maker recommends it.
Schwalbe says tape often fits when it is 2–4 mm wider than the rim’s internal width, but that is not a universal substitute for the wheel maker’s specification. Zipp, for example, publishes model-specific tape guidance.
Mistakes that do not fix the cause
- Adding more sealant: it may make a bigger mess inside the rim without restoring the tape barrier.
- Tightening the valve with pliers: force does not repair a breach elsewhere.
- Submerging and inflating repeatedly: useful leak detection becomes unsafe if a rim cavity is pressurising.
- Patching one visible tape bubble: hidden sealant or another channel may remain.
- Using general-purpose tape without approval: thickness, stretch, adhesive, heat resistance, and residue all matter.
- Riding because pressure loss is slow: a slow hidden leak still needs correction.
If the leak instead comes from a tread hole, use the road-tubeless puncture sequence. If the whole system feels too maintenance-heavy, compare tubes, TPU tubes, and tubeless rather than continuing with an unreliable setup.
Your next step
Stop inflating, photograph the leak locations, and find the exact wheel service document. Deflate and inspect the tape and valve at home—or hand the wheel to a competent tubeless workshop. After repair, perform a controlled pressure-retention and bead-seat check before returning to normal road speed.
Sources and further reading
- SRAM/Zipp: wheel care and signs of old or damaged tubeless tape
- SRAM/Zipp: tubeless tape installation service manual
- Schwalbe: tubeless tape, valve, leakage, and installation guidance
- ENVE: why air or sealant at the valve hole requires stopping and inspecting tape
- r/bikewrench reader context: sealant at spoke holes and valve area