How to switch from flat handlebars to drop bars without feeling out of control
Learn road-bike controls after flat bars with a three-session practice plan for mounting, braking, shifting, hand changes, turning, and emergency stops.
 Field guide / switch-from-flat-bars-to-drop-bars
Moving from a flat handlebar to a drop bar should be treated as learning a new control layout, not relearning how to balance a bicycle. Start on the brake hoods, learn which lever moves which brake and gear, then practise stopping and hand changes before adding traffic, speed, hills, or a group.
The short answer: use three short sessions. First, learn the controls while stationary. Second, start, stop, shift, and turn in an empty flat space. Third, repeat on a simple quiet loop. The drops come after reliable braking from the hoods—not before.
Why a familiar rider can still feel like a beginner
A recent road-cycling discussion included a rider asking how to move from a hybrid’s flat bar to a first drop-bar bike. The issue is recurring because several things change together:
- the hands sit farther forward and in line with the bike;
- brake and shift functions may share the same lever body;
- steering inputs feel different on a narrower bar;
- the rider can choose hoods, tops, or drops;
- braking access changes with hand position;
- toe overlap, steering angle, and body position may feel unfamiliar at low speed.
None of that means drop bars are inherently beyond a beginner. It means the first ride should be a lesson, not a commute or fitness test.
Session 1: map every control while stationary
Support the bike securely with both wheels on the ground. Use the component manual or ask the shop to demonstrate your exact controls.
- Put both hands on the rubber brake hoods with thumbs wrapped securely.
- Identify which lever operates the front brake and which operates the rear brake. Do not infer this from a different bike; regional setups can differ.
- Squeeze each brake separately while pushing the bike a few centimetres.
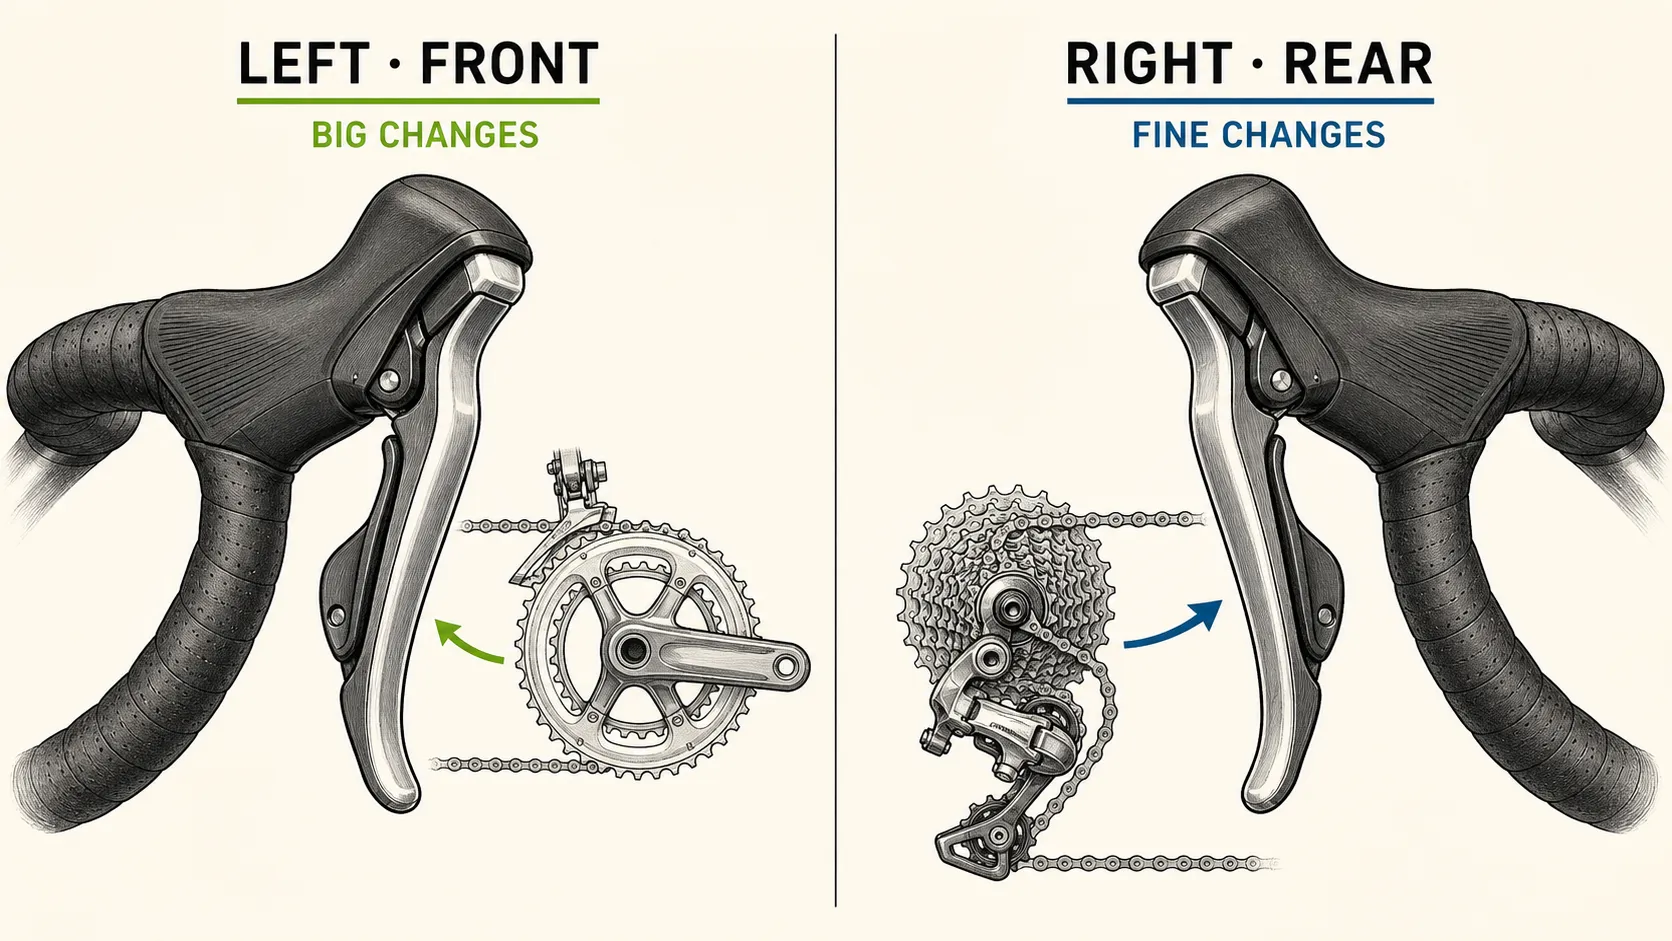
- Identify the controls that move the chain to an easier or harder rear sprocket.
- Identify the front-shift controls if the bike has more than one chainring.
- Confirm how an electronic system wakes, indicates battery state, and shifts.
- Check that your fingers can apply both brakes from the hoods without opening the hand to its limit.
Shimano’s road-control manuals tell riders to learn their bicycle’s braking characteristics and proper technique before use. Use the Shimano manual library by entering the model number printed on the lever; another rider’s lever may look similar but work differently.
If the lever is out of reach, pulls close to the bar, feels weak, or operates an unexpected wheel, do not take the bike onto the road. Reach adjustment may exist, but it is model-specific and does not repair a brake fault. Use the brake-lever safety guide to separate those problems.
Start on the hoods
The hoods are the normal beginner position because they combine steering, shifting, and immediate brake access. Keep shoulders relaxed, elbows softly bent, wrists close to neutral, and eyes up.
Do not begin on the tops merely because they feel more upright. Conventional drop-bar brakes cannot be reached from the tops. Do not force yourself into the drops because the bicycle is called a road bike. The drops are useful later for control and leverage, but only when lever reach and vision remain good.
Read the drop-bar hand-position guide for the role of each position. For this transition, the hoods are home base.
Session 2: an empty-space control circuit
Choose a large, dry, level, traffic-free area with clean pavement and no pedestrians crossing your line. Wear the same shoes and use the same pedals planned for the first ride. Flat pedals are entirely valid while the hand controls are new.
Start and stop ten times
Use a deliberately easy gear. Start with one foot on a pedal, look ahead, push away, place the second foot, then coast. Brake progressively with both brakes and put one foot down only when almost stopped.
Repeat until you no longer look down for the pedals or controls. If starting is unstable, make the gear easier and keep both hands on the hoods.
Shift one control at a time
On a long straight line, pedal lightly and make one rear shift. Notice the lever movement, sound, and resistance change. Repeat in both directions. Do not stare at the cassette.
Add front shifts only after rear shifts are automatic. Ease pedal pressure during the shift; do not force the chain under a standing effort. The road-bike gear guide explains the sequence without assuming a particular groupset.
Make wide turns
Look through the turn, keep both hands on the hoods, and use a broad radius. At walking speed, the front wheel turns more and toe overlap may occur on some bikes. Keep the inside pedal up and do not panic if the steering feels more active than the hybrid.
Practise a firm, straight stop
At a modest speed, move hips slightly back, keep the bike upright, and squeeze both brakes progressively. Release and repeat. Increase speed only when the stop is straight and predictable. Do not practise a maximum-effort stop on loose or wet ground.
Session 3: one quiet loop
Choose a short, familiar route with smooth surfaces, open sight lines, few junctions, no steep descent, and an easy way home. Ride it once without a speed or distance goal.
Use this order:
- Stay on the hoods for the first lap.
- Brake before each bend, not while surprised inside it.
- Shift to an easier gear before slowing or climbing.
- Look behind only on a straight, clear section—or stop to check.
- Return home while you still have attention and confidence in reserve.
On a second lap, try the drops for a few seconds on a clear straight section, then move one hand at a time back to the hoods. Leave the tops for a later calm ride, because they remove immediate brake access.
Separate unfamiliarity from bad fit
The position may feel unusual, but it should not make basic control precarious. Reassess the bike when:
- you cannot reach both brake levers securely from the hoods;
- shoulders remain locked and elbows straight even at easy pace;
- you slide forward into the hands;
- neck position prevents you seeing ahead;
- knees strike the bar or hands;
- hands become numb, painful, or weak;
- the drops are unreachable without losing steering control.
A shorter stem is not a universal answer, and rotating the handlebar can damage the relationship between the drops and controls. Start with beginner bike fit and comfort and use model-specific torque instructions before moving any part.
Delay these combinations
Learn one new demand at a time. Do not combine your first drop-bar sessions with:
- clipless-pedal learning;
- busy traffic or unfamiliar junctions;
- a fast group ride;
- eating or drinking while moving;
- steep climbing or descending;
- riding at night or in rain;
- recording video or checking navigation while moving.
The bicycle will still be there after three calm sessions. Rushing several skills together gives you less useful feedback about which one caused a wobble or missed stop.
Your next step
Find the model number on each shift/brake lever and map every control while stationary. Then schedule one 20-minute empty-space session whose only goals are ten starts, ten stops, and single rear shifts. Add a quiet-road loop only after those feel ordinary.