Stripped hydraulic-brake bleed-port threads: can you still ride?
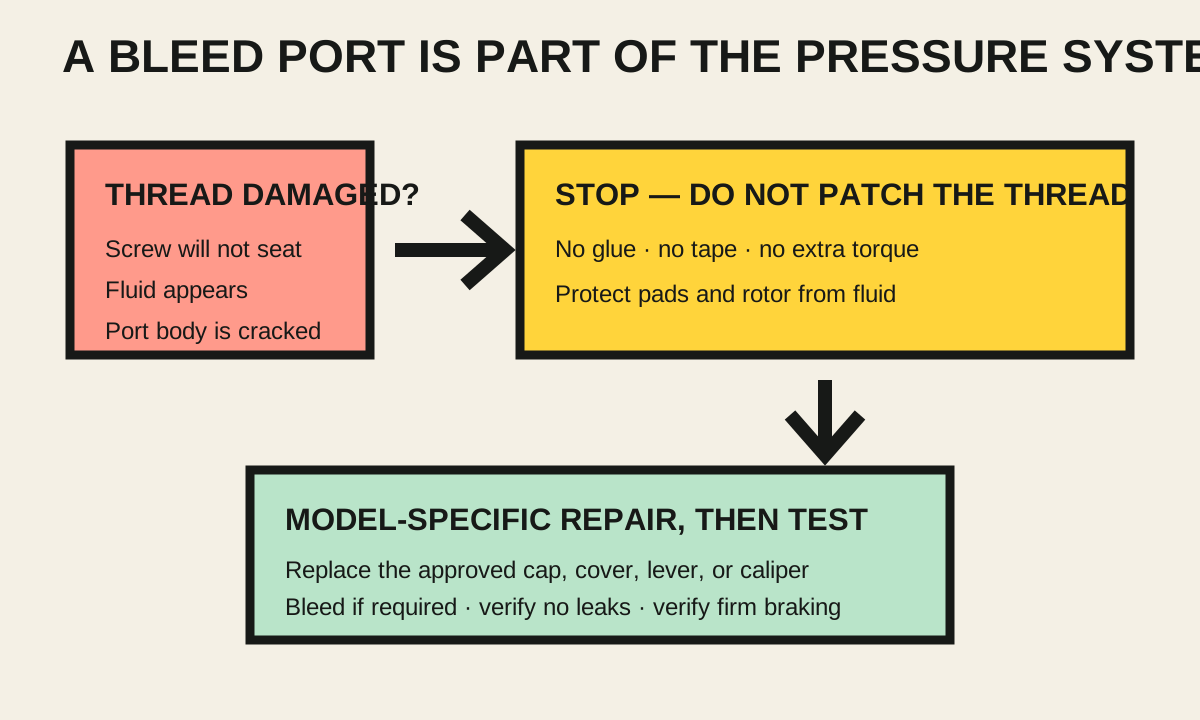
A bleed screw that will not tighten is not a tape-or-glue repair. Stop riding, identify the damaged lever or caliper port, and use the maker's approved replacement path.
 Field guide / stripped-hydraulic-brake-bleed-port-can-you-ride
Before you buy
Check the starter kit first
Print the one-page buying brief for helmet, lights, water, phone, and repair compatibility before comparing upgrades.
A hydraulic-brake bleed screw that will not seat securely means the brake has an unresolved pressure-system fault. Park the bike. Tape, glue, threadlocker, wire, or “just finger-tight” cannot restore known thread engagement, sealing, or the component maker’s approval.
The short answer: identify whether the damage is in a removable reservoir cover, the lever body, the caliper body, or only the screw. Then follow the exact model’s parts diagram and service manual. The approved repair may be a screw and O-ring, a cover, a complete lever, or a caliper. A qualified mechanic should bleed and pressure-check the repaired brake when the procedure requires it.
Why this is not an ordinary loose screw
A current r/bikewrench discussion asked whether a bicycle could be used while a lever bleed-port screw no longer held firmly. The replies included improvised thread repairs. That public thread identifies the reader question; it does not validate those suggestions.
The screw closes an opening used to service the hydraulic circuit. Its O-ring, seat, threads, and surrounding component are a system. If any part is damaged, braking pressure, fluid retention, and contamination control are uncertain. A closure that stays in place on the workstand has not proved it will seal through vibration, temperature change, repeated lever pressure, and a hard stop.
Stop before making the damage harder to diagnose
- Do not squeeze the lever repeatedly to “see if it holds.”
- Keep the bicycle upright and protect the floor.
- Prevent any fluid from reaching the pads, rotor, tyre, or painted surfaces.
- Photograph the port, screw, seal, lever or caliper model number, and any loose fragments.
- Put the screw and O-ring in a clean container without forcing them back in.
- Arrange transport rather than riding the bicycle to the shop.
If fluid reaches the braking surfaces, do not wipe the rotor and continue. Follow the brake maker’s contamination procedure. Many makers require contaminated pads to be replaced.
Identify what is actually stripped
The phrase “bleed valve” can refer to different parts. Record the exact model printed on the lever and caliper, then use the maker’s exploded view.
Lever reservoir port
Some levers use a small bleed screw and O-ring in the lever or a removable reservoir cover. If the female threads are in a replaceable cover, the maker may list that cover separately. Other lever bodies do not offer a field repair for damaged port threads.
Caliper bleed screw or nipple
The caliper closure can use a different tool, seal, and torque from the lever port. Do not transfer the lever’s instructions to the caliper. Damage to a caliper body may require caliper replacement.
Screw head versus female threads
A rounded tool socket is not the same fault as stripped female threads. A damaged screw may be replaceable while the port remains sound, but only inspection can establish that. Metal on the screw, missing thread crests, cracking, or a screw that turns without tightening points to more than a cosmetic problem.
Why extra torque is especially risky
Bleed closures often have much lower torque specifications than the larger bolts around them. In one official Shimano dealer manual covering BL-M4100, the final lever bleed screw specification is 0.5–1 N·m. The caliper bleed screw in the same brake family uses a different procedure and specification. Those numbers are examples for named components, not universal values.
Use the exact manual, the specified tool, and a torque tool capable of working accurately at that low range. A large workshop torque wrench may not be suitable near the bottom of its scale; check the torque-wrench guide before relying on one.
Do not use these improvised “repairs”
- PTFE or plumbing tape: the port was not designed as a tapered plumbing joint, and loose material can enter the system.
- Threadlocker or glue: neither recreates missing parent material or a specified sealing surface. It can obstruct the bleed path and complicate replacement.
- Copper wire or foil in the threads: this changes engagement unpredictably and can shed material.
- A longer random screw: it may bottom internally, damage the reservoir, use the wrong head or seal, or block a passage.
- Overtightening what remains: this can remove the last intact threads or crack the component.
An engineering thread repair is only relevant if the brake manufacturer supplies or approves that process for the exact part. Do not assume a general-purpose insert is safe in a thin hydraulic component.
What a complete repair looks like
A proper handoff includes:
- exact lever and caliper model numbers;
- confirmation of which component and threads are damaged;
- approved replacement part numbers;
- the correct fluid and uncontaminated service equipment;
- replacement of contaminated pads when the maker requires it;
- a bleed if opening or replacing the component introduces air;
- a static leak and lever-firmness check;
- correct wheel, pad, caliper, and rotor installation;
- a controlled low-speed brake test away from traffic.
Do not mix mineral-oil and DOT-fluid tools or fluids. If you are unsure what the brake uses, stop at model identification and let a qualified mechanic take over. Our one-bleed-kit guide explains why the fluid paths must stay separate.
Prevent a repeat
Clean the tool socket before inserting the bit, seat the correct bit fully, replace a damaged O-ring with the specified part, and tighten only to the model-specific value. Stop if the screw does not begin by hand as the manual expects. “Snug” is not a useful substitute for a very small published torque.
Your next step
Photograph both model numbers and the damaged port, download the matching dealer manual and exploded view, and ask the shop to confirm the replaceable unit before ordering anything. Keep the bicycle parked until that unit is repaired, the hydraulic system is serviced as required, and the brake passes a controlled function test.
Sources and further reading
- Shimano hydraulic-disc-brake dealer manual for BR-M6100, BR-M6120, BL-M6100, BR-MT410, and BL-M4100
- Reddit demand signal: stripped lever bleed-port threads — used to identify the question, not to source repair advice.