Which way do quick-release skewer springs face?
Install bicycle quick-release centering springs with the narrow ends toward the hub, then secure and verify the wheel without mistaking the springs for the clamp.
 Field guide / quick-release-skewer-spring-direction
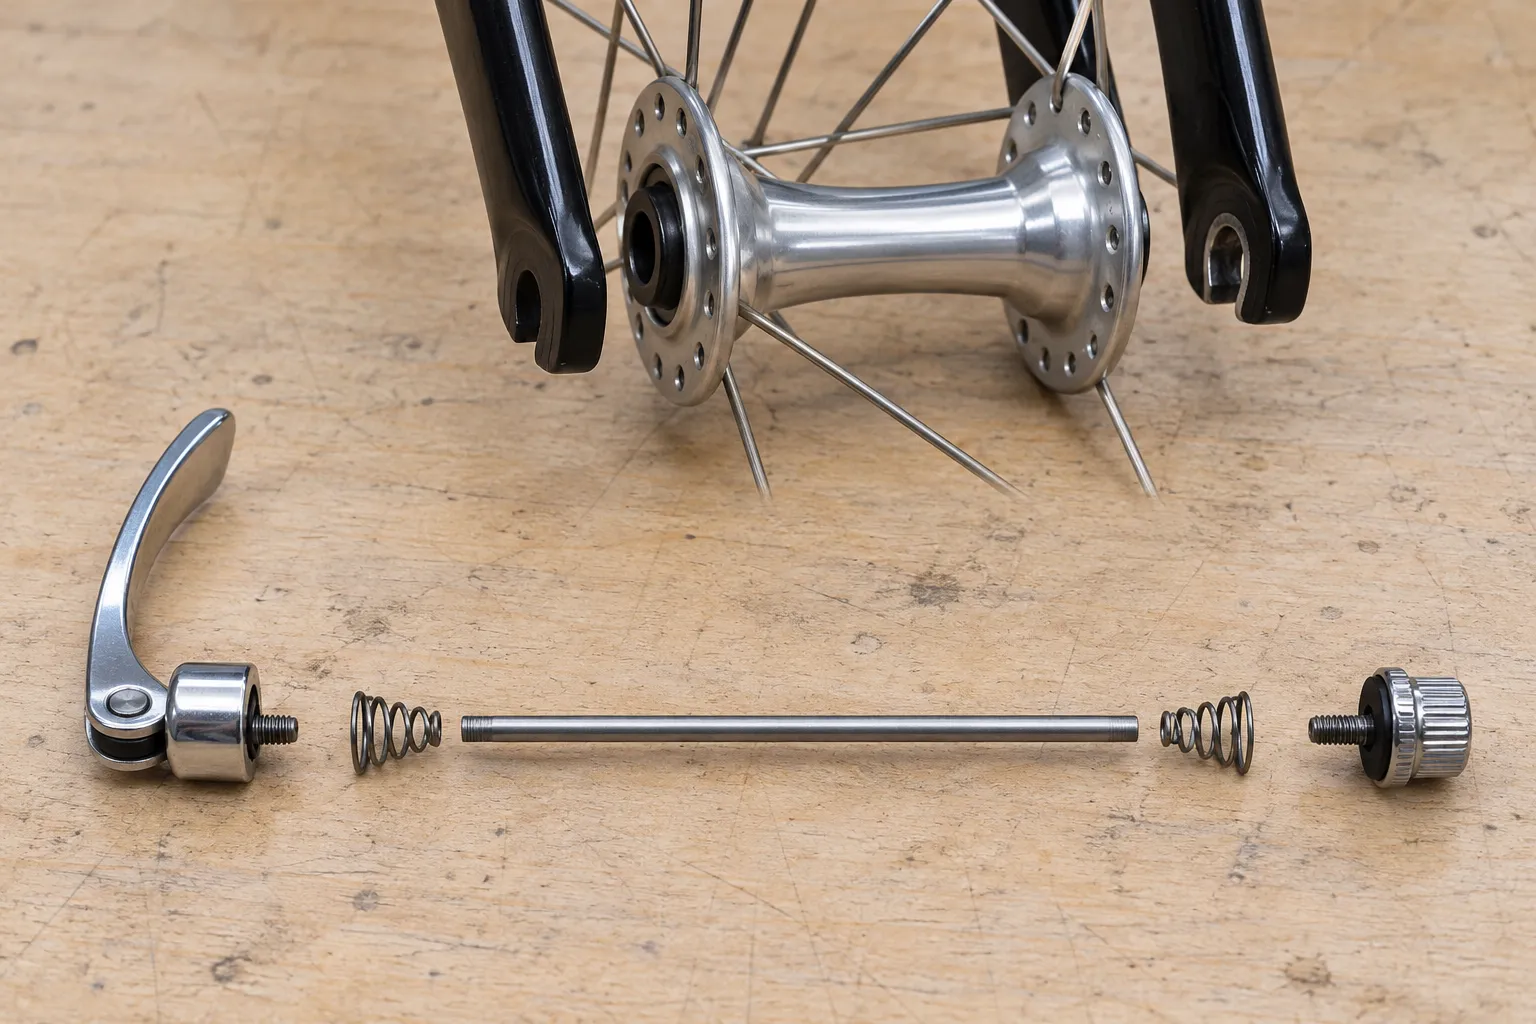
On a traditional bicycle quick-release skewer, the narrow end of each conical spring faces inward toward the hub. The wide end faces outward toward the lever or adjustment nut. The springs centre the skewer while the wheel is removed; they do not create the clamping force that holds the wheel in the frame.
The short answer:
lever — wide end / narrow end — hub — narrow end / wide end — nut. If a spring is backwards, trapped, crushed, or missing, stop and reinstall the system according to the hub and bicycle instructions before riding.
Why the spring direction matters
Repair discussions show the same assembly mistake in different forms: a backwards spring became mangled and trapped while a rear wheel was being removed and another rider reported a spring interfering with wheel seating while the tyre rubbed the frame. These anecdotes cannot inspect another bicycle, but they expose a recurring confusion.
The narrow spring end nests around the small axle end. The wide end rests against the lever body or adjustment nut. Reversed, the wide coil may sit against or enter the dropout incorrectly, prevent full axle seating, deform when clamped, or make wheel installation feel inexplicably tight.
The spring is a convenience part. The cam lever, adjustment nut, skewer, hub axle ends, and dropouts form the retention system. Correct spring direction does not rescue an incorrectly adjusted quick release.
Confirm you actually have a quick release
A quick-release skewer is a thin rod that passes through a hollow hub axle. It normally has a cam lever on one end and an adjustment nut on the other. The wheel axle rests in open dropouts.
A thru-axle is much thicker, passes through closed frame or fork holes, and threads into the frame, fork, or a captive nut. It does not use the two small conical skewer springs described here.
Do not call every removable wheel rod a thru-axle. The installation and tightening methods are different. If yours is a thru-axle, use the road-bike thru-axle guide and the exact bicycle manual.
Reassemble the skewer in the correct order
With the wheel removed and supported:
- Open the lever and remove the adjustment nut.
- Remove both springs and inspect them for bending, flattening, rust, or sharp damage.
- Wipe the skewer and inspect the rod, cam, threads, and nut.
- Slide the skewer through the hollow hub axle.
- Install one spring on each side with each narrow end toward the hub.
- Thread the adjustment nut on far enough that it cannot fall off, but leave room to install the wheel.
If a spring was crushed inside a dropout, inspect the dropout, axle end, and skewer. Do not straighten a badly deformed spring and call the job finished; obtain the correct replacement.
Seat and clamp the wheel—not the spring
Follow the bicycle and hub instructions. For many open-dropout bikes, the wheel is easiest to seat with the bicycle upright on the ground so the axle can settle fully into both dropouts.
Hold the lever fully open, turn the adjustment nut to establish the correct clamping tension, then close the lever through its cam action. The lever is not a wing nut: spinning it around and around does not prove that the cam has clamped correctly. Shimano’s quick-release manual warns that incorrect installation can allow the wheel to detach and tells riders to check wheel installation before riding.
The final lever position must not interfere with the frame, fork, brake, rotor, or spokes, and it must not be easy to snag. Exact closing force and position belong to the component instructions. If the lever closes with almost no resistance or cannot close fully, open it and adjust the nut—never use a tool or lever extension to force it.
Run a wheel-security check
Before riding:
- confirm both axle ends are fully seated in the dropouts;
- confirm neither spring is visible between an axle end and dropout face;
- confirm the lever is fully closed and the nut is engaged correctly;
- lift the bike slightly and strike the top of the tyre with the palm to check that the wheel remains seated;
- spin the wheel and check tyre clearance, rim-brake alignment, or disc-rotor clearance;
- squeeze the brake and rock the bike gently to detect obvious looseness.
If the wheel sits off-centre, do not immediately adjust spokes, brakes, or frame alignment. Reopen, inspect, and seat the wheel again. Our off-centre wheel diagnosis separates installation from dish and frame problems.
Can you ride without the springs?
Some traditional skewers can clamp without the centering springs because the springs are not the retaining force. That mechanical fact is not permission to discard parts from an unknown system. Replace missing or damaged springs with the correct parts and follow the maker’s complete assembly.
If a roadside repair leaves uncertainty about the skewer, axle, or dropout, do not ride the bicycle. Wheel retention is not a suitable trial-and-error check under body weight.
Your next step
Open the quick release, verify that both narrow spring ends point toward the hub, then reinstall and check the wheel using the exact manual. If a reversed spring has been crushed or the wheel still will not seat centrally, stop and have the hub, skewer, and dropouts inspected together.