What to pack in a multi-day road-bike repair kit
Build a repair kit around your exact bike, route, skills, and bailout options, with puncture supplies, a tested pump, chain repair, and only justified trip spares.
 Field guide / multi-day-road-bike-repair-kit
Before you buy
Check the starter kit first
Print the one-page buying brief for helmet, lights, water, phone, and repair compatibility before comparing upgrades.
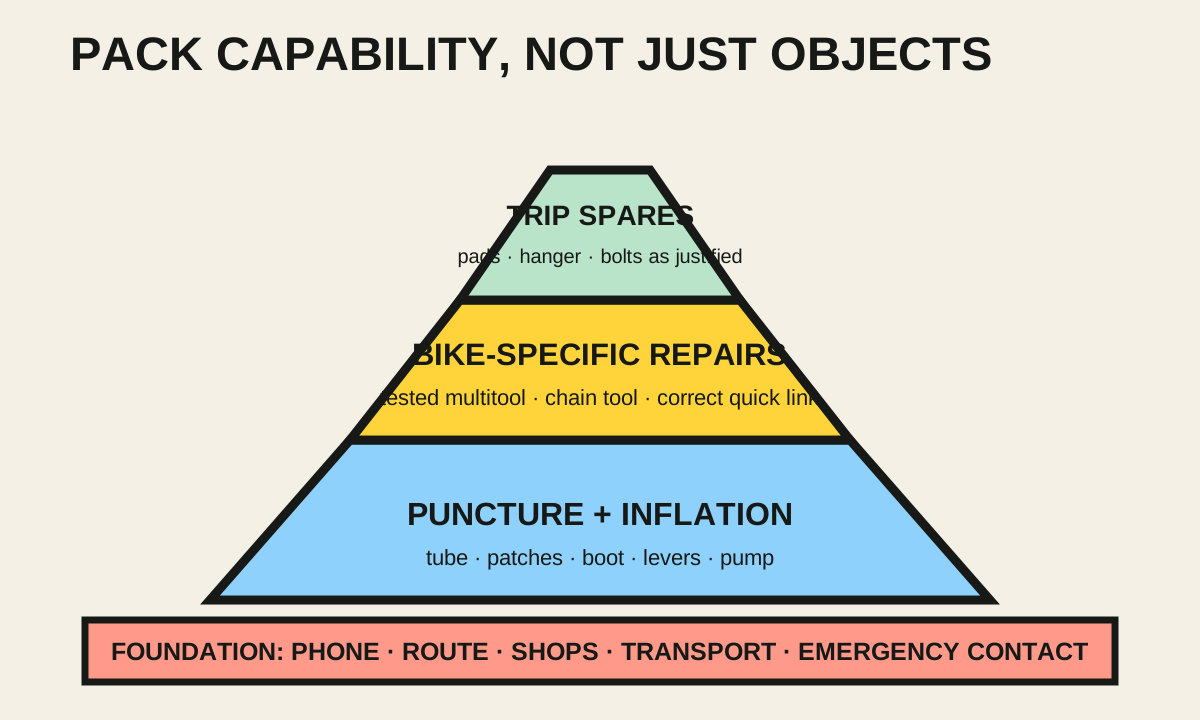
Pack a multi-day repair kit for the failures you can recognise and fix on your exact bicycle—not for every repair a workshop can perform. Start with puncture and inflation capability, add a tested bike-specific multitool and chain repair, then add trip spares only when the route, component availability, and consequence justify them.
The short answer: carry a reliable pump, tyre levers if your tyres need them, a compatible spare tube even for tubeless, patches, a tyre boot, the correct tubeless plugs if applicable, a multitool that fits your bike, a working chain tool, and the correct quick link. Pair the kit with a charged phone, offline route, shop and transport plan, and the skill to use each item.
Start with the trip, not a shopping list
A current Reddit question about tools for a first three-day cycling trip and a high-engagement bikepacking tool-kit discussion show the same tension: some riders carry a workshop, while others assume a phone solves everything. Neither answer transfers automatically.
Write down:
- distance between towns, shops, rail stations, and accommodation;
- mobile coverage and whether the route is remote;
- solo, paired, group, or supported riding;
- tube, tubeless, or mixed tyre systems;
- rim or disc brakes and the exact pad type;
- mechanical or electronic shifting;
- proprietary parts such as derailleur hanger, seatpost hardware, thru-axle, or integrated cockpit;
- forecast and road surface;
- what repairs you have practised.
A three-day hotel route through populated areas needs less self-rescue equipment than one day across a remote plateau. Duration matters less than distance from help.
Layer 1: repair the tyre and restore pressure
Punctures are the most realistic roadside repair for many road riders. Build one complete system.
For tubed tyres
Carry:
- at least one tube in the correct wheel diameter and a workable width range;
- the correct valve type and enough valve length for the rim depth;
- tyre levers if the tyre cannot be removed safely by hand;
- a patch kit with fresh adhesive or compatible self-adhesive patches;
- a tyre boot for a casing cut;
- a pump proven to reach a rideable pressure on that tyre.
A second tube is sensible when the route is remote, roads are rough, or two bikes use compatible sizes. Patches extend the kit after the spare is used.
For tubeless tyres
Carry:
- the maker-compatible plug tool and plugs;
- a spare tube as the fallback;
- a valve-core tool if your valve requires one;
- a tyre boot for a larger casing cut;
- tyre levers only if compatible with the rim and tyre;
- a reliable pump;
- optional small sealant quantity when the route and system justify it.
Test whether you can remove the tubeless valve enough to install the tube. A beautiful emergency tube is useless if the valve nut is seized or the tyre cannot be unseated. Use the roadside puncture practice guide before departure.
Pump first, CO₂ second
CO₂ is fast but finite. A pump allows repeated seating, pressure adjustment, and a second repair. If you carry CO₂, treat it as an addition to—not an untested replacement for—the pump on a self-supported multi-day trip.
Inflate the actual tyre at home from flat. Confirm the pump head does not unscrew a removable Presta valve core and that the barrel does not overheat before useful pressure.
Layer 2: make the multitool fit your bicycle
List every fastener you would realistically adjust on the road:
- wheel axle or quick release;
- stem and handlebar faceplate;
- seatpost and saddle clamp;
- bottle cages and luggage mounts;
- derailleur mounting and cable pinch bolt;
- brake caliper position where user service is appropriate;
- pedal hex only if pedal removal is part of transport.
Test the multitool on each one. The right bit may still be too short for a recessed bolt, too wide beside a saddle rail, or impossible to turn with the luggage fitted. Our multitool test procedure catches those failures before the roadside.
Do not carry a pocket torque tool as permission to loosen safety-critical carbon hardware casually. Record the exact manufacturer torque specifications and use the correct procedure. If a part moved after correct assembly, identify the cause rather than repeatedly tightening it.
Layer 3: repair one broken chain
Carry:
- a chain tool that works with the chain width;
- the exact compatible quick link;
- compact quick-link pliers if your link cannot be managed reliably without them;
- a small clean bag for damaged or greasy parts.
Practise removing a damaged outer-link pair from an old chain and installing the link according to its manufacturer. Direction, speed compatibility, reuse rules, and required pliers vary. Shimano’s current dealer manual, for example, specifies its QUICK-LINK procedure and warns against cutting at a previously joined location; SRAM publishes separate PowerLock instructions.
A shortened chain may not safely use every gear. Avoid the large chainring and largest rear sprocket combination, pedal gently, and go directly to a repair point. If the derailleur, hanger, wheel, or frame is damaged, a chain link alone is not a complete repair.
Layer 4: add only justified spares
Useful candidates include:
- a model-specific derailleur hanger on remote routes;
- one set of correct brake pads for a long, wet, mountainous trip;
- spare luggage-rack bolts that match the fitted hardware;
- a valve core and cap;
- a short length of strong tape wrapped around a clean card;
- a few small cable ties;
- electronic-shifting charger or spare battery when range demands it;
- one spare cleat bolt if your shoe system is known to use a removable standard bolt.
Each spare needs a reason and an installation method. A derailleur hanger without the tool for the axle and hanger fastener is dead weight. Brake pads without a pad spacer, piston procedure, and safe bedding plan may not solve a hydraulic problem.
Do not pack random bolts that can be mistaken for a safety-critical fastener. Label the spares by location.
What usually belongs in the bailout plan instead
Some jobs are poor roadside candidates:
- suspected frame, fork, handlebar, or wheel cracks;
- hydraulic hose or fluid failure;
- a badly bent or cracked rim;
- damaged tyre bead;
- stripped crank or pedal threads;
- internal cable or brake-hose replacement;
- bearing or freehub failure requiring special tools;
- electronic faults not solved by charging or a documented reset.
Prepare the alternative:
- offline map with bike shops and stations saved;
- accommodation phone numbers;
- local taxi or transfer options that accept bicycles;
- insurer or event-support details;
- emergency contact and medical information;
- payment method and identification;
- a route-sharing plan that respects your privacy.
Tools reduce inconvenience. They do not remove the need to stop when the bicycle is unsafe.
Split group equipment deliberately
Two riders can share a pump, chain tool, selected tools, and some spares only when their bikes are compatible and they will remain together. Each rider should still have the means to handle separation: phone, identification, route, emergency details, and at least a basic inflation or puncture plan appropriate to the trip.
Do not assume one quick link fits both chains, one tube fits deep and shallow rims, or one brake pad fits two calipers. Write the compatibility beside each shared item.
Pack and test the finished kit
Do one complete rehearsal:
- install the spare tube or plug a practice tyre;
- inflate it with the travel pump;
- use every intended multitool bit;
- operate the chain tool and identify the quick-link direction;
- confirm the bag does not rub the tyre or obstruct lights;
- ride rough ground and recheck the mounts;
- weigh the kit only after it works;
- replace used patches, cartridges, links, and sealant immediately.
Keep sharp tools away from the spare tube. Put the tube in a small protective bag with a little air so it does not crease tightly against metal. Store clean brake pads away from lubricant and sealant.
Your next step
Print or write the bike’s fastener, tube, valve, chain, quick-link, brake-pad, axle, and hanger specifications. Lay out the proposed kit and remove every item you cannot match to a repair you have practised. Then add the missing bailout details before adding another tool.
Sources and further reading
- Shimano dealer manual: chain and QUICK-LINK procedures
- SRAM road cassette and chain user manual
- r/cycling demand signal: tools for a first multi-day trip
- r/bikepacking demand signal: varied real-world repair kits
Reddit examples were used to map recurring packing questions, not to validate compatibility or repair procedures.