What kind of bicycle chain joining link is this—and how do you remove it?
Distinguish a slotted quick link, joining rivet, and spring-clip master link before opening a bicycle chain, then check speed, direction, and reuse rules.
 Field guide / identify-remove-bike-chain-joining-link
Before you buy
Check the starter kit first
Print the one-page buying brief for helmet, lights, water, phone, and repair compatibility before comparing upgrades.
First look for elongated keyhole slots, a visible retaining clip, or a special joining rivet. Those clues separate the common connector families, but they do not tell you whether the part is reusable or compatible. Find the chain’s brand, model, and number of rear sprockets before opening it.
The short answer: a modern slotted quick link normally releases by bringing its two pins toward each other with the maker’s method, often using quick-link pliers. A joining rivet is driven with a compatible chain tool according to the chain maker’s instructions. An older spring-clip master link has a separate retaining clip. Do not pry at an unidentified plate with a screwdriver.
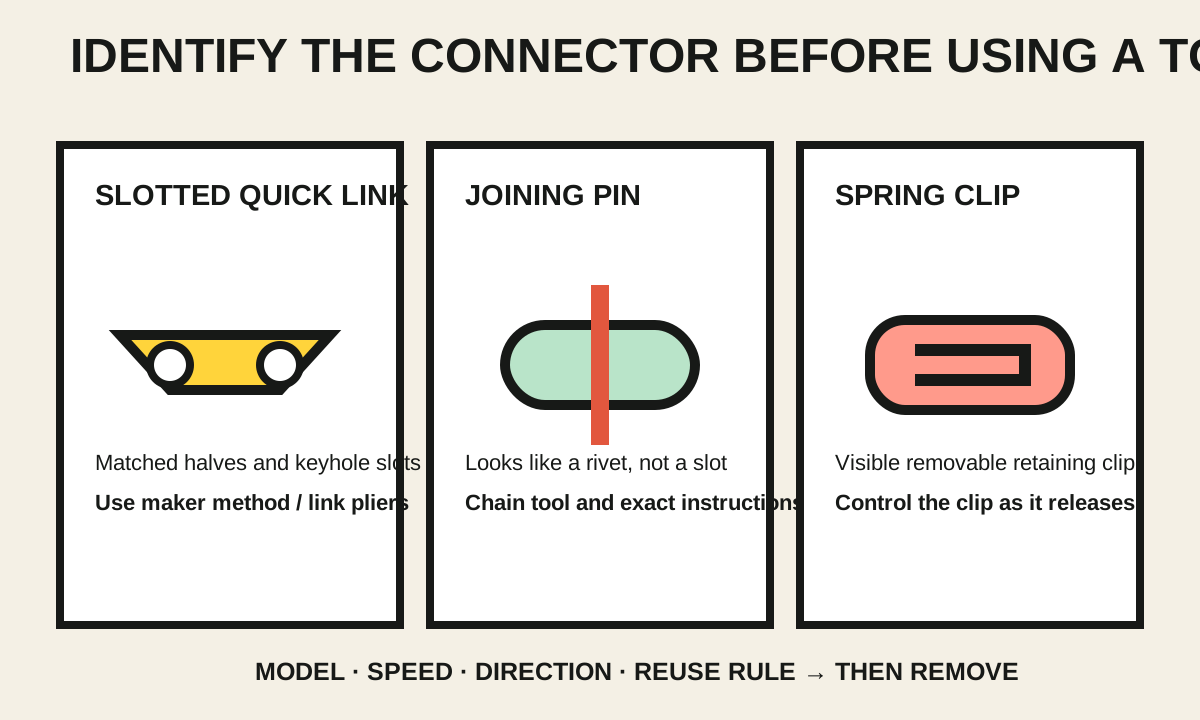
Why the connector can be surprisingly hard to recognise
A current r/bikewrench question asked what type of chain link was fitted and how to open it. Photos can reveal a distinctive plate, but a safe instruction still depends on the product.
Terms overlap. “Quick link,” “master link,” “connector link,” “power link,” and branded names can all describe removable-looking connectors. Some close and open several times; some are single use; some require a specific orientation; and some older connectors use an entirely different clip.
Clean one chain section and inspect both sides
Put the bicycle in a stable stand or turn the cranks carefully by hand. Wipe a short section at a time and look for a plate that differs from its neighbours.
Record:
- lettering or arrows on both outer plates;
- the chain brand and model markings;
- the number of rear cassette sprockets;
- whether one plate has keyhole-shaped slots;
- whether there is a separate spring clip;
- whether one rivet looks different or has a guide-pin remnant;
- any cracking, spreading, bent plates, or stiff movement.
Take a sharp, square-on photograph before moving anything. If no connector appears after one full chain revolution, the chain may use a joining pin, or the connector may simply be hidden under dirt.
Type 1: slotted two-piece quick link
The two outer plates usually mirror each other. Each pin sits in a slot that locks when chain tension pulls the pins apart. Link pliers squeeze the rollers or pins toward each other so the plates can disengage.
Before removal, check:
- whether the link is reusable or single use;
- whether it is directional;
- which chain speeds and models it supports;
- whether the maker requires dedicated opening or closing pliers;
- whether a replacement must be fitted after opening.
KMC’s official instructions, for example, show a connector tool pressing the link until the pins disengage. KMC separately states that some MissingLinks are non-reusable while designated reusable versions have their own reuse limit. Those rules apply to the named KMC parts, not to every quick link.
If the link will not release with the correct, fully seated tool, remove chain tension and clean it again. Do not twist the chain sideways or wedge a screwdriver between plates.
Type 2: special joining pin
A joining pin can make the chain look nearly continuous. Depending on the system, one rivet may have a different surface, outline, or break-off guide section. Removal generally uses a chain tool to drive a rivet, but the chain maker decides which rivet can be driven and how the chain may be reconnected.
Do not push an ordinary factory rivet partly out and push it back in unless the maker explicitly permits that procedure. Modern narrow chains can be damaged at the plate interface even when the result looks aligned.
If you need to remove a chain that has no quick link, follow the no-quick-link removal guide and have the specified replacement connector ready before starting.
Type 3: spring-clip master link
Some wider, single-speed, hub-gear, BMX, and older chains use a master link with two pins, a removable outer plate, and a spring clip. The closed end of the clip is commonly oriented with chain travel according to the maker’s instructions so an obstacle is less likely to catch the open end.
Control the clip as it releases; it can spring away. Use the specified pliers or a controlled method from the chain manufacturer. Inspect the clip, pins, and plate, and replace any distorted part. Never substitute a generic clip that merely appears to fit.
Do not identify compatibility by colour or width alone
Two links can look almost identical while differing in pin diameter, plate shaping, width, speed designation, or locking feature. Match the connector to the chain maker’s compatibility table, not only “11-speed” or “silver.” Mixed-brand use requires explicit compatibility support from the involved makers.
Also check direction. The chain itself, the quick link, both, or neither may be directional. Read the chain-direction guide before installation.
Open the link without losing the chain path
Before separating the chain:
- Photograph its route through both derailleur pulleys and around the cage tab.
- Shift to positions that reduce chain tension where the drivetrain design permits.
- Use a chain holder or a bent spare spoke to hold the two ends together.
- Keep fingers away from loaded derailleur movement.
- Open the identified connector with the specified tool.
- Catch all connector pieces and keep them labelled.
The routing photograph matters. A chain passed on the wrong side of the rear-derailleur cage tab can still join and shift while making noise and damaging parts. Compare your result with the derailleur routing guide.
Reconnection is a separate safety check
Install a new connector when required. Confirm model, speed, orientation, full pin engagement, and the maker’s locking signal or procedure. Flex the joined area by hand; it should articulate like the neighbouring links without a gap, bent plate, or stiff spot.
Turn the cranks by hand through a complete chain revolution, then shift on a stand without applying full force. Stop if the link clicks, rides high, spreads, binds, or touches another component. The first road test should be controlled and should not begin with a standing sprint.
Your next step
Clean and photograph both faces of the unusual link, then copy every marking on the chain and count the rear sprockets. Download the connector instructions for that exact product before buying pliers or opening the chain.
Sources and further reading
- KMC MissingLink connector and remover instructions
- KMC MissingLink connection, reuse, and compatibility notes
- Reddit demand signal: identifying and opening an unfamiliar chain connector — used to identify the question, not as the service instruction.