How to stop a road bike when you cannot touch the ground from the saddle
You do not need both feet flat while seated. Learn a calm brake, slide-forward, one-foot-down stop and check whether the bike still fits safely.
 Field guide / how-to-stop-road-bike-cannot-touch-ground
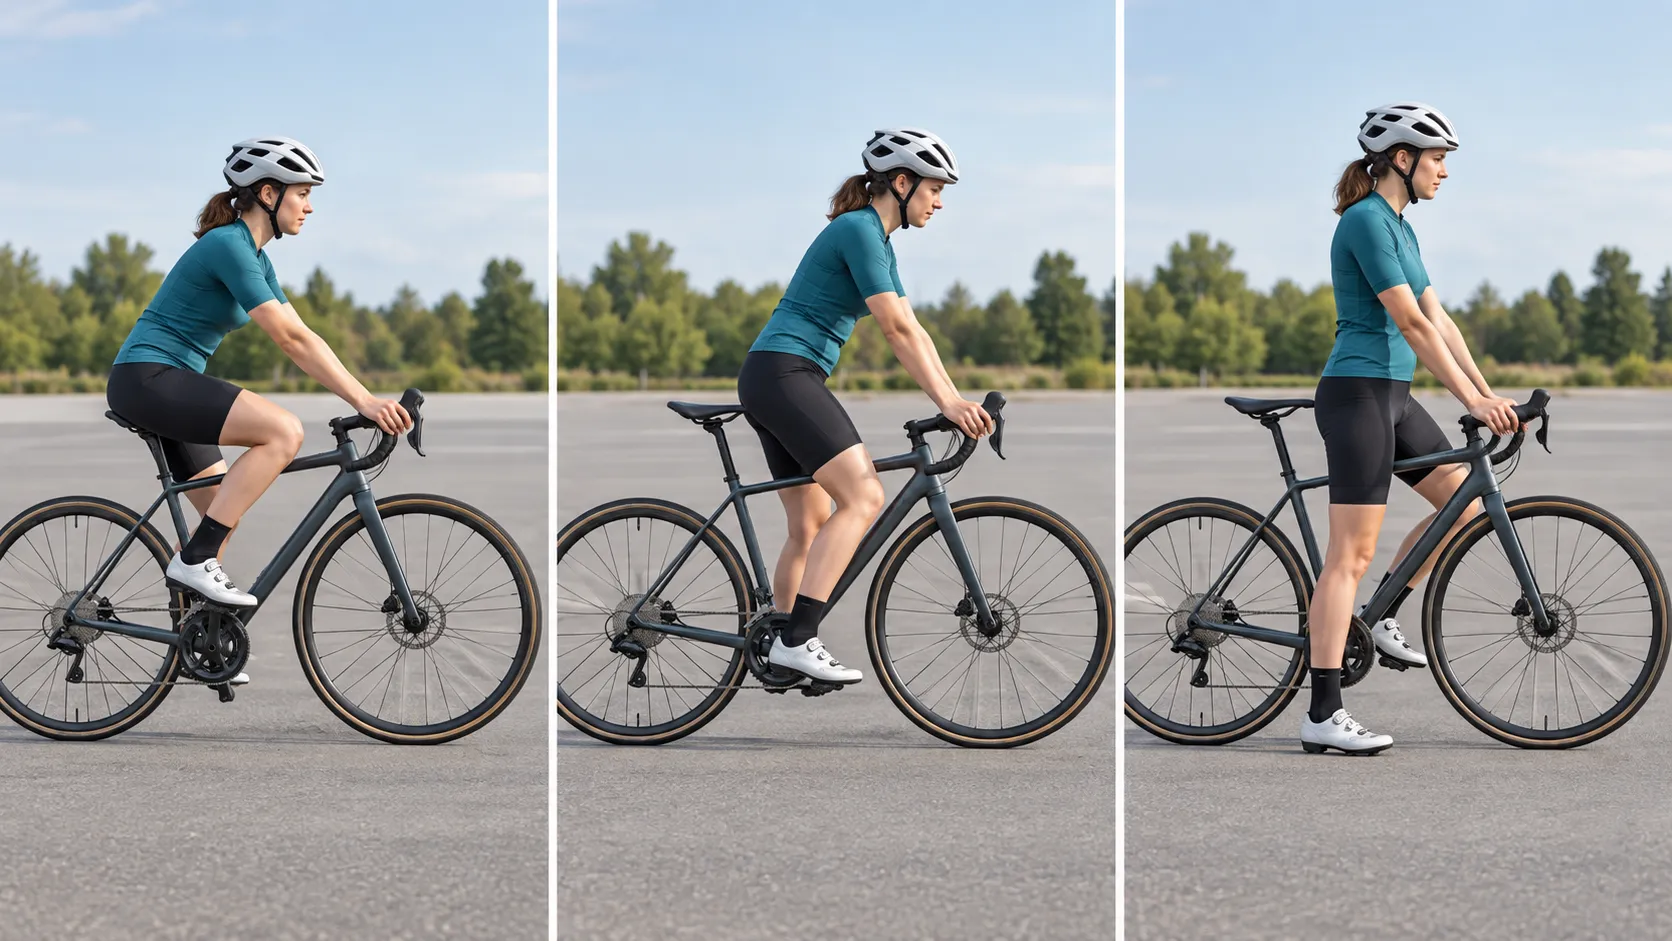
You usually will not put both feet flat on the ground while remaining seated on a correctly set-up road bike. As the bike stops, keep the brakes covered, slide forward off the saddle, stand over the frame, and place one foot down. The other foot can stay on a pedal ready for a controlled restart.
The short answer: reaching the ground from the saddle is not the fit test. Safe pedalling height and safe stopping are separate skills. Learn the off-saddle stop in a flat practice area, but check the frame size if you cannot stand over the bike, the saddle is already at its safe minimum, or the controls are out of reach.
Why beginners think the saddle is too high
A recent beginner discussion combined hills, tired legs, and worry about having to lean to one side to reach the ground. That is a recurring first-bike concern because childhood bikes are often set low enough to plant both feet while seated.
On a road bike, lowering the saddle until both feet are flat can leave the knees excessively bent while pedalling. It may make stopping feel familiar while making every kilometre less comfortable. The better solution is to separate the pedalling position from the stopping position.
Learn the basic one-foot stop
Start with flat pedals if clipless release is not yet automatic.
- Look where you want to finish. Choose a clear stopping mark on flat ground.
- Cover both brakes. Use a smooth, progressive squeeze. Keep the bike straight and avoid grabbing one lever suddenly.
- Choose the foot that will land. Either side can work; use the side that feels stable in the practice area.
- Move your weight forward as walking speed approaches. Rise slightly, slide off the front of the saddle, and let your hips move over the top tube.
- Place one foot flat enough for secure support. Keep the other foot on its pedal rather than searching for the ground with both legs.
- Hold the brakes while stationary. This prevents the bike rolling as you settle or prepare to restart.
Bikeability’s official training material similarly teaches riders to keep the brakes on while stationary and use one foot on the ground for balance. The exact side and restart sequence depend on local traffic direction, the road camber, obstacles, and the rider.
Restart without wobbling into danger
Before moving, select an easy but not empty-spinning gear. Put the pedal-side crank slightly forward and above horizontal so the first push moves the bike decisively.
Look ahead, release the brakes, push down on the raised pedal, lift onto the saddle, and bring the grounded foot to its pedal once the bike is rolling. Do not stare down searching for the pedal in traffic. Practise enough that a missed pedal means coasting straight and stopping again—not swerving.
If you use clipless pedals, master the same sequence on flat pedals first or follow our low-stress clipless practice progression.
Practise in four small stages
Stage 1: stationary movement
Hold both brakes, stand over the top tube, sit on the saddle, then slide forward and put a foot down. Repeat without rolling until clothing, pockets, and the saddle nose do not catch you.
Stage 2: walking-speed stops
Roll only a few metres. Stop at the same mark five times with your chosen foot, then practise the other foot. Use smooth braking and keep the bars straight.
Stage 3: stop and restart
Link the stop to a clean first pedal stroke. Add looking behind only after the basic movement is stable; our looking-behind drill is a separate skill.
Stage 4: realistic but quiet practice
Add a painted line, gentle route junction, or slight road camber in a traffic-free environment. Do not jump directly from a car park to a busy signal on a hill.
When this is a skill problem—and when it is a fit problem
Needing to leave the saddle is normal. These signs still deserve a size or setup check:
- the saddle is below its minimum-insertion or adjustment limit;
- you cannot clear the top tube when standing over the frame;
- your foot cannot reach a pedal confidently at the bottom of the stroke;
- your hips rock or you point the toes dramatically to complete each revolution;
- the brake levers are difficult to reach or pull;
- the bike must be leaned so far that it feels likely to fall; or
- you cannot start without a push from the ground.
Do not cut a seatpost, replace a stem, or move the saddle far forward merely to solve a stopping concern. Read how to tell whether a road bike is too big or too small and ask a shop to check frame clearance, saddle range, and brake reach.
Hills and sudden stops need a plan
For an uphill stop, shift to an easier gear before slowing. Hold both brakes firmly once stopped, angle the bike only enough to plant the supporting foot, and restart across or along the slope only where it is legal and clear. Walking is a valid option; use the safe steep-hill stop guide if balance or gearing is running out.
An emergency stop is a separate braking skill. Practise progressive front-and-rear braking on a clean, dry surface with coaching if possible. Do not learn maximum braking at the same time as learning to leave the saddle.
Your next step
Take the bike to a flat, empty practice area and perform ten slow stops at the same mark: brake, slide forward, one foot down, brakes held. If you cannot do that without catching the frame, losing brake access, or leaning dramatically, stop and have the fit checked before riding in traffic.