How to set road-bike cleats for the first time
Build a conservative first cleat position, mark it, practise release, and change one variable at a time without using cleats to self-diagnose pain.
 Field guide / how-to-set-road-bike-cleats-first-time
Before you buy
Check the starter kit first
Print the one-page buying brief for helmet, lights, water, phone, and repair compatibility before comparing upgrades.
Your first road-bike cleat position should be a calm, repeatable baseline—not an attempt to correct your entire anatomy. Start with both cleats in a conservative rearward position, align each shoe to your natural foot angle, tighten to the pedal maker’s specification, mark the outline, and practise release before riding.
The short answer: match the components, place the cleat under or slightly behind the ball of the foot within the system’s range, preserve your natural toe angle, and make only small documented changes. Pain is a reason to stop, not a cue to keep rotating bolts.
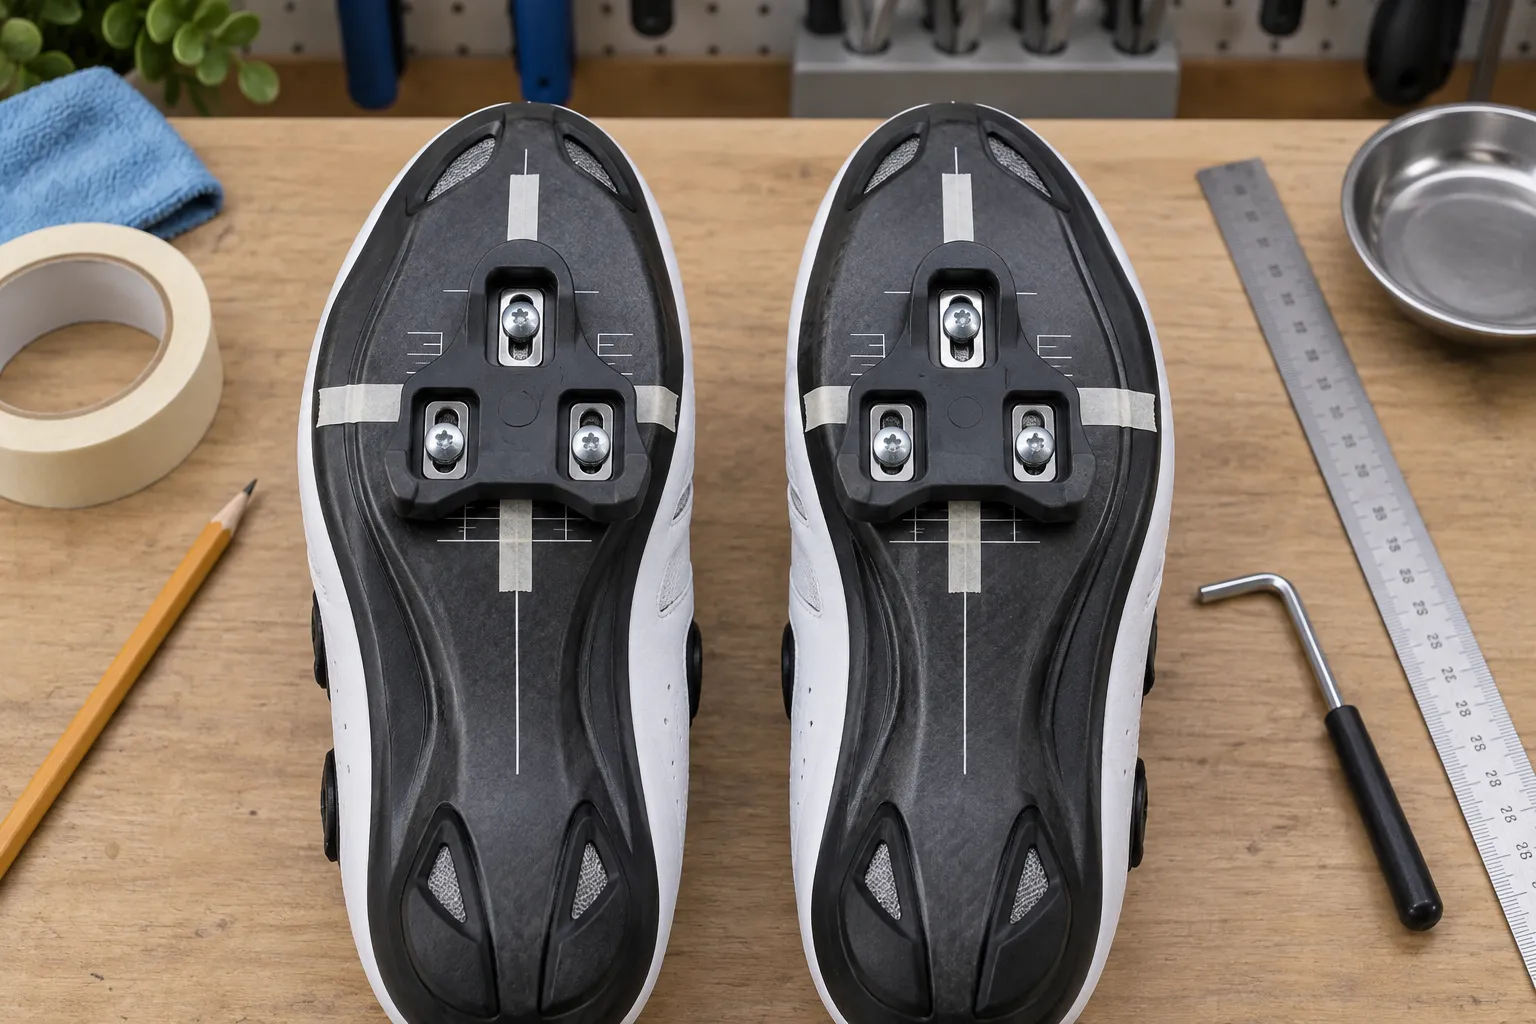
Why “just centre the cleats” is incomplete advice
Current bike-fit discussions repeatedly connect cleat questions with one-sided knee tracking, forefoot pressure after moving a cleat, and knee pain that has several possible causes. Those stories show why riders search for a setup method; they do not prove that one cleat angle caused or cured a condition.
A cleat has several adjustments at once:
- Fore-aft: toward the toe or heel.
- Lateral: toward the inside or outside edge of the shoe.
- Rotation: the angle that points the toe inward or outward.
- Float: permitted foot rotation while engaged, determined mainly by the cleat and pedal system.
- Release force: how hard it is to unclip, adjusted on some pedals.
Changing two or three together makes the result impossible to interpret.
Confirm compatibility before position
A three-bolt road shoe does not accept every road cleat, and a two-bolt recessed shoe uses a different mounting pattern. Even similar-looking cleats may not be compatible across pedal families.
Before opening the bolts, confirm:
- the shoe’s bolt pattern matches the cleat;
- the exact cleat model is approved for the pedal;
- all washers and mounting hardware are present;
- the bolt length suits the shoe and does not project into the footbed;
- the left and right cleats face the correct direction;
- the pedal’s release adjustment is inside its permitted range.
If you have not chosen a system, compare flat pedals, SPD, and SPD-SL before buying shoes.
Build a neutral starting position
This is a baseline for an uninjured rider, not a clinical prescription.
1. Mark the ball of each foot
Put on the socks you ride in and the cycling shoes. Locate the widest bony joint at the base of the big toe, then mark that position on removable tape along the side of each shoe. Repeat for the little-toe side if it helps you understand the forefoot line.
Do not assume both feet are identical.
2. Start moderately rearward
Place the pedal axle around the ball-of-foot line or slightly behind it, while staying inside the cleat’s permitted adjustment range. A rearward start is often easier to repeat and less aggressive than pushing the cleat all the way toward the toe.
Shimano’s general SPD-SL dealer manual describes a fore-aft adjustment range for its referenced cleats, but the actual range and bolt torque belong to your exact product. Do not transfer dimensions from one cleat to another.
3. Respect your natural foot angle
Sit on a table with lower legs relaxed and observe whether each foot naturally points slightly inward, outward, or straight. Use that only as a clue. Position the cleat so the shoe can sit near that relaxed angle while the pedal’s float leaves room in both rotational directions.
Do not force both shoes visually parallel if your feet are not naturally parallel. Equally, do not make a large rotation based on one glance; your hip and knee path matter once pedalling begins.
4. Start laterally centred
Begin around the middle of the cleat’s side-to-side range unless shoe-to-crank clearance or a known fit prescription requires otherwise. Confirm the shoe, ankle, and heel do not strike the crank, chainstay, or pedal body.
5. Tighten progressively and torque correctly
Snug the bolts evenly, recheck position, then use the value and sequence in the exact manual. Shimano’s cited general manual specifies 5–6 N·m for the SPD-SL cleat shown there, but that is not permission to apply the same number to another brand or model.
After tightening, draw around each cleat with pencil or place small tape references at the edges.
Practise release before evaluating fit
Cleat position is irrelevant if release is unreliable.
- Read the pedal’s engagement and release instructions.
- In a traffic-free place, apply the brakes and keep one foot on the ground.
- Engage and release the other shoe repeatedly.
- Swap sides.
- Ride slowly, unclip early, then stop.
- Confirm the cleat does not move on the shoe.
Shimano’s dealer guidance tells riders to provisionally tighten the cleat and practise engaging and releasing one shoe at a time. The full clipless confidence guide adds a safe first-ride sequence.
Use a three-ride test, not a car-park verdict
Choose a short familiar route with light traffic. Keep intensity easy enough that you can notice how the setup feels.
After each ride, record:
- whether either cleat loosened;
- whether clipping in and out stayed consistent;
- any heel contact with the bike;
- whether one foot feels pushed against the edge of its float;
- where pressure or numbness appears in the shoe;
- any new joint pain and when it begins.
Normal unfamiliarity should settle as the motion becomes automatic. Sharp, increasing, one-sided, or persistent pain is not an adaptation target.
Change one variable at a time
If the setup is secure and pain-free but one detail feels off:
- Trace the current position.
- Photograph both soles square-on.
- Choose one variable: fore-aft, lateral, or rotation.
- Move only a small, measurable amount within the maker’s range.
- Re-torque all bolts.
- Repeat the same easy test route.
- Restore the marked baseline if the result is worse.
Never loosen cleat bolts at the roadside and continue without proper torque. A cleat that rotates unexpectedly may prevent release.
Do not use cleats to diagnose pain
Outer-knee pain is not always “cleat angle.” Forefoot burning is not always “move the cleat back.” Symptoms can involve shoe width and closure pressure, saddle height, training load, prior injury, foot support, leg-length difference, crank clearance, or a medical condition.
Stop and seek qualified help when:
- pain persists off the bike;
- swelling, weakness, numbness, instability, or reduced movement appears;
- the symptom returns quickly after rest;
- you have a recent injury or medical condition;
- several small, reversible setup checks have not helped;
- you are considering wedges, shims, extenders, or intentionally different left/right positions.
A bike fitter can observe movement; a qualified clinician can assess injury. Neither role should be replaced by a comment thread.
Recheck after the first rides
Cleat bolts can settle. Follow the manufacturer’s inspection interval and check immediately if release feel changes. Replace worn cleats according to the maker; walking can wear exposed road cleats quickly.
Keep the original outline or a sole photo. When replacing cleats, it provides a much better starting point than guessing from scratch.
Your next step
Before mounting anything, write down the exact shoe, cleat, and pedal models and download their current manuals. Build and mark the neutral baseline, practise both feet in a safe place, then complete three short easy rides. If pain appears, stop and return to the last comfortable setup rather than chasing it with more changes.
Use the starter gear checklist if shoes and pedals are competing with more important first-ride essentials.