How to compare road-bike geometry charts across brands
Ignore the size label first. Compare frame stack and reach, then account for the cockpit, saddle range, standover, and handling before buying a road bike.
 Field guide / compare-road-bike-geometry-charts
Before you view or pay
Check fit, condition, and starter gear first
Use the buying checklist to choose the right path: used-bike viewing, first-bike fit and type, hidden repair costs, or starter gear.
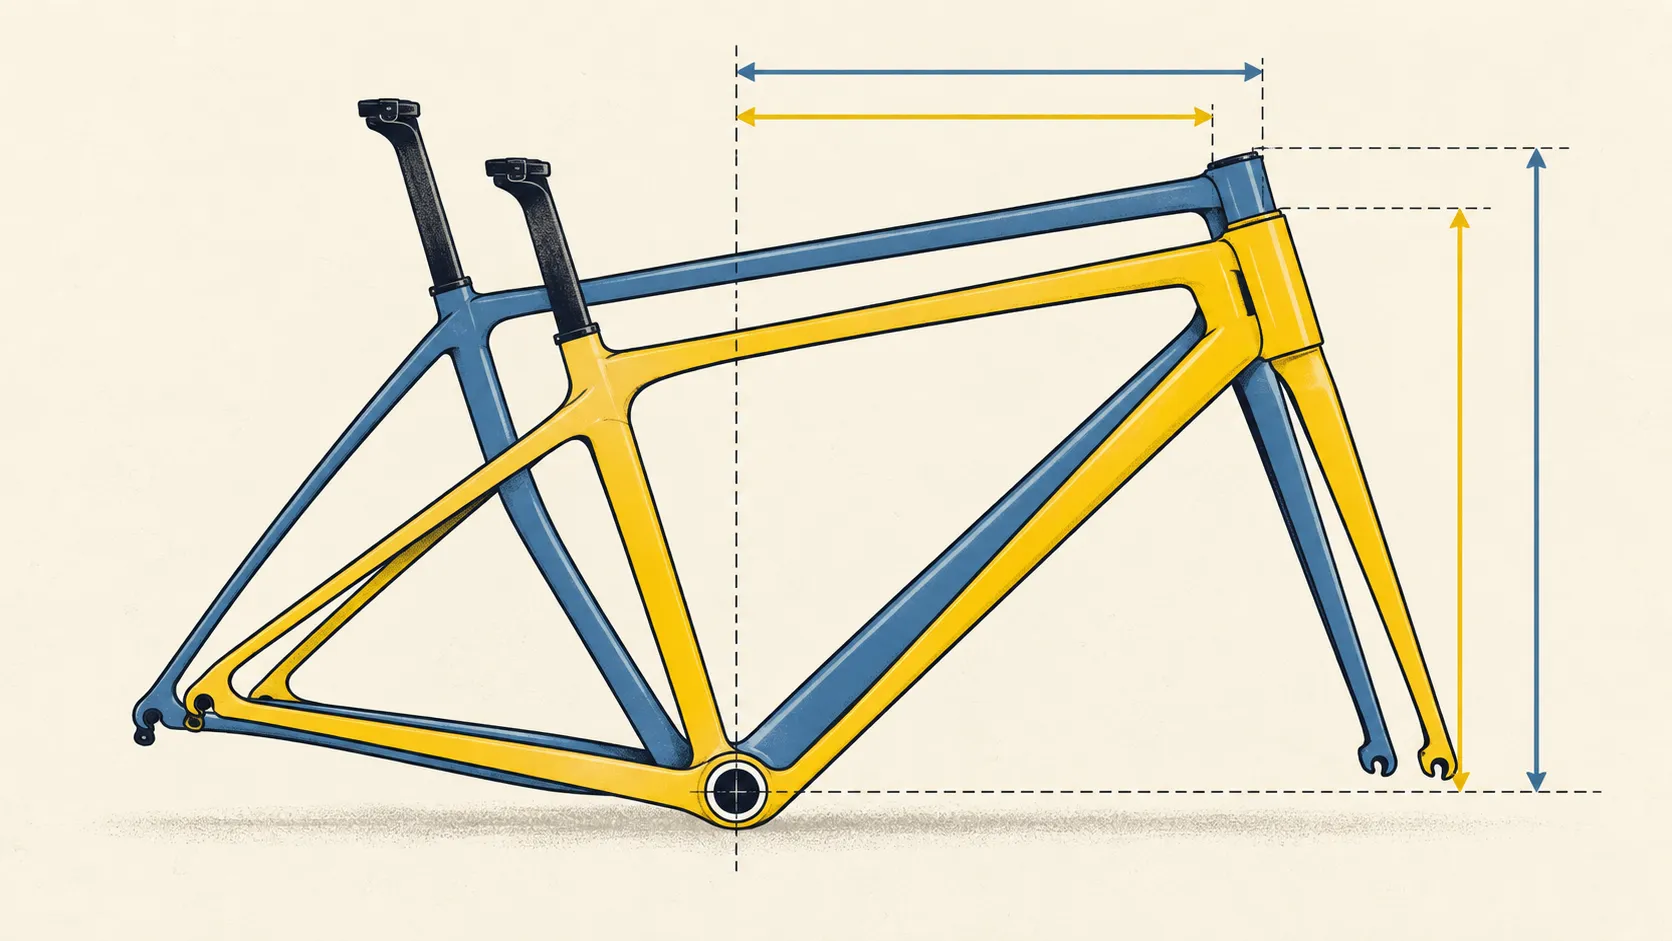
A size 54 from one brand can fit differently from a 54—or a medium—from another. Size labels are product names, not a shared measurement standard. Start with frame stack and reach, then compare the complete cockpit and saddle adjustment range.
The short answer: find the stack and reach of a road bike that already fits you, or establish a target with a qualified fitter. Compare those numbers with the exact model, size, and model year you are considering. Then check stem, spacers, handlebar reach, seatpost offset, standover, crank length, and intended handling before declaring two frames equivalent.
Why the label creates confusion
Beginner buying threads routinely ask which road bike to choose while listing a height and a size letter. A current first-bike discussion notes that models and brands use different geometry even when recommendations sound similar. Riders have also documented receiving 54, 55, 56, medium, and large recommendations across brands.
The useful signal is not that online commenters can size a stranger. It is that the label alone cannot compare bikes.
Start with stack and reach
Frame stack is the vertical distance from the centre of the bottom bracket to the top-centre of the head tube. More stack generally provides a higher starting point for the cockpit.
Frame reach is the horizontal distance between those same reference points. More reach generally provides a longer starting point.
Because both use the bottom bracket and head tube, they are more comparable across sloping and horizontal top-tube designs than nominal seat-tube size. Canyon’s current geometry guidance likewise identifies stack and reach as key starting numbers while warning that they do not describe the final hand position.
Two important cautions:
- Confirm units and definitions in each manufacturer’s chart.
- Use the exact model year. Geometry can change while the model name remains.
Frame reach is not handlebar reach
Your hands rest on the hoods, not at the top of the head tube. The final hand position also depends on:
- headset top cover and spacer height;
- stem length and angle;
- handlebar reach and drop;
- handlebar rotation;
- brake-lever shape and position;
- integrated cockpit dimensions.
Some manufacturers publish complete or “effective” cockpit stack and reach. Do not compare that figure directly with another brand’s frame-only reach. Label every column in your notes.
A frame with 5 mm more reach can still ship with a shorter stem or shorter-reach handlebar. Conversely, a close frame match can produce a much longer hood position with a different cockpit.
Use your current bike as a reference
If you have a comfortable bike:
- Identify its exact model, size, and model year.
- Find the original manufacturer geometry chart.
- Record frame stack and reach.
- Record spacers, stem length and angle, handlebar model or reach, and hood position.
- Record saddle height from bottom-bracket centre, saddle setback, and saddle model.
- Note what you want to preserve or change.
Do not copy numbers from a marketplace listing without verifying them. Sellers often confuse top-tube length, seat-tube size, and the size printed on the frame.
No suitable reference bike? A fit before purchase can establish practical ranges. Read should you get a bike fit before buying? before paying for a frame that requires extreme compensation.
Build a small comparison table
Use one row per exact candidate size:
| Measurement | Current bike | Candidate A | Candidate B |
|---|---|---|---|
| Frame stack | |||
| Frame reach | |||
| Stem length/angle | |||
| Spacer allowance | |||
| Handlebar reach | |||
| Seat tube angle | |||
| Seatpost offset | |||
| Standover | |||
| Crank length | |||
| Tyre clearance |
Calculate differences, but do not invent a universal acceptable tolerance. Five millimetres can matter in one dimension and be easy to accommodate in another. Integrated cockpits and cut steerers reduce the adjustment range.
Check the saddle range separately
Frame stack and reach describe the front triangle from the bottom bracket. They do not guarantee the saddle will reach your required position.
Check:
- minimum and maximum saddle height;
- seatpost insertion limits;
- seatpost offset and whether alternatives exist;
- saddle-rail clamp range;
- seat-tube angle;
- interference with bags, lights, or proprietary hardware.
Do not slide the saddle to an extreme solely to repair handlebar reach. The saddle establishes the pedalling position first; the cockpit should then meet the rider.
Do not ignore standover and toe clearance
Standover does not define road-bike fit, but adequate clearance and the ability to stop and start confidently matter. Smaller frames may also use different wheel sizes or steering geometry, which affects toe overlap and replacement choices.
Toe overlap can be normal on some road bikes, but a new rider should discover it during controlled practice, not the first tight turn in traffic. See is toe overlap normal? for the handling check.
Geometry also changes handling
Do not reduce the chart to fit coordinates only. Head angle, fork offset, trail, wheelbase, front-centre, chainstay length, and bottom-bracket drop influence steering and stability together.
Avoid rules such as “more trail always means better” or “shorter wheelbase is faster.” Compare bikes designed for similar uses, and test them. An endurance bike and a race bike can be made to place your hands similarly yet still handle differently.
Our endurance versus race bike guide explains the category tradeoffs without treating either label as a fit guarantee.
Watch for comparison traps
- Same label, different model: a medium race bike and medium endurance bike from one brand may differ.
- Same name, different year: geometry and cockpit hardware can change between generations.
- Frame versus complete coordinates: frame reach is not reach to the hoods.
- Stock photo assumptions: spacer count and stem angle in marketing images may not match the delivered setup.
- Integrated cockpit optimism: changing length or width can be expensive or restricted.
- Cut steerer: a used bike may no longer have room to raise the handlebar.
- Extreme stem fix: a dramatically shorter or longer stem can change handling and still fail to solve the underlying size problem.
Decide between two sizes
When the maker recommends two sizes, compare both complete setups. Ask:
- Which can achieve the required saddle height within limits?
- Which can place the hoods appropriately without an extreme stem or spacer arrangement?
- Does either create standover, toe, or control problems?
- Can the integrated cockpit be changed affordably?
- Which handling character suits the intended rides?
“Size down because it is racier” and “size up for comfort” are poor universal rules. A larger frame usually increases both stack and reach; it does not simply raise the bars. The exact chart decides.
Your next step
Open the manufacturer geometry charts for the exact year and size of every candidate. Put frame stack and reach beside your reference bike, then add the stock stem, spacers, handlebar, seatpost, standover, and crank length. Take that table to a test ride or fitter, and use the road-bike buying checklist before paying.
Sources and further reading
- Canyon: road-bike geometry, frame stack and reach, and complete cockpit position
- Canyon: road-bike sizing and comparing stack and reach
- r/cycling reader context: current first-bike discussion emphasising model-specific geometry
- r/cycling recurring reader context: inconsistent size labels across brands