Clincher, tubeless, or tubular? Identify the tyre system before buying parts
Tell clincher-with-tube, tubeless clincher, and glued tubular bicycle tyres apart before ordering a tyre, tube, valve, wheel, or repair kit.
 Field guide / clincher-tubeless-or-tubular-bike-tyres
Before you buy
Check the starter kit first
Print the one-page buying brief for helmet, lights, water, phone, and repair compatibility before comparing upgrades.
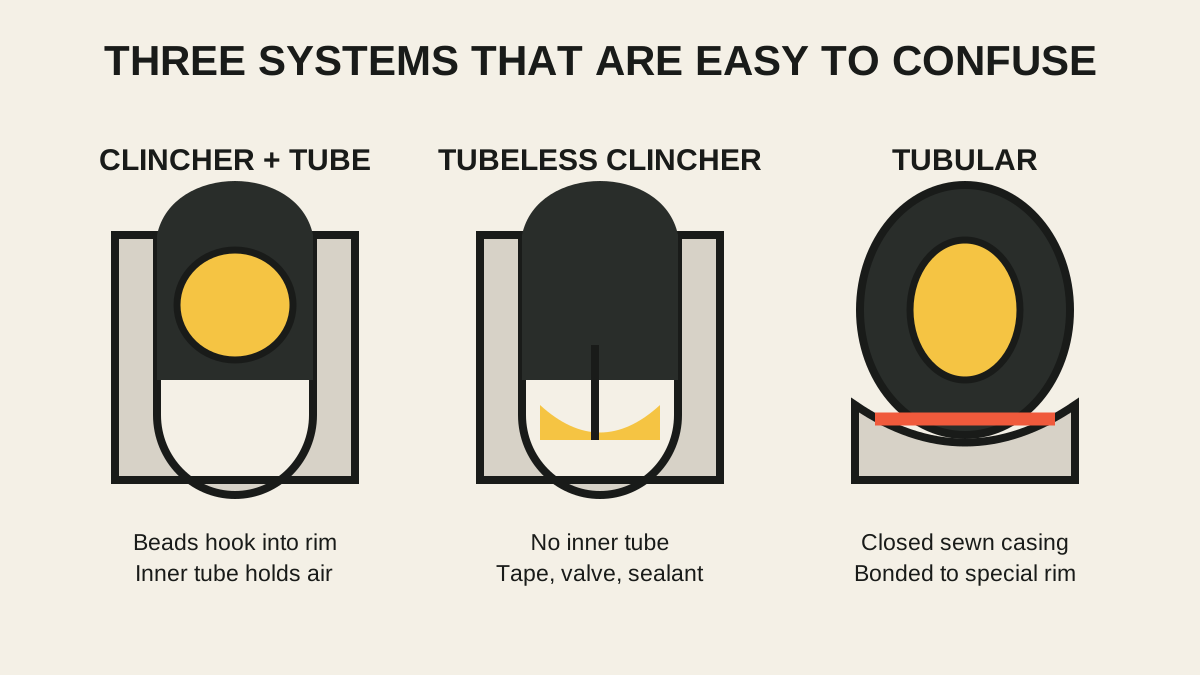
A clincher tyre has separate beads that fit into a clincher rim. It may hold air with an inner tube or as a compatible tubeless system. A tubular tyre is a closed casing sewn around its tube and bonded to a special tubular rim. Tubular does not mean tubeless.
The short answer: if the tyre has removable beads seated inside rim walls, it is a clincher system; what is inside determines tube or tubeless. If the tyre is a closed round casing glued or taped onto a shallow rim bed, it is tubular. Record both tyre and wheel models before ordering anything.
Why the names cause expensive mistakes
A recent beginner question described a tyre glued directly to the wheel as “tubeless”. The wheel was actually tubular. That distinction changes the tyre, rim, installation method, roadside plan, and whether a cheap trial ride is sensible.
The three common road systems are:
- Clincher with inner tube: the tube contains the air; two tyre beads lock into the rim.
- Tubeless clincher: an airtight compatible tyre and rim use tubeless tape, a separate valve, and usually sealant; there is no inner tube in normal use.
- Tubular: the casing is sewn closed around a tube, then glued or taped to a tubular rim.
Park Tool explicitly notes that tubular and common clincher systems are not interchangeable.
Start with the wheel profile
Look at the wheel from the side and around the valve. Do not remove anything yet.
Signs of a clincher rim
A clincher rim has sidewalls and bead seats that retain the tyre’s two edges. Depending on the rim, those sidewalls may have hooks or use an approved hookless design. The mounted tyre enters the rim rather than simply sitting on top of a shallow curved bed.
The wheel or rim model may say clincher, tubeless ready, TLR, or an equivalent term. “Tubeless ready” means the system can potentially be configured tubeless; it does not prove that no tube is installed.
Signs of a tubular rim
A tubular rim has a shallow, curved tyre bed without clincher bead hooks. The round tyre casing sits on that bed. You may see dried glue, adhesive tape, or a slight bonded edge between tyre and rim.
Do not pull at the tyre to “see whether it is glued” while it is inflated. A tubular’s bond is safety-critical, especially during cornering. If its condition or installation is unknown, have a workshop familiar with tubular systems inspect it.
Then determine what is inside a clincher
Once you know the rim is a clincher, identify tube versus tubeless. Use the least disruptive evidence first:
- Check the receipt or workshop record for a tubeless conversion and sealant date.
- Record the exact tyre and rim models and confirm compatibility with both manufacturers.
- Look for dried sealant around the valve or bead—but treat it as a clue, not proof.
- If the valve has a removable core, deflate safely and inspect for liquid sealant.
- If still uncertain, ask a shop or carefully inspect inside at home with the tools to restore the setup.
Our dedicated guide explains how to tell whether a clincher has a tube or is tubeless. Valve colour, a retaining nut, or a removable core alone cannot settle it.
Match the replacement to the system
For a clincher with a tube
You need a tyre whose bead diameter and width are compatible with the rim, plus a tube that fits the tyre size and has a suitable valve type and length. The printed tyre size—not a guess from appearance—is the starting point.
Use the inner-tube size guide before ordering. Keep within the lower pressure limit stated by the tyre and rim makers.
For a tubeless clincher
You need a tyre and rim approved to work together, correctly installed tubeless tape, a suitable valve, compatible sealant, and an inflation method. Hookless compatibility and pressure limits require particular attention.
A tubeless-compatible tyre can often accept a tube as an emergency measure, but only when the tyre and rim makers permit it and no sharp object, damaged tape, or unsafe rim condition threatens the tube.
For a tubular
You need a tubular tyre of the correct diameter and width, plus the exact bonding system and procedure appropriate to the tyre and rim. This is not a quick clincher-style tyre swap. Old adhesive must be assessed, the base tape and rim inspected, and the bond installed and cured correctly.
Park Tool notes that tubular bonding is safety-critical and that the system remains susceptible to installation failure. For a first encounter, competent workshop installation is the sensible default.
Can you convert one system to another?
A clincher wheel cannot become tubular with different tape, and a tubular rim cannot hold an ordinary clincher tyre. Conversion means replacing the wheel or rim with the other type.
A compatible clincher wheel may switch between tube and tubeless operation, but that is a setup change rather than a change to tubular. Confirm the rim and tyre are approved, replace damaged tape or valves, and follow the exact makers’ instructions.
If an inherited bike has valuable tubular wheels but you want simple, widely available roadside repairs, compare the cost of suitable clincher wheels with the cost of restoring the tubular setup. Check axle type, dropout spacing, brake interface, cassette/freehub, and frame clearance before buying. The replacement-wheel compatibility guide covers those checks.
What to carry for each system
- Tube clincher: correctly sized spare tube, inflation device, and tyre levers if needed.
- Tubeless clincher: plug tool, compatible plugs, inflation device, and an emergency tube.
- Tubular: a properly prepared spare or a documented rescue plan; roadside bonding is not the same as installing a clincher tube.
Whatever the system, practise at home. A mysterious wheel should not be the first maintenance lesson learned at the roadside.
Your next step
Photograph the tyre sidewall, rim profile, valve, hub, cassette, and brake interface. Record every model marking. Confirm the system and compatibility before spending money, then build the matching roadside repair kit.