Why does a bike chain stick to the chainring when you backpedal?
Diagnose a chain that clings to the chainring by checking chain release, model-specific compatibility, wear, damage, chainline, and setup in a safe order.
 Field guide / chain-sticks-to-chainring-when-backpedalling
A chain that stays attached to the chainring longer than it should is often called chain suck. Dirt and wear can cause it, but so can a new chainring with the wrong tooth profile for the chain. Do not assume that a matching speed count makes every chain and ring compatible.
The short answer: first establish whether the chain sticks only during a workshop backpedal or also while pedalling forward. Then record the exact chain and chainring models, verify the manufacturer’s compatibility, clean and inspect both parts, and check chainline and installation. Do not “bed in” parts that visibly bind.
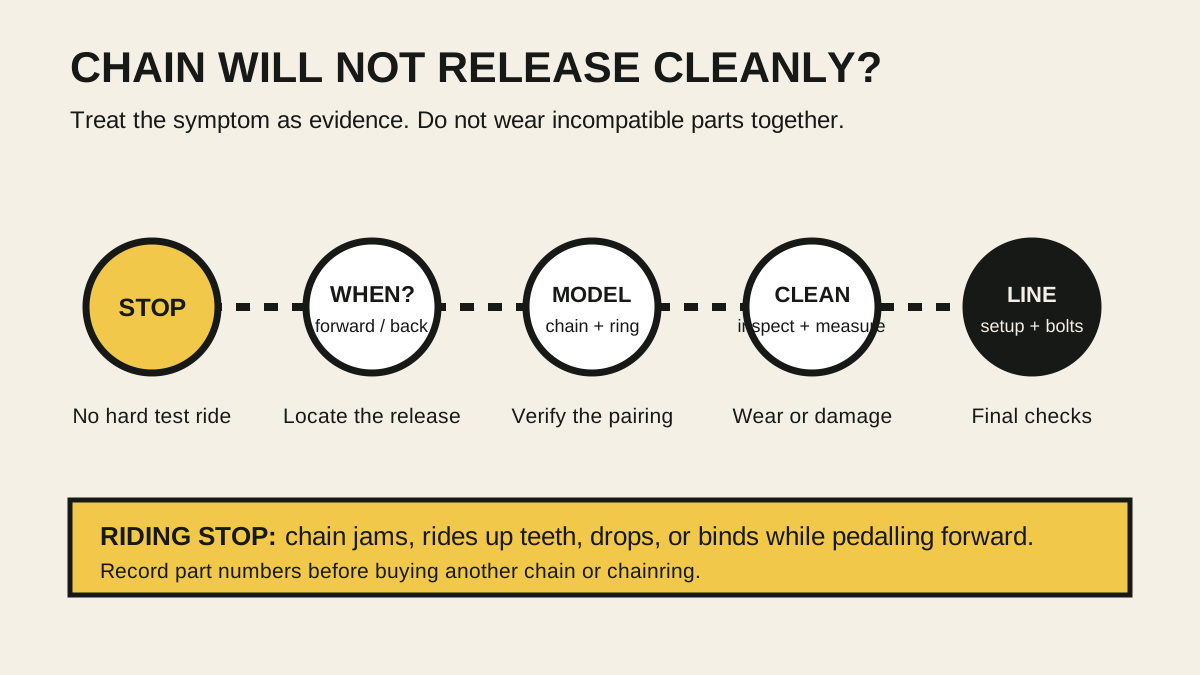
First separate backpedalling behaviour from a riding fault
Put the bike in a stand or support it so the driven wheel is clear. Keep fingers, sleeves, and tools away from the moving drivetrain. Turn the crank slowly by hand and observe where each chain link should leave the bottom or rear of the chainring.
Record whether the chain:
- releases cleanly while pedalling forward but hesitates only when backpedalled;
- climbs up a tooth before releasing;
- remains wrapped around the ring and pulls the lower chain run upward;
- catches only on wide teeth of a narrow-wide ring;
- sticks at the same point on every chainring rotation;
- began doing this after a new chain, chainring, crank, or bottom bracket was fitted.
Backpedalling can expose chain-angle effects that do not appear under forward drive, especially in extreme cassette positions. It is still a useful diagnostic signal. Binding during normal forward pedalling, chain derailment, or a rear derailleur being pulled forward is a stop-riding fault.
Verify the exact chain and chainring pairing
Read the model code stamped on the chain and the model or compatibility marking on the chainring. Photograph both. Confirm the complete pairing in the maker’s current compatibility chart—not only “11-speed” or “12-speed.”
Modern chains can use distinctive plate shapes, widths, and engagement features. Modern 1× chainrings can use narrow-wide, alternating, offset, or brand-specific tooth profiles. For example, Shimano’s product charts specify an HG 12-speed chain for particular 12-speed chainrings, while SRAM says its road Flattop and Eagle chains are not interchangeable because their widths and matching teeth differ.
That leads to three practical rules:
- A chain sliding over a chainring in your hand does not prove compatibility.
- A third-party claim such as “Shimano compatible” is incomplete unless it names the chain family, generation, and speed.
- If a problem started immediately after one part changed, verify that new part before adjusting unrelated components.
Return a new component that cannot be supported by a precise compatibility statement. Grinding the teeth or riding until the chain removes material is not a controlled fix.
Clean before judging wear or damage
Wipe and clean the chain and chainring well enough to see the tooth faces and the spaces between chain plates. Thick lubricant, dried wax, grit, or a damaged quick link can change how a link articulates and releases.
Turn every link by hand. A stiff link will not flex around or leave the ring normally. Check the joining pin or quick link, but use only the chain manufacturer’s approved correction method. The guide to checking chain wear explains why the correct gauge and method matter.
Inspect for:
- a bent, cracked, loose, or incorrectly mounted chainring;
- a burr or damaged tooth at one repeatable location;
- a stiff, twisted, or damaged chain link;
- extreme hooked wear on a non-shifting ring;
- a directional chain or chainring installed the wrong way;
- narrow-wide teeth engaged with the wrong alternating links.
Do not diagnose every short or sculpted tooth as wear. Shift ramps and tooth shaping are deliberate on many multi-ring drivetrains. Compare with the maker’s image or a known-good matching ring, and use the fuller chainring replacement guide before buying parts.
Check chainline and the full drivetrain setup
If the parts are compatible and undamaged, observe the chain from directly behind. In the middle of the cassette, it should not approach the chainring at an obviously severe sideways angle. On a 1× conversion, the crank, chainring offset, bottom-bracket spacing, rear hub, and cassette position together determine chainline.
Also verify:
- chainring bolts or a direct-mount lockring are secure to the specified torque;
- spacers and chainring orientation match the crank instructions;
- the chain is the correct length and routed correctly through the derailleur;
- the rear wheel and cassette are fully seated and secure;
- the derailleur cage moves freely and provides tension;
- the problem is not limited to an extreme cross-chain combination.
Do not move bottom-bracket spacers or reverse an offset ring experimentally. Those changes can affect crank clearance, bearing preload, chainline, and frame clearance. Follow the instructions for the complete crank and frame interface or ask a mechanic to measure it.
Should a used chain go on a new chainring?
It depends on measured wear, compatibility, and how the old parts wore together. A chain that has not reached its maker’s replacement limit may be serviceable, but one measurement cannot rule out a stiff link, wrong chain family, damaged plates, or local wear.
A fresh ring can reveal a worn chain that seemed quiet on its old ring. The reverse also happens: a new chain may skip on worn cassette sprockets. Read chain or cassette: what needs replacing? for that separate load-related diagnosis.
Avoid the blanket rule that every chainring replacement requires a new chain, but do not keep an old chain merely because a gauge has not fallen through. Check it using the chain maker’s method and judge the system, not one number.
What not to adjust first
Rear-derailleur indexing, limit screws, and B-gap do not change the tooth profile at the chainring. They may affect chain angle or shifting, but they cannot make an incompatible chain and ring compatible.
Likewise, adding more lubricant may quiet a drivetrain without correcting the cause. Randomly shortening the chain can create a dangerous large-sprocket shortage. Filing teeth destroys the designed profile. Make one evidence-led change at a time and retest by hand.
When to use a mechanic
Book a workshop diagnosis when the chain binds under forward load, any part is damaged, the part numbers cannot be identified, chainline needs measuring, or a new matched chain and ring still do not release cleanly. Bring the old parts and all packaging; the compatibility claim and installation history are useful evidence.
Your next step
Photograph the chain model, chainring markings, crank model, and drivetrain from the side. Stop riding if the fault occurs under forward pedalling. Verify the chain–ring pairing in the maker’s chart before buying or adjusting anything, then work through cleanliness, link movement, damage, chainline, and installation in that order.
Sources and further reading
- Shimano: current drivetrain compatibility information
- SRAM: why road Flattop and Eagle 12-speed chains are not interchangeable
- r/bikewrench discussion: a new chainring binding with an apparently unworn chain — used as an editorial question signal, not as a remote diagnosis.