Why does your bike feel less comfortable on an indoor trainer?
Indoor discomfort can come from a tilted bike, fixed posture, poor cooling, setup errors, or a fit problem. Check the trainer system before moving the saddle.
 Field guide / why-indoor-trainer-feels-uncomfortable
The same road bike can feel less comfortable indoors because the trainer changes the system around it. The bike may sit at a different angle, move less beneath you, hold you in one position, run hotter, or be mounted with the wrong adapters. Do not assume the saddle suddenly became wrong.
The short answer: first verify secure, model-correct installation and measure the axle heights rather than automatically adding a front-wheel block. Then improve cooling, stand briefly, change hand position, and reduce uninterrupted saddle time. Change fit only after the trainer-specific causes are controlled.
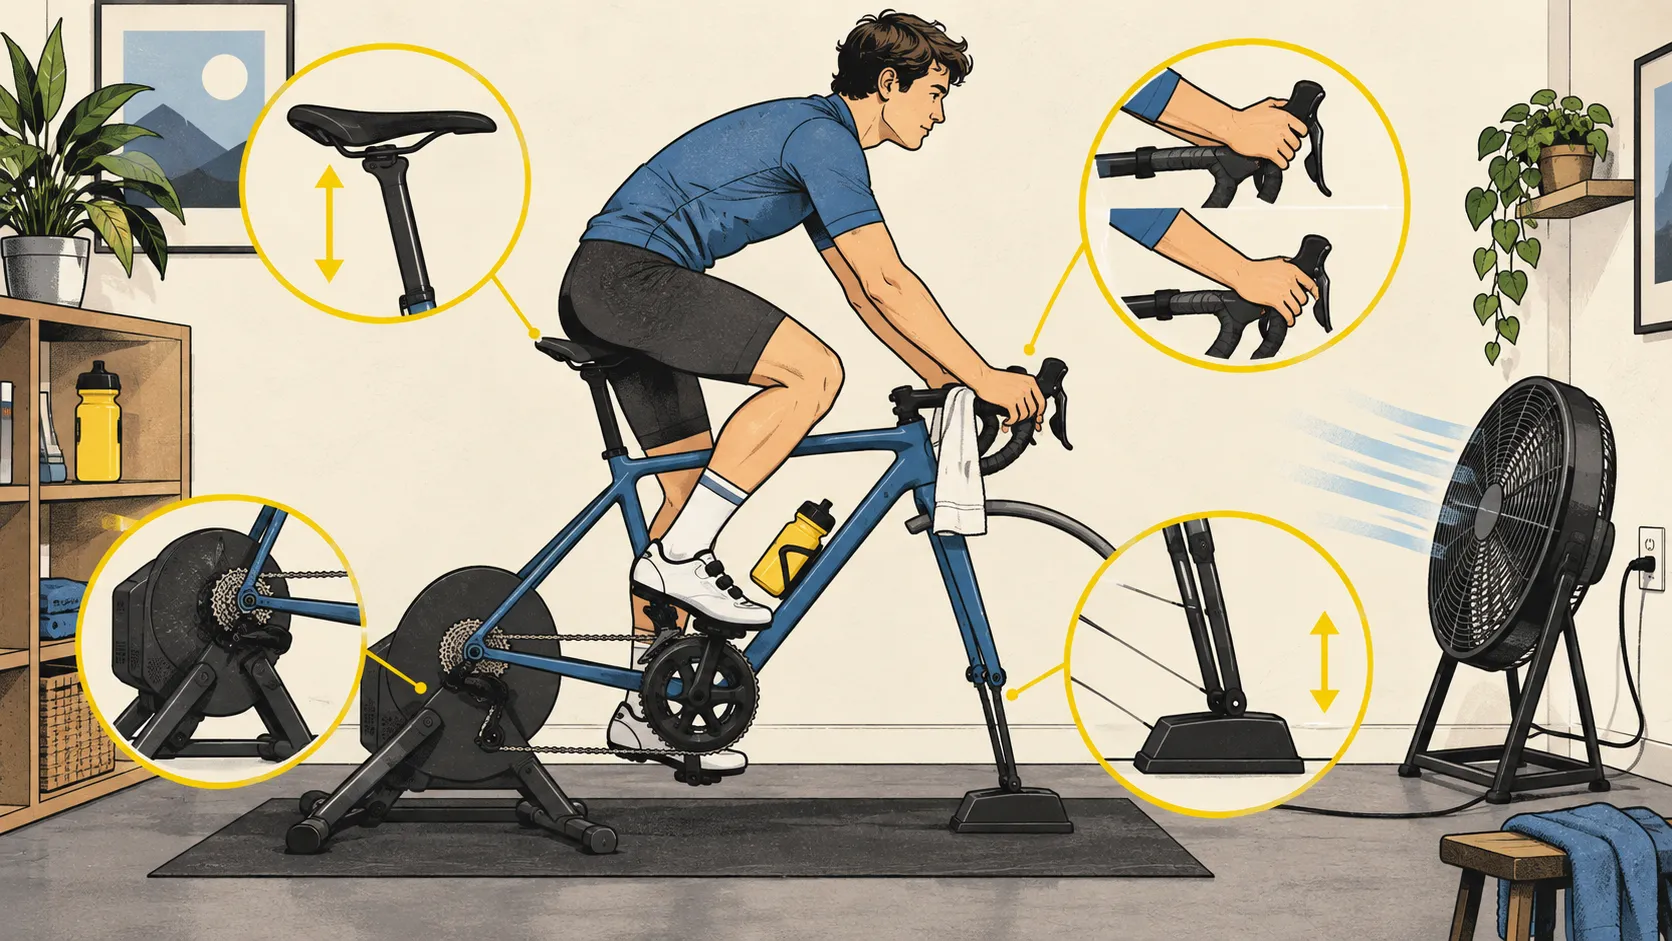
Why this question appears so often
A current r/bikefit thread described saddle pain, heavy hands, and fatigue during trainer rides. Another recent fit discussion raised whether a front-wheel block was changing the indoor position.
Replies to online fit videos often jump straight to saddle height or stem length. The safer order is to inspect the trainer installation and environment first. Otherwise you can alter a good outdoor fit to compensate for a tilted or poorly mounted indoor setup.
Start with installation, not comfort hacks
Use the exact trainer revision and bicycle manual. Check:
- the supported axle and dropout standard;
- correct left- and right-side adapters and their orientation;
- full contact at the designed mounting points;
- quick-release or thru-axle installation to manufacturer instructions;
- frame, derailleur, brake, and trainer clearance;
- stable feet on a firm, level surface;
- no abnormal flex, movement, rubbing, or noise.
Wahoo’s KICKR CORE guidance, for example, requires a stable level surface and model-correct mounting. Its compatibility notes say some smaller wheel sizes require front support, while 700c setups are designed to sit level without an added block. That is one product family’s rule—not permission to generalise to every trainer.
If anything is uncertain, stop and contact the trainer or bicycle manufacturer. Improvised washers, reversed adapters, or forced clearances can damage a frame.
Measure whether the bike is actually level
Do not judge by tyre-to-floor height alone on a direct-drive trainer. Compare the centre height of the front axle with the effective rear axle centre on the trainer, with the setup on its normal mat and floor.
A simple check:
- Confirm the floor or platform is level.
- Mount the bike exactly as instructed.
- Measure vertically from the floor to each axle centre.
- Compare the result with the trainer maker’s intended wheel-size setting.
- Add a front support only if the manufacturer requires it or measurement shows it is needed.
Raising the front changes the bike’s angle relative to gravity. That can rotate the saddle and shift how you load it and the handlebar. A block is not automatically a comfort upgrade.
Indoor riding removes normal movement
Outdoors, the bike leans, rolls, and moves beneath you. You freewheel, stand for junctions, look around, change line, and absorb road variation. A rigid trainer can keep the pelvis and hands in a narrower pattern for much longer.
Add movement deliberately:
- change between hoods and tops where control allows;
- stand for 10–20 seconds at regular intervals;
- include easy pedalling between harder blocks;
- keep elbows soft rather than locking them;
- shorten the first indoor sessions before extending duration.
Movement accessories may change feel, but they are not a substitute for secure compatibility or a suitable bike fit.
Cooling is part of fit indoors
Outdoor airflow removes heat and helps evaporate sweat. Indoors, the same power can feel much harder without a strong fan. As temperature and discomfort rise, riders may brace, slump, grip harder, and stop changing position.
Place a stable fan where it cools the torso and face without creating a cable or blade hazard. Keep controls dry, use a towel without covering vents or moving parts, and protect the floor. Drink according to the session and environment.
Do not position mains connections where sweat or a spilled bottle can reach them.
Resistance can trap you in a bad posture
Very high resistance at low cadence encourages grinding and bracing. Erg mode can make this worse when cadence drops and the trainer increases resistance to hold the target power.
For comfort troubleshooting:
- choose an easy, steady session;
- use a manageable gear and cadence;
- avoid maximal efforts;
- note exactly when the symptom begins;
- compare with an outdoor ride of similar easy duration.
If discomfort appears only under a hard indoor workload, load management may be part of the problem. If it appears immediately at easy effort, installation, angle, or fit moves higher on the list.
Change one variable at a time
Use this order:
| Check | Why it comes first |
|---|---|
| Correct mounting and compatibility | A safety and frame-protection requirement |
| Floor stability and axle height | Trainer angle can mimic a fit change |
| Cooling and hydration | Heat changes effort and posture |
| Movement and session duration | Static loading is trainer-specific |
| Resistance and cadence | Bracing can create contact-point pressure |
| Bike fit | Evaluate only after the indoor environment is repeatable |
Do not move the saddle forward just to reach the bars. Do not drop the saddle by a centimetre based on one short video comment. Record current measurements before any adjustment and change only a few millimetres at a time where appropriate.
When the trainer reveals a real fit issue
The trainer can make an existing problem easier to notice because the environment is consistent. Repeated one-sided knee pain, numb hands, perineal numbness, or inability to maintain a relaxed posture may deserve a fit assessment.
Compare indoor and outdoor symptoms, and tell the fitter which trainer, adapters, front support, shoes, cleats, and resistance mode you used. Bring photos or measurements of the setup. Our guide on whether an online bike-fit video can answer the question explains the limits of remote visual guesses.
Your next step
Before your next session, verify every adapter against the trainer manual, measure both axle centres, aim a strong fan at your torso, and schedule brief posture changes. Ride easily for 30 minutes and record when discomfort starts. If the bike is insecure or symptoms include numbness, sharp pain, or weakness, stop rather than testing further.