When should you replace road-bike rim brake pads?
Inspect wear grooves, pad condition, rim contact, debris, and braking performance so you replace rim-brake pads before they become a safety problem.
 Field guide / when-to-replace-rim-brake-pads
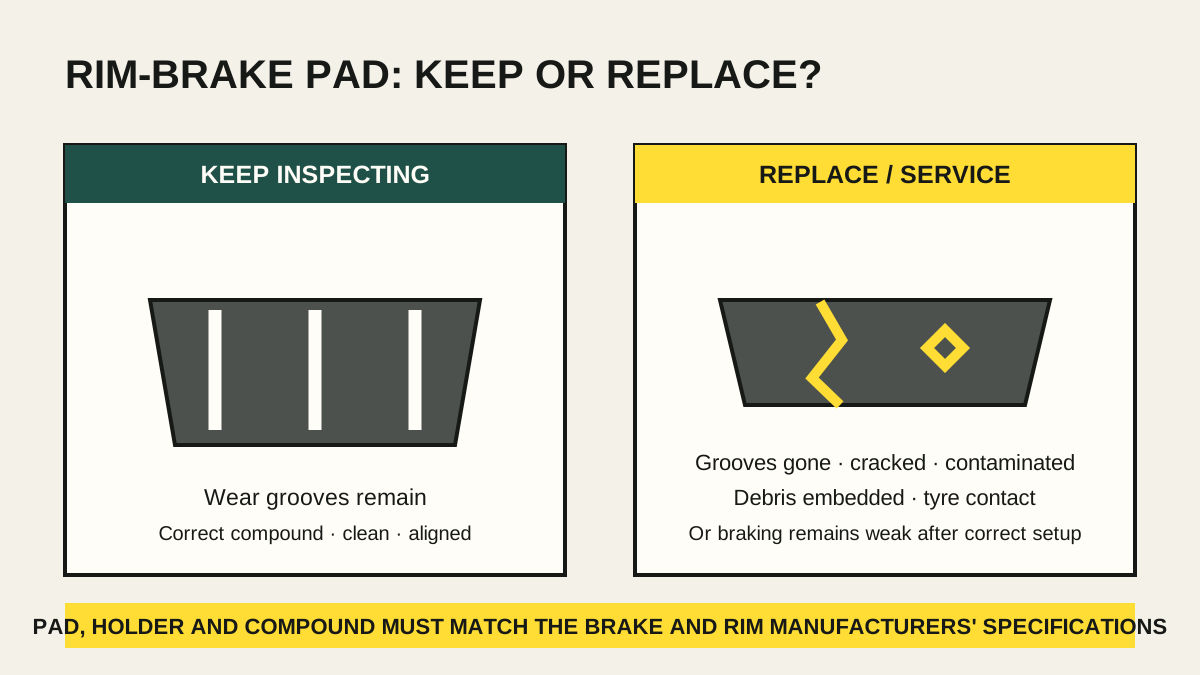
Replace rim-brake pads when they reach their maker’s wear indicator, lose their grooves where those grooves are the indicator, crack, harden, become contaminated, carry damaging debris, or cannot be aligned safely. Do not judge only by lever travel: cable adjustment can compensate for pad wear but cannot restore missing pad material or grip.
The short answer: inspect both pads in bright light with the wheel installed correctly. Find the model-specific wear mark, check the complete braking surface, and confirm the pad contacts only the rim’s braking track. If the specification is unknown or the pad is damaged, replace it with a compound approved for that rim—or ask a mechanic.
Why lever travel does not answer the question
A recent beginner discussion asked how much V-brake pad wear is acceptable, while the reported symptom was deeper lever travel and weak rear braking. That is a useful distinction for road-bike owners: lever feel, pad wear, cable condition, rim condition, setup, and braking technique are related but not interchangeable.
A barrel adjuster can move pads closer to the rim as material wears. It cannot:
- replace rubber that has reached its wear limit;
- remove oil from a contaminated pad;
- correct the wrong compound for a carbon rim;
- repair a cracked holder or loose fixing;
- make a worn or contaminated rim safe;
- compensate safely for a pad that contacts the tyre.
Treat lever travel as a reason to inspect the full brake, not as proof that the pad is worn out.
Inspect the pads without removing them first
Set the bike on level ground with both wheels correctly installed and secured. Use a bright light and look at each pad from the front, side, above, and below.
Check for:
- Wear indicators. Many pads have grooves or a marked wear line. Shimano instructs users of relevant caliper pads to consult a dealer when the grooves are no longer visible. Other makers use different indicators, so identify the exact pad.
- Even material. One end should not be worn to the holder while the other remains thick.
- Cracks or chunks. Replace a pad with splits, missing pieces, severe glazing, or separation from its holder.
- Embedded debris. Metal or stone fragments can score the rim. Do not gouge at a pad blindly and then assume it is sound.
- Contamination. Oil, grease, polish, and some cleaners can reduce braking. Replacing the pad may be necessary, and the rim must be cleaned as its maker specifies.
- Correct contact. The full pad face must meet the braking track—not the tyre, rim edge, or space below the track.
- Secure hardware. The holder, fixing bolt, and cartridge insert must be properly retained.
Open the brake quick release only if you understand how to close and verify it. Do not operate a wheel quick release as though it were a brake clearance adjustment.
Check the rim at the same time
Rim brakes use the wheel rim as a wear component and heat surface. A fresh pad does not make a damaged rim safe.
Inspect the braking tracks for:
- the wheel maker’s wear indicator;
- deep scoring, dents, cracks, or bulging;
- an abrupt concave surface or thinning;
- contamination;
- inconsistent width or a wheel that runs badly out of true;
- heat damage or discolouration identified by the maker as unsafe.
Rim wear limits and inspection methods are model-specific, especially for carbon rims. If the indicator has disappeared, the surface is damaged, or you cannot confirm the specification, stop riding and have the wheel assessed.
Choose a replacement by system, not shape alone
A pad that slides into the holder is not automatically compatible. Confirm all of these:
- brake caliper or arm model;
- cartridge insert versus one-piece pad;
- holder orientation and retention method;
- aluminium, carbon, ceramic-coated, or other rim surface;
- rim manufacturer’s approved pad list;
- wheel and brake maker restrictions on mixing compounds.
Never move a pad previously used on an aluminium braking track onto a carbon rim unless the wheel maker explicitly permits it. Tiny embedded aluminium fragments can damage a carbon braking surface. Use dedicated, approved pads and clean holders as instructed.
If the old pad has an arrow or left/right marking, record its orientation before removal. Some grooves and holders are directional.
When adjustment may be enough
If pads remain within specification, are clean and correctly aligned, and braking is otherwise normal, increased lever travel may come from normal pad wear or cable settling. The correct adjustment could involve the barrel adjuster or cable—but use the brake manual.
Adjustment is not enough when:
- the lever reaches the handlebar;
- cable strands are frayed or corroded;
- housing moves, splits, or is poorly seated;
- a pad moves in its holder;
- the caliper does not return normally;
- pads cannot be aligned without tyre contact;
- braking stays weak, grabby, or inconsistent;
- the rim is wet, contaminated, worn, or damaged.
Our guide to a brake lever that pulls close to the handlebar separates cable, hydraulic, pad, rotor, rim, and setup clues.
Bedding and testing new rim-brake pads
Install pads only with the model-specific fastener sequence, direction, clearance, toe, and torque. Cartridge pads must have their retention hardware correctly installed. Spin the wheel and confirm neither pad contacts the tyre.
Then test in stages:
- Squeeze each brake firmly while stationary; the lever must not reach the bar.
- Confirm the brake releases and the wheel rotates freely enough for the design.
- Walk beside the bike and operate each brake separately.
- Ride at walking pace in a traffic-free, level place.
- Increase speed and braking force gradually, following the pad and rim makers’ bedding instructions.
New pads can feel different, and wet rims usually need more stopping distance. Do not make a steep descent the first test.
Replace before a trip, not during it
There is no universal mileage interval. Rider mass, terrain, weather, grit, rim material, braking technique, pad compound, storage, and adjustment all change pad life. Inspect visually as part of the five-minute pre-ride check and more closely before wet rides, mountain trips, or travel.
Carrying spare pads is sensible on remote multi-day routes only if you also carry the correct tools and know the installation. For ordinary riders, replacing borderline pads before the trip is the safer plan.
Your next step
Photograph the pad markings and find the brake and wheel manuals. Inspect all four pad faces and both rim tracks in daylight. If any wear indicator is reached, compatibility is uncertain, or the pad cannot sit entirely on the braking track, keep the bike parked until the correct parts are fitted and tested.