What tyre pressure should you use on indoor bike rollers?
Start from documented tyre, rim, and roller limits, then make small pressure changes while checking heat, casing movement, stability, and wear.
 Field guide / tyre-pressure-for-indoor-bike-rollers
Before you buy
Check the starter kit first
Print the one-page buying brief for helmet, lights, water, phone, and repair compatibility before comparing upgrades.
Indoor rollers do not have one universal tyre pressure. Use a pressure inside the approved tyre-and-rim window that keeps the casing stable on the drums without excessive heat or harshness. Your normal outdoor pressure is a safer starting point than automatically inflating to the sidewall maximum.
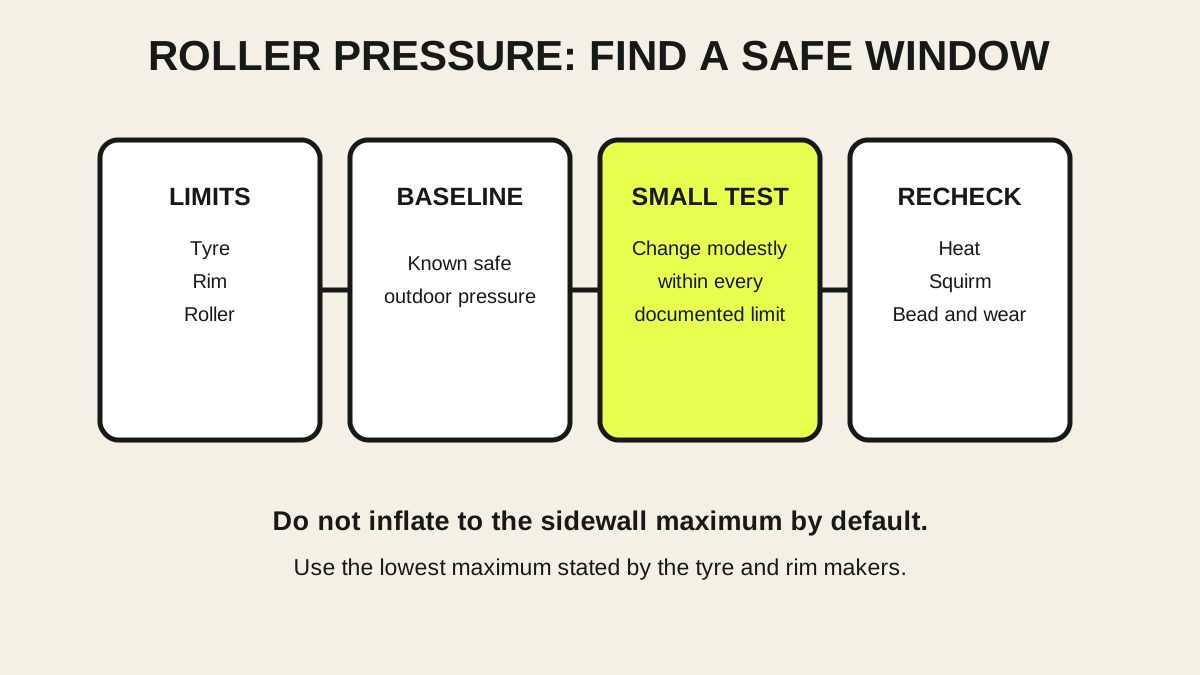
The short answer: read the tyre, rim, and roller instructions; the lowest applicable maximum always wins. Begin at a known safe outdoor pressure, ride easily for ten minutes, and check temperature, casing movement, bead seating, and pressure retention. Increase only in small steps if the tyre visibly squirms or runs unusually hot. Never use extra pressure as a substitute for compatibility or clean, aligned rollers.
Why outdoor pressure is not the whole answer
A recent r/cycling question asks what pressure to use for 28 mm tubeless road tyres on free-motion rollers. Replies range from “just ride them” to inflating close to the maximum or installing a separate high-pressure training tyre.
On the road, tyre pressure balances system weight, surface roughness, speed, grip, comfort, rim protection, and casing behaviour. On rollers, the surface is smooth and continuously curved. There are no potholes, but a small drum can deform the tyre repeatedly at one contact patch and generate heat. The bicycle also needs predictable side-to-side behaviour.
That does not prove every roller requires high pressure. Drum diameter, surface, resistance unit, tyre construction, width, tubed or tubeless setup, rider mass, speed, room temperature, and workout duration all matter.
Build the permitted pressure window first
Collect four pieces of information:
- The exact tyre model, size, and tubed or tubeless setup.
- The rim model, internal width, and hooked or hookless construction.
- The roller model and current setup instructions.
- Your measured outdoor pressure with the same wheel and tyre.
The maximum is the lowest applicable value from the tyre and rim makers. A hookless rim can have a lower limit than a hooked rim, and the permitted value can depend on tyre size. Continental instructs riders to follow both tyre and rim guidance and use the lower limit when they differ.
Do not treat MAX PSI as a target. It is a boundary. Temperature rises can increase internal pressure, which is another reason to leave margin rather than starting at the ceiling.
Check whether the roller maker specifies a setup
Use the exact product support page, not advice for a different trainer type. Free-motion rollers, fixed rollers, a wheel-on resistance trainer, and a direct-drive trainer load tyres differently.
Inside Ride publishes separate setup and stationary-cycling guides for its manual and smart E-Motion systems. Confirm:
- wheelbase adjustment;
- drum alignment and cleanliness;
- resistance-unit setup;
- whether the manufacturer names tyre restrictions;
- maintenance and pre-ride checks.
If the manual gives no PSI value, do not invent a manufacturer recommendation. That means you must operate within the tyre-and-rim limits and evaluate the setup conservatively.
Start at the known outdoor baseline
Check pressure cold with the same gauge you use outside. Confirm that the bead witness line is even, the valves are straight, and both tyres hold pressure normally.
Then:
- Ride easily for five minutes while staying seated.
- Observe whether the tyres wander, squirm, or visibly fold at the drum.
- Continue to ten minutes at an ordinary endurance effort.
- Stop and carefully feel near—not on moving parts—for abnormal heat.
- Recheck pressure after the system cools.
- Inspect tread, sidewalls, bead line, sealant leakage, and roller surface.
Warm is not the same as dangerously hot, and touch is not a calibrated thermometer. You are looking for a large difference from the front tyre, outdoor experience, or previous stable sessions.
Change pressure in small steps
If the tyre shows obvious casing movement or develops unusual heat while every component is compatible and aligned, add a small amount of pressure within the permitted window and repeat the same short test.
Do not jump from a comfortable road setting to an old 90–100 PSI habit merely because another rider uses 25 mm tubed tyres. A 28 or 32 mm tubeless tyre on a wide rim can have a much lower approved maximum.
Likewise, do not lower pressure to create workout resistance. Use the roller’s resistance mechanism or gearing. Deliberate casing deformation adds heat and wear without producing a controlled training load.
Decide whether premium outdoor tyres belong on the rollers
Rollers turn both wheels, so a separate rear “trainer tyre” does not solve the complete setup in the same way it can on a fixed wheel-on trainer. A second inexpensive wheelset or durable tyre pair can make sense when:
- roller volume is high;
- outdoor tyres are expensive or difficult to replace;
- swapping wheels does not create brake or drivetrain problems;
- the alternative tyres and rims remain fully compatible;
- you can reproduce fit and safe wheel installation.
But changing equipment only to chase higher pressure is not automatically safer. The training tyres still need suitable grip on the drums, correct size, sound casings, and approved pressure.
If you keep the outdoor tubeless setup, check sealant age and pressure more frequently. Indoor heat and time can change pressure retention even without outdoor punctures.
Stop at these signs
End the session if you notice:
- a bead witness line becoming uneven;
- sealant at the bead or valve;
- casing wrinkles or sidewall bulging;
- a hot rubber smell;
- rapid tread pickup, blistering, or delamination;
- repeated sideways walking that setup adjustments do not solve;
- pressure loss;
- roller vibration, damaged drum surface, or wheel rub.
Let everything cool, find the cause, and contact the roller, rim, or tyre maker when the combination is uncertain.
Keep a repeatable indoor setup card
Record front and rear cold pressures, gauge, room temperature, tyre and rim models, roller spacing, and the result of the ten-minute check. Recheck when you change tyre width, wheel, sealant, tube material, rider load, or roller resistance hardware.
This is more reliable than remembering that “somewhere around 70 felt fine.” It also makes a manufacturer support request useful.
Your next step
Photograph the tyre sidewall and rim model, download the roller setup guide, and write down the lowest permitted maximum. Begin your next session at the current safe outdoor pressure and perform the ten-minute inspection. Change by only a small step if the tyre shows a specific problem—never simply because another rider uses a larger number. If rollers are only one option you are considering, compare them with the beginner indoor-cycling setup priorities before buying more equipment.
Sources and further reading
- Inside Ride: E-Motion roller setup and stationary-cycling guides
- Continental: hookless tyre and rim pressure safety
- Continental: bicycle tyre pressure, seating, and care instructions
- r/cycling reader context: pressure for 28 mm tubeless tyres on free-motion rollers — used as a current question signal; personal PSI values in replies were not treated as universal specifications.