Saddle pushed far forward on the rails: is that a fit problem?
A forward saddle can be comfortable and valid, but the clamp must stay inside the approved rail area and the position should not be hiding a frame or seatpost mismatch.
 Field guide / saddle-far-forward-on-rails
A saddle near the front of its rails is not automatically wrong. It may be the correct position for the rider, frame, and seatpost. The real questions are whether the clamp is inside the approved rail zone, whether the hardware matches the rails, and whether the position works under real riding load.
The short answer: do not move a comfortable saddle backward just to make it look centred. First confirm safe rail support and record the position. If the clamp is at or beyond the limit, use the correct seatpost offset or reassess the frame and fit instead of clamping on a bend.
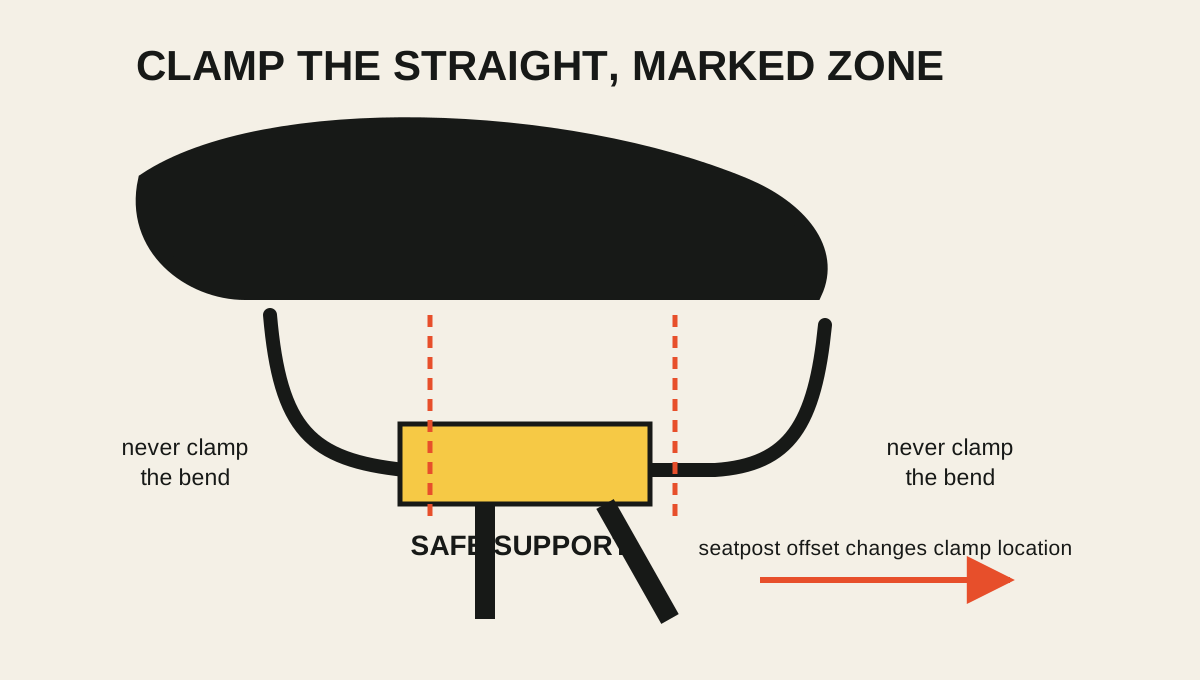
Check safety before fit theory
Remove enough dirt to see the complete clamp and both rails. Without loosening anything, check:
- the clamp sits entirely inside the rail’s marked range;
- if there are no marks, it sits on the straight section, not either bend;
- upper and lower clamp pieces contact the rails as designed;
- round or oval rail dimensions match the clamp hardware;
- the bolt, barrel, wedges, and washers are present and correctly oriented;
- the rails have no crack, dent, exposed fibre, bend, or polished movement mark;
- the saddle does not rock or rotate under firm hand pressure;
- the bolt has not been tightened beyond the component instruction.
Canyon’s road manual warns that the clamp must remain within the marked rail area—or on the straight rail section when no area is marked—because clamping a bend creates a breakage risk. That is a structural rule, not an aesthetic preference.
Carbon rails may require different clamp ears or a different cradle from 7 mm round metal rails. Use the carbon-rail compatibility guide before swapping saddles.
Why a forward position can be valid
Saddle fore-aft changes several relationships at once:
- where the pelvis sits relative to the bottom bracket;
- the effective reach to the handlebar;
- weight distribution between wheels;
- hip relationship through the pedal stroke;
- how the rider supports the torso at different efforts.
Body proportions, crank length, saddle shape, frame seat-tube angle, and seatpost offset all affect the resulting position. There is no rule that the clamp should appear visually centred on every correctly fitted bicycle.
Likewise, do not move the saddle to correct handlebar reach without checking the pedalling position. Trek’s owner guidance notes that fore-aft changes both reach and weight distribution. The saddle is not simply a substitute for the right stem or frame.
Measure the actual position
Before changing anything, record:
- saddle height from the bottom bracket to a repeatable saddle point;
- saddle setback from a plumb or level reference;
- saddle tilt with the bike on level ground;
- distance from saddle nose to a repeatable handlebar point;
- clamp position relative to the rail marks;
- seatpost model, offset, and orientation;
- discomfort and handling notes after short and long rides.
Photograph both sides of the clamp. Saddles have different lengths and shapes, so nose-to-handlebar distance alone cannot transfer a fit between models.
Use the one-change fit log if you decide to test an adjustment.
Decide whether the hardware is the mismatch
Clamp safely inside the range, no symptoms
Leave it alone. Recheck bolt security at the interval in the manufacturer instructions and continue monitoring comfort on representative rides.
Clamp inside the range, but at the very front
This can still be valid. Check that there is adjustment margin for the rider and that the bike handles predictably. A professional fit may be worthwhile if the position was reached by repeated symptom chasing.
Clamp beyond the range
Do not ride it that way. A seatpost with less rearward offset—sometimes called zero-offset—can move the clamp forward relative to the frame while leaving the saddle’s rider-facing position similar. Compatibility must include diameter or proprietary shape, length, insertion, clamp type, rail size, system-weight limit, and frame approval.
Changing seatpost offset requires a deliberate fit reset. Follow the seatpost-offset guide rather than moving one part and assuming every coordinate stayed fixed.
Saddle must be extreme to make the handlebar reachable
That suggests the frame, cockpit, or riding position needs a wider review. Moving the saddle changes pedalling and weight balance; it cannot create unlimited frame reach correction. Compare the bike with the too-big or too-small guide.
Test without chasing appearance
If the current setup is safe but you want to experiment, move only a few millimetres and keep saddle height and tilt referenced. A fore-aft move along angled rails can also change effective saddle height.
Test on the same route and note:
- pressure at the hands and saddle;
- knee tracking and pedalling stability;
- ability to use hoods and drops with relaxed elbows;
- steering on climbs and descents;
- whether you slide forward or brace against the bars;
- symptoms later that day or on the next ride.
Return to the recorded baseline if the new position is worse. “More conventional looking” is not a fit outcome.
When to get qualified help
Book a fitter or mechanic when:
- the clamp sits outside the marked rail area;
- the post or saddle instructions are unavailable;
- you need different rail clamps or proprietary seatpost parts;
- one bolt reaches torque while the saddle still moves;
- numbness, pain, or repeated saddle sores continue;
- the saddle needs an extreme position to reach the bars;
- a carbon rail or seatpost has any suspected damage.
Do not add unapproved shims, file a clamp, or exceed torque to hold an incompatible interface.
Your next step
Photograph the clamp, find the saddle and seatpost manuals, and confirm the complete clamp is inside the allowed straight section. If it is safe and the fit works, record it and ride. If it is out of range, preserve the rider position on paper and solve the hardware or frame mismatch.
Sources and further reading
- Canyon road-bike manual: clamp within rail markings and never on the bends
- Trek owner guidance: fore-aft position changes reach, weight distribution, and hip relationship
- Canyon Ultimate guide: saddle adjustment and carbon-rail clamp requirements
- r/bikefit reader context: a comfortable saddle that looked unusually far forward — used as a current fit-question signal; appearance-based advice in replies was not treated as a fit prescription.