What should a pre-purchase bike fit give you?
Ask for usable fit coordinates, geometry limits, component assumptions, and candidate sizes—not a vague frame-size label.
 Field guide / pre-purchase-bike-fit-deliverables
Before you view or pay
Check fit, condition, and starter gear first
Use the buying checklist to choose the right path: used-bike viewing, first-bike fit and type, hidden repair costs, or starter gear.
A useful pre-purchase bike fit should leave you with numbers you can apply to real geometry charts and test bikes. “You are a 56” is not enough: sizes differ between brands, and the final position also depends on the stem, spacers, handlebar, saddle, seatpost, cranks, and safety limits.
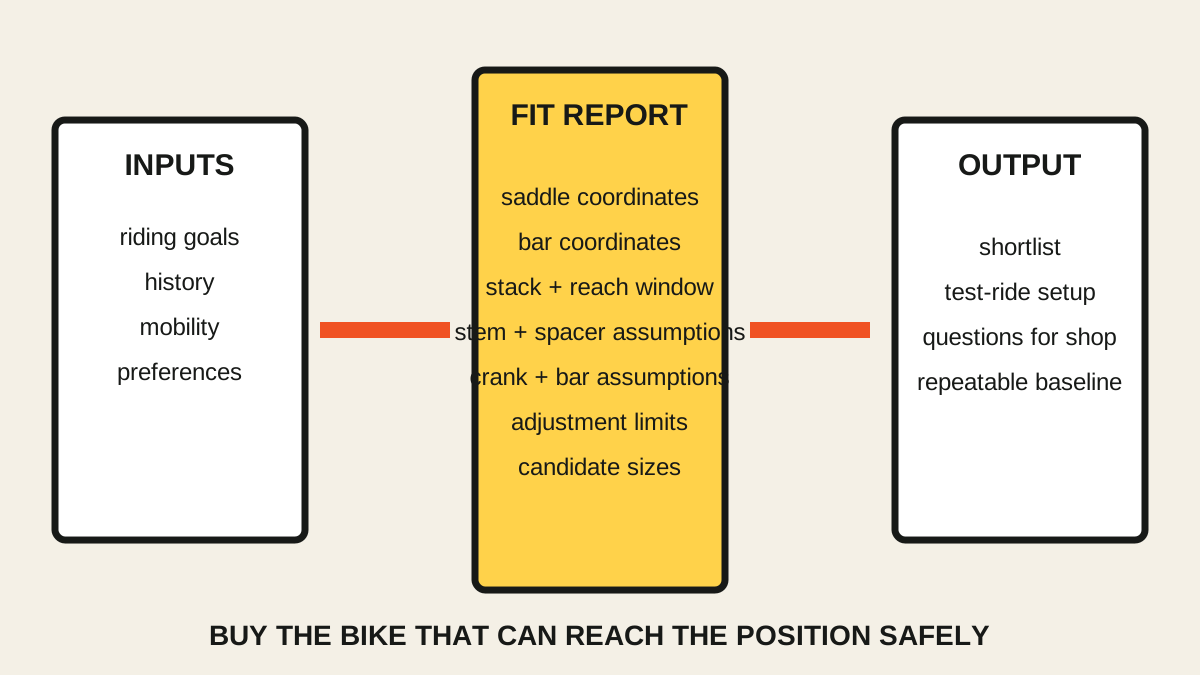
The short answer: ask for target saddle and handlebar coordinates, an acceptable frame stack-and-reach window, the component assumptions used to reach that position, and specific model/size recommendations or exclusions. The report should explain how to reproduce the tested setup and what must be confirmed on a real test ride.
Clarify which service you are buying
A recent pre-purchase fitting question asked what usable information should come out of the appointment. That matters because “bike fit” can describe very different services:
- a shop size recommendation based mainly on height;
- a static body-measurement service;
- a dynamic fit on your current bike;
- a pre-purchase session on an adjustable fit bike;
- a clinical assessment involving a qualified health professional.
Ask what the fitter will do, what equipment they use, how long the session lasts, and exactly what written output is included. A pre-purchase service should be able to test a proposed position without first owning the candidate bike.
Bring goals, not just body measurements
The fitter needs to know what the bike must do. Bring:
- expected ride duration and frequency;
- road, gravel, racing, commuting, or mixed use;
- comfort versus aerodynamic priorities;
- current riding experience;
- previous injuries or current symptoms;
- shoes, pedals, and shorts you intend to use;
- candidate bikes and geometry charts, if you have them;
- non-negotiables such as mudguards, aero bars, luggage, or tyre clearance.
Height and inseam help with sizing, but they do not define a complete riding position. Tell the fitter what you can sustain, not what looks fast in a photograph.
Ask for contact-point coordinates
The most reusable outputs describe where your body meets the bike. Names and reference points vary, so the report must define each measurement. Useful items include:
- saddle height and the exact reference points used;
- saddle setback relative to the bottom bracket;
- saddle tilt and model or dimensions used during the test;
- saddle-to-handlebar reach;
- saddle-to-handlebar drop;
- handlebar or hood coordinates relative to the bottom bracket;
- handlebar width and reach;
- crank length;
- cleat position, if it was assessed.
A number without a measurement method is difficult to reproduce. “Saddle height 745 mm” could mean bottom bracket to saddle top along the seat tube, or another path. Ask for the diagram or definition.
Separate rider position from frame geometry
Frame stack and reach describe the frame; they do not directly equal the handlebar position. Headset covers, spacers, stem length and angle, handlebar reach, hood placement, and integrated cockpits all change the final contact point.
The report should therefore give either:
- an acceptable frame stack-and-reach range plus component assumptions; or
- a shortlist of exact models and sizes with the proposed configuration for each.
Bikefitting.com’s own sample reporting explains that the aim is not to find a frame whose stack and reach exactly equal the theoretical position. It is to select a frame that can achieve the position with suitable components and within safe adjustment limits.
Demand the component assumptions
Two fitters can recommend the same frame size but imagine different builds. Ask the report to record:
- stem length and angle;
- spacer height and the maker’s allowed maximum;
- headset top-cover height;
- handlebar reach, drop, flare, and width;
- crank length;
- seatpost offset;
- saddle rail position and remaining adjustment;
- any proprietary cockpit dimensions;
- whether the position leaves adjustment in both directions.
Be cautious if the only way to make a new bike fit is an extreme stem, every available spacer, a saddle at the end of its rails, or a seatpost used outside its instructions. A good purchase has reasonable adjustment margin for real-world refinement.
Ask which bikes are excluded—and why
A useful fit can save money by ruling out a tempting option. The fitter should be able to say:
- this size cannot put the bar high or close enough;
- that model needs a proprietary cockpit unavailable in the required length;
- one size leaves safe adjustment room while the adjacent size does not;
- the desired tyre or accessory changes the suitable category;
- a candidate can work only with a specific bar, stem, or seatpost.
This is more valuable than a long brand list. It turns the report into decision criteria you can use when new models appear.
Treat the fit as a baseline, not a guarantee
A fitting session cannot reproduce every hour of a long ride, road vibration, fatigue, heat, climbing, descending, or group riding. Your position may also evolve with fitness, mobility, goals, equipment, and injury status.
Test the recommended setup on the real bike when possible. Confirm brake-lever access, low-speed control, toe and tyre clearance, standing climbing, and comfort across your intended hand positions. Make one change at a time and keep a bike-fit log after purchase.
Questions to email before booking
Use this short script:
- Is this a pre-purchase sizing session on an adjustable fit bike?
- Will I receive a written report with defined contact-point coordinates?
- Will you provide an acceptable geometry range or evaluate my exact candidate models?
- Will the report include stem, spacer, handlebar, crank, and seatpost assumptions?
- Can you identify configurations that exceed a manufacturer’s adjustment limits?
- Is a follow-up included after I buy the bike?
- How do you handle pain, injury history, or a referral outside your scope?
If the answers are vague, compare another service. The guide to choosing a bike fitter explains how to assess process and independence before paying.
Your next step
Choose two or three candidate bikes, download their official geometry and cockpit charts, and ask the fitter to show—on paper—how each would reach the tested position. Leave with the report, not just a verbal size.
Sources and further reading
- Reddit: recent discussion about pre-purchase fit deliverables — editorial demand signal only; anecdotes were not treated as verified facts.
- Bikefitting.com: static fit and report outputs
- Bikefitting.com: example report with matching bike dimensions
- International Bike Fitting Institute fitter directory