How to choose the right road-bike saddle width
Use sit-bone width as a starting point, then test saddle shape, riding position, and pressure symptoms instead of buying by body size, padding, or gender label alone.
 Field guide / how-to-choose-road-bike-saddle-width
The correct road-bike saddle is wide enough to support your bony contact points in your riding posture, without creating thigh interference or concentrating pressure on soft tissue. Your height, weight, clothing size, or sex label cannot determine that width by itself.
The short answer: measure your sit-bone spacing as a useful starting point, shortlist saddles intended for your riding position, and test them with the same bike setup and shorts. Width matters, but contour, nose shape, cutout, tilt, height, reach, and how your pelvis rotates can change the result.
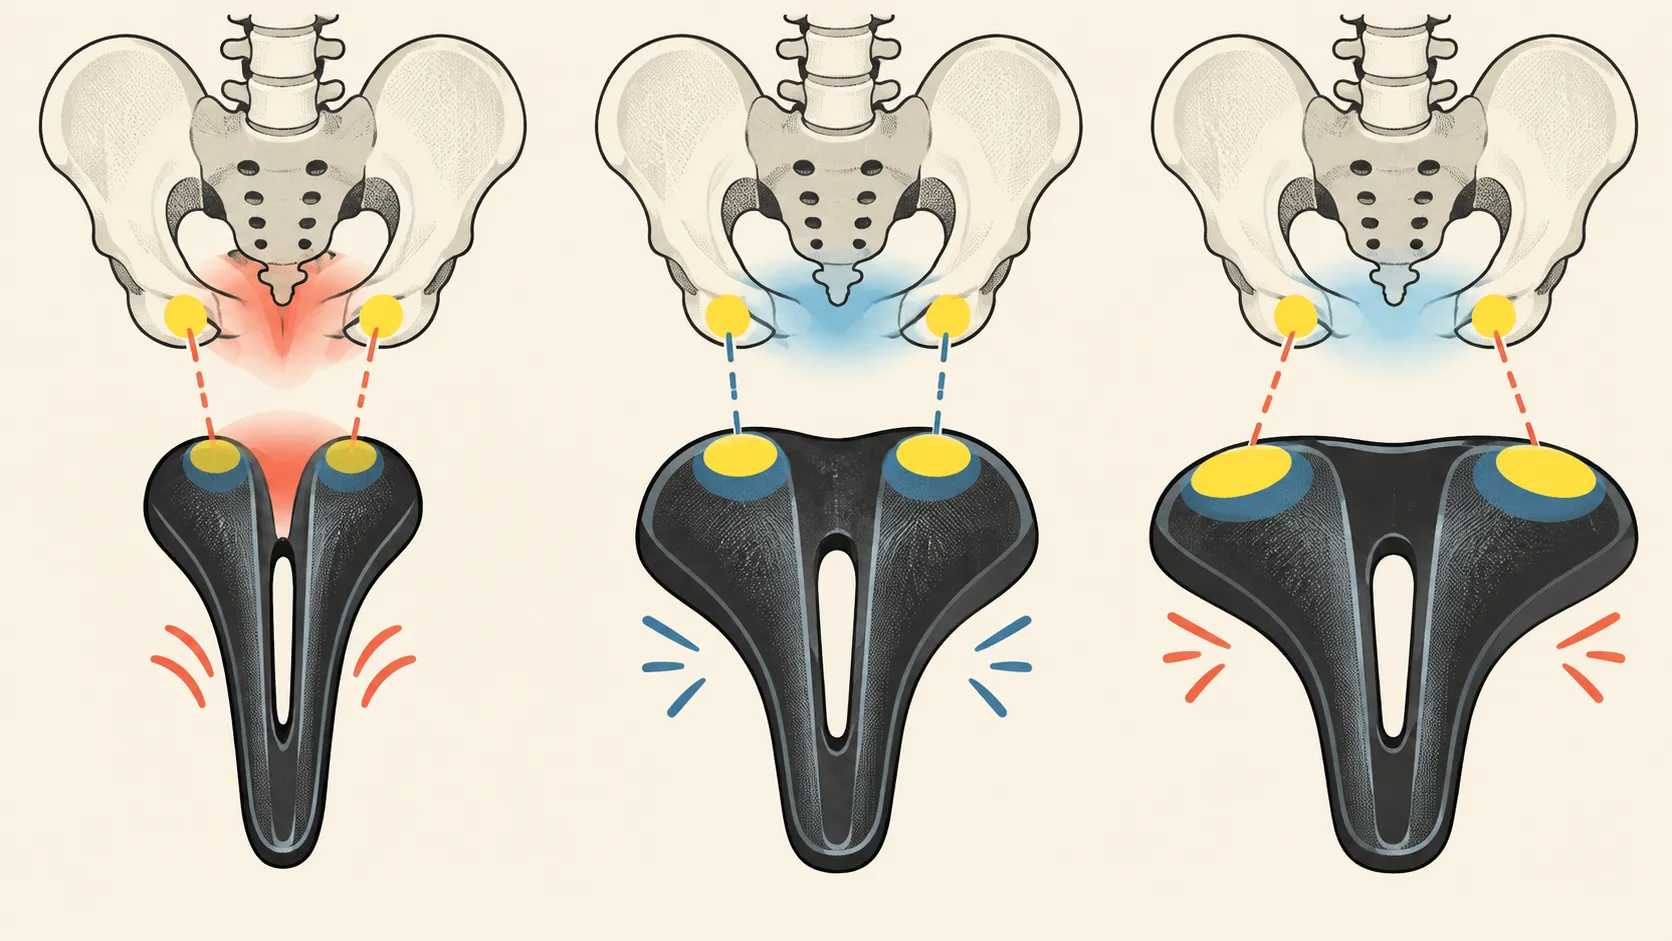
Why body size is a poor shortcut
A recent r/cycling discussion described a larger rider who found a narrower-than-expected sit-bone measurement after persistent saddle trouble. Another current bike-fit question linked soft-tissue discomfort, hood position, and sliding forward.
Those stories are demand signals, not proof that one measurement or saddle solves every rider. They do show why “bigger person equals wider saddle” is unreliable. Bone spacing and riding posture are not visible from overall body shape.
What the evidence can—and cannot—tell you
A 2023 study of ten healthy young women compared four saddle widths during short stationary trials. In that specific setup, a saddle wider than the riders’ measured ischial spacing improved parts of pressure distribution and comfort. The study is useful evidence that width affects loading, but its small sample, population, short duration, fixed workload, and tested designs do not create a universal add-one-centimetre buying rule.
Other research has found that pelvic tilt, flexibility, body weight, saddle position, nose design, and riding posture also affect saddle pressures. That is why a width measurement should narrow the test set, not declare a winner.
Measure sit-bone spacing as a shortlist tool
The most repeatable option is a shop or fitter with an appropriate measurement system and several test saddles. A home impression in corrugated cardboard, foil over a yielding surface, or another maker-approved method can provide a rough starting value, but technique affects the result.
For a home check:
- Wear thin clothing and use a firm, slightly yielding measurement surface.
- Sit in a posture that roughly matches your intended road position; a very upright impression may not represent a rotated road posture.
- Load the surface firmly enough to leave two clear depressions.
- Mark the centre of each depression and measure centre to centre in millimetres.
- Repeat twice. If the values vary widely, treat the method as inconclusive.
Do not measure the outside edges of the marks. Do not add an internet constant without checking the saddle maker’s own sizing method, because brands define usable width and rider posture differently.
Match shape to the way you actually sit
Flatter or more curved profile
A flatter saddle can make fore-aft movement easier. A more curved or waved saddle may locate the pelvis more strongly. Neither is inherently more supportive; the result depends on anatomy, position, and how much you move during a ride.
Long or short nose
Nose length and width influence thigh clearance and forward positions. A short-nose design does not automatically remove pressure; it changes where usable support and the transition to the nose occur.
Cutout or channel
A cutout may reduce pressure in one region but can increase pressure around its edges or elsewhere. Research in women has found that design effects vary rather than proving that every cutout is better. Judge symptom location and pressure distribution, not the presence of a hole.
Padding
More padding is not the same as more support. Thick soft foam can feel inviting for a minute and still allow concentrated pressure or chafing later. Padded cycling shorts and saddle padding also interact; test the complete contact system.
Set the saddle before judging it
A suitable saddle can feel wrong when its installation is wrong.
Start with:
- height in a reasonable range;
- the saddle visually level according to the maker’s intended reference surface;
- fore-aft position based on fit, not an attempt to shorten the handlebar reach;
- the clamp hardware in the permitted rail zone;
- the exact fastener sequence and torque from the seatpost manual.
Do not point the nose sharply downward to escape pressure. That can make you slide forward, brace with your arms, and create a second comfort problem. Use why you keep sliding forward on the saddle to separate tilt, position, reach, and shape.
Use a controlled saddle test
Change only the saddle where possible. Keep shorts, bike setup, route, tyre pressure, and approximate effort consistent.
Test in stages:
- Ten minutes: check immediate pressure, thigh contact, and whether you sit naturally.
- Thirty to sixty minutes: note hotspots, sliding, chafing, numbness, and hand loading.
- A normal ride: confirm that the result survives climbing, hoods, tops, and changes in intensity.
- The following day: record skin irritation or persistent symptoms rather than relying only on the finish-line impression.
A return or demo programme is often worth more than a persuasive product description. Do not keep riding through numbness to “break in” a saddle.
Read the symptom, not the marketing label
| Symptom | Possibilities to investigate |
|---|---|
| Pressure centred on soft tissue | Width, contour, pelvic rotation, tilt, reach, saddle position |
| Inner-thigh rubbing at the rear | Saddle too wide in that region, shape, shorts, or knee path |
| Two sharp sit-bone hotspots | Shape or padding mismatch, abrupt load increase, width/setup issue |
| Sliding toward the nose | Tilt, rear contour, saddle too high, excessive reach, posture |
| Numbness | Stop riding; unload pressure and obtain qualified assessment |
| One-sided discomfort | Saddle alignment, asymmetry, injury, cleat or fit issue |
New sit-bone tenderness can occur when riding time increases, but severe or persistent pain is not a requirement of adaptation. Skin lesions need a different response; see preventing and responding to saddle sores.
Your next step
Measure your sit-bone spacing twice, write down your normal riding posture and symptom location, then choose two or three test saddles using each manufacturer’s own width guidance. Test one variable at a time. If numbness or persistent soft-tissue pain is involved, stop experimenting through symptoms and consult an appropriately qualified clinician and bike fitter.
Sources and further reading
- Journal of Sports Science and Medicine study: saddle width and pressure in female cyclists
- Applied Ergonomics study: saddle nose width, cutout, pressure, and discomfort
- r/cycling reader context: body size did not predict one rider’s measured saddle width
- r/bikefit reader context: soft-tissue pressure changes between tops and hoods