Disc brakes lost power after storage? Diagnose before riding
Separate a firm lever with poor bite from a soft or changing lever, then inspect contamination, corrosion, pads, rotor, cables, leaks, and bedding.
 Field guide / disc-brakes-lost-power-after-storage
Disc brakes can lose useful friction while a bike is parked. Storage does not wear the pads through mileage, but oil mist, cleaners, humidity, corrosion, a caliper leak, glazed surfaces, cable deterioration, or an incomplete original bed-in can change braking. Do not assume several hard stops will cure it.
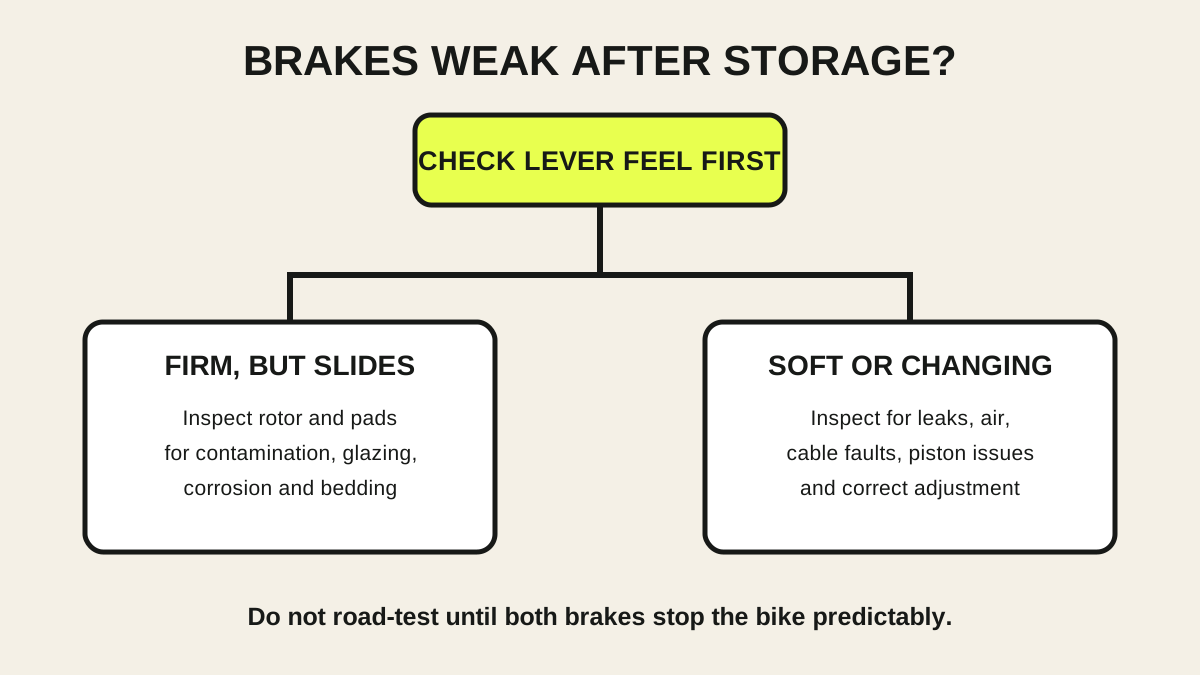
The short answer: check lever feel before touching adjusters. A firm, normal lever with weak sliding or noise points first toward the pad-and-rotor friction surfaces. A soft, long, sticky, or changing lever points toward hydraulic, cable, caliper, or adjustment faults. Inspect both systems cold and clean, follow the exact brake manual, and complete a controlled brake test before road use.
Parking did not make contamination impossible
A current r/bikewrench question describes mechanical and hydraulic disc brakes that lost bite while their bikes were unused. The pads were nearly new, yet the brakes slid and made a dragging-door sound.
Low mileage does not rule out contamination. Aerosol lubricant, chain oil, silicone polish, suspension oil, cleaning spray, road film, or fluid leaking at a piston can reach a rotor or pad in storage. New pads can also have little useful transfer layer if they were never bedded to the rotor correctly.
Humidity can create light rotor corrosion. Cable housings can collect corrosion or settle into poor routing. Hydraulic seals or hose joints can reveal a leak over time. Treat “it sat unused” as part of the history, not a diagnosis.
Step 1: map the symptom without riding
With the bike secure and the brakes cool, operate each lever separately.
Record:
- firm and normal, or soft and long;
- same on repeated pulls, or changing;
- smooth return, or slow/sticky return;
- rotor turning freely when released, or dragging;
- noise only under braking, or every wheel revolution;
- visible fluid, corrosion, dirt, or rotor damage.
Compare front with rear, but do not treat the stronger brake as proof it is perfect. If the lever pulls close to the bar, firms up after pumping, fails to return, or fluid is present, stop. The exact brake may need adjustment, hose work, piston service, or bleeding.
Step 2: protect the friction surfaces
Before inspecting, move chain lubricant, degreaser, polish, and aerosol products away. Wear clean gloves. Do not touch the rotor track or pad face with bare fingers.
Look for:
- oily sheen or a fingerprint pattern;
- dark wet areas around caliper pistons or hose joints;
- uneven pad colour;
- glassy pad surfaces;
- rotor scoring, deformation, or heavy corrosion;
- a pad spring touching the rotor;
- friction material below the maker’s limit.
Shimano’s road disc-brake manual says pads with oil on them should be replaced and gives model-specific wear instructions. This is safer than improvised burning, baking, or soaking. A forum method that appears to rescue a pad does not prove that oil has left its porous friction material or that its binder remains sound.
Step 3: inspect the system that creates force
Hydraulic brakes
Check the lever body, hose, connections, caliper, and piston area for fluid or dirt that appears wet. Do not confuse ordinary assembly grease with a conclusion; if uncertain, have the system inspected.
A lever that slowly approaches the bar under steady pressure, changes after repeated pulls, or has visible leakage needs model-specific service. Do not add fluid, mix fluid types, or improvise a bleed. Shimano mineral-oil systems and brakes using DOT fluid have different procedures and materials.
Mechanical disc brakes
Inspect the cable for broken strands, corrosion, kinks, slipping at the anchor, damaged housing, and poor end-cap seating. Confirm that the caliper arm returns fully and the rotor is correctly positioned between the pads.
Do not compensate for a contaminated pad by pulling more cable. Adjustment can restore pad clearance and lever travel; it cannot restore missing friction.
Step 4: clean only as the maker permits
Follow the exact rotor and brake instructions. Use a clean lint-free cloth and only the cleaning agent the maker allows. Avoid spraying cleaner near installed pads, bearings, tyres, painted surfaces, or seals.
Do not sand the rotor aggressively, use a torch on pads, apply household solvents, or add “anti-squeal” chemicals unless the component maker explicitly instructs it. These shortcuts can change thickness, surface finish, pad bonding, seals, or future contamination.
If contamination is confirmed or strongly suspected, remove its source before installing replacement pads. Replacing pads while a piston or hose continues to leak wastes the new set.
Step 5: bed compatible pads to a sound rotor
New pads and a cleaned or replaced rotor need the brake maker’s bedding procedure. Bedding transfers pad material to the rotor so friction becomes consistent. It is not a series of emergency stops.
Use a traffic-free, level area with an escape route. Build moderate speed, apply one brake progressively to slow firmly without locking the wheel, release, and repeat as instructed. Allow cooling where the procedure requires it.
Stop if power does not build predictably, the lever changes, vibration develops, or noise worsens. Repeated hard braking on a contaminated system can spread material rather than repair it.
Complete a staged return test
Before ordinary riding:
- Confirm wheel and axle security.
- Spin each wheel and check normal release.
- Hold each lever under steady pressure and watch for movement or leakage.
- Perform a walking-speed stop with each brake separately.
- Perform several controlled low-speed stops in a traffic-free area.
- Reinspect pads, rotor, caliper, and lever.
Do not begin with a descent or traffic. If either brake remains weaker than its documented normal operation, book service.
Prevent recurrence during storage
Store the bicycle away from aerosol lubricants, solvent vapour, oily rags, and direct spray. Do not hang it where household chemicals can drip onto a rotor. After washing, dry the bike and avoid directing high-pressure water at calipers or bearings.
Before the first ride after a long pause, use the post-storage bicycle safety check and test both brakes before leaving home.
Your next step
Write down whether the weak brake has a firm or soft lever, then photograph both pad faces, the rotor track, caliper, and hose or cable route without touching the friction surfaces. Find the exact brake manual. If oil, leakage, uncertain wear, or abnormal lever travel appears, stop and arrange model-specific service.
Sources and further reading
- Shimano road hydraulic-disc dealer manual: pad replacement and contamination criteria
- Shimano hydraulic-disc maintenance: cleaning and approved service materials
- r/bikewrench reader context: disc-brake power reduced while bicycles were stored — used as a current symptom signal; repair suggestions in replies were not treated as manufacturer instructions.