Cracks around bicycle rim spoke holes: stop riding or repair?
Identify stress cracks around spoke holes, distinguish them from scratches and seams, and decide whether a cracked bicycle rim needs immediate replacement.
 Field guide / cracks-around-bike-rim-spoke-holes
A line radiating from a spoke hole can be a structural fatigue crack. If it crosses the rim material, grows from the nipple seat, appears at several holes, or comes with loose spokes or a changing wheel shape, stop riding and replace the rim or complete wheel. Tightening the spoke is not a repair.
The short answer: clean and inspect the area under bright light. A confirmed crack around a spoke nipple removes that rim from service until a competent wheel builder or the manufacturer evaluates it.
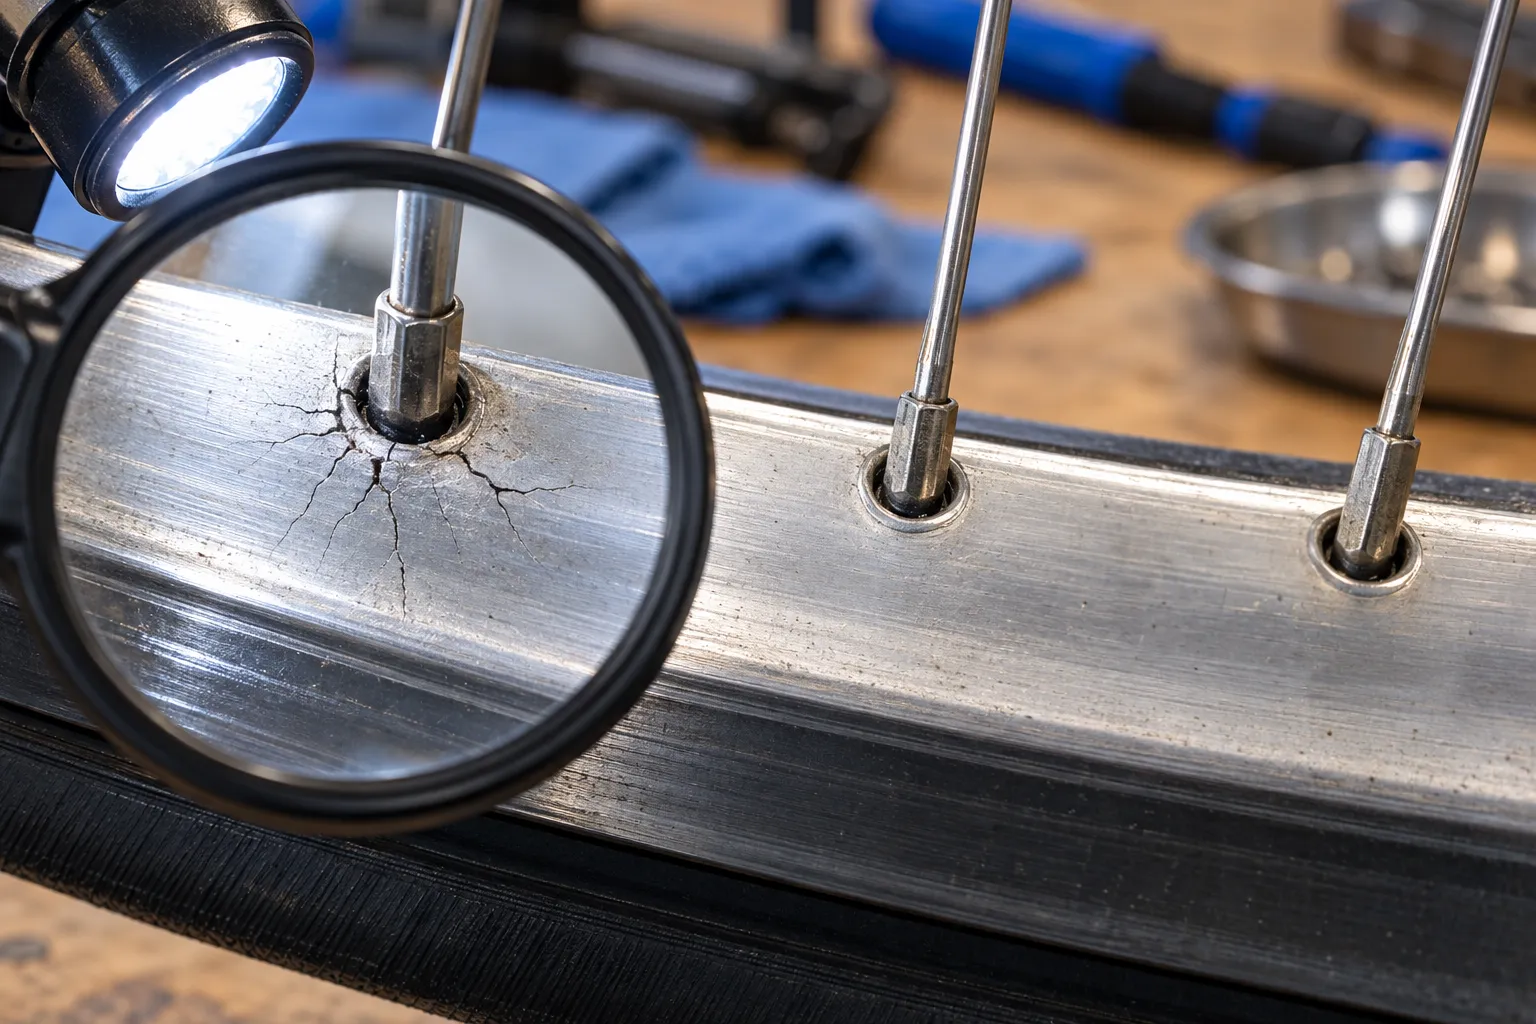
Why cracks form at spoke holes
Every tensioned spoke pulls on a small area of the rim. A suitable rim spreads that load through its material, eyelet, washer, or internal bed. Cracks can begin when repeated stress exceeds the rim’s fatigue life or when local load becomes too high.
Contributors can include:
- uneven or excessive spoke tension;
- too few or unsuitable spokes for the total load and use;
- rim damage, corrosion, or manufacturing defect;
- a poorly built or repeatedly re-trued wheel;
- high motor torque or cargo load on a wheel not designed for it;
- impacts and long service life;
- incompatible nipples, washers, or drilling.
DT Swiss notes that higher wheel deformation increases dynamic stress at spoke holes and that insufficiently reinforced wheels under high loads can develop cracks there. That relationship does not let you diagnose the single cause from a photo; the whole wheel needs inspection.
Clean the rim before judging the line
Remove surface dirt with a cloth and a cleaner approved by the rim maker. Deflate the tyre if the rim shape looks wrong, but do not dismantle a pressurised tubeless system casually.
Use bright light from different angles and a magnifier or phone macro camera. Look for:
- a line beginning exactly at the nipple hole or eyelet;
- several radial lines around one hole;
- an eyelet lifting or a nipple pulling through;
- a ridge you can catch with a fingernail;
- corrosion or dark contamination emerging from the line;
- the same pattern at adjacent spoke holes;
- loss of true, repeated spoke loosening, or changing tension.
A shallow surface scratch normally continues across the area without focusing on the nipple seat. A pinned or welded rim joint occurs at one fixed point in the hoop and can look like a straight seam; it should not be assumed to be a crack, but a displaced or opening joint still needs professional assessment.
Do not use internet photo tests as proof
Dye penetrant and other non-destructive inspection methods require suitable products, preparation, and interpretation. Paint, anodising, dirt, and curved surfaces can mislead. Do not sand a carbon rim, drill the end of a crack, add adhesive, or hide the area under tape.
Send the manufacturer or wheel builder:
- clear close and wide photographs;
- rim and wheel model;
- serial or production code privately;
- rider, bicycle, luggage, and cargo total mass;
- tyre pressure and tyre size;
- spoke count and lacing pattern;
- history of impacts, broken spokes, and recent truing;
- whether the wheel has a motor.
Why tightening the spoke makes it worse
A loose spoke near a crack may be a symptom of the nipple seat moving. Adding tension loads the already damaged area and can accelerate failure. Truing can temporarily hide the wobble while the crack continues to grow.
Do not ride home to “see whether it gets worse.” Arrange pickup, public transport, or another wheel. If a spoke has also failed, read whether a broken-spoke wheel is rideable—but a rim crack makes this a stop-riding case.
Replace the rim or the whole wheel?
A skilled wheel builder may be able to reuse the hub with a new compatible rim and usually new spokes and nipples. Compare:
- rim availability and exact effective rim diameter;
- hub condition and remaining value;
- new spokes, nipples, tape, labour, and shipping;
- warranty or crash-replacement coverage;
- complete replacement-wheel cost;
- whether the original wheel was appropriate for system weight and use.
If repeated spokes broke before the crack appeared, solve the load, build, or compatibility problem rather than copying the old wheel. Use the guide to why spokes keep breaking and the compatible-wheel checklist before ordering.
Inspect the rest of the bicycle
A cracked rear rim can be part of a wider overload or impact event. Check the tyre, frame and fork clearance, axle, hub, rotor, cassette, and the other wheel. Confirm the bicycle and wheel system-weight limits include the rider, bike, luggage, water, locks, and any motor conversion.
Your next step
Mark the wheel as unsafe, photograph every spoke hole, and send the evidence to the wheel maker or an experienced builder. Ask for a written decision on warranty, rim rebuild, or complete replacement before changing spoke tension.
Sources and further reading
- DT Swiss: why higher loads can cause cracks near spoke holes
- DT Swiss wheel inspection and service guidance
- r/bikewrench demand signal: repeated loose spokes and cracks around spoke holes — used as an editorial question signal, not a diagnosis of that bicycle.