How to clean sticky sports drink off a road bike
Rinse sugar before it traps grit, use mild soap without pressure-washing, protect brake surfaces, dry hidden seams, and fix the leaking bottle or cage.
 Field guide / clean-sticky-sports-drink-off-road-bike
Sports drink dries into a sticky film that holds dust and road grit. Leaving it around bottle-cage bolts, cable ports, bottom-bracket seams, or a front derailleur turns a small leak into abrasive grime. The answer is prompt, gentle washing—not aggressive solvent or a pressure washer.
The short answer: remove and wash the bottle, rinse the spill with low-pressure water, use a soft sponge with bike-maker-approved mild detergent, rinse again, then dry seams and hardware. Keep every cleaner and lubricant away from braking surfaces. Inspect the cage, bottle cap, nozzle, and frame afterward so the leak does not repeat.
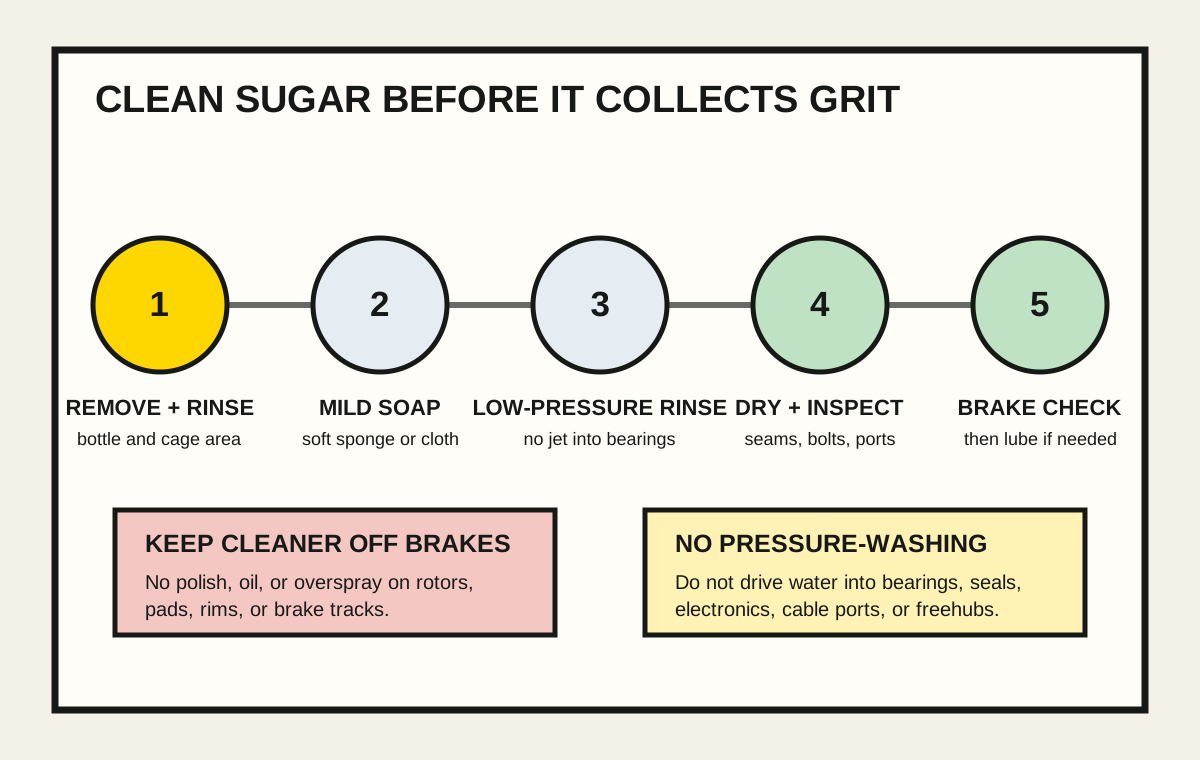
Clean it today, not after the next ride
Sugar is water-soluble when fresh. Once mixed with road dust it becomes a gritty paste, especially on the down tube, seat tube, front derailleur, crank area, chainstay, and rear brake or caliper.
Park the bicycle somewhere stable and shaded. Switch off and, if the manual requires it, remove electronic batteries before washing. Close charging ports. If the bicycle has a removable wheel or accessory whose manual changes the wash procedure, follow it.
Do not clamp a carbon frame tube in a workstand. Support the bicycle at an approved point.
Remove the bottle and identify the leak
Empty the bottle and wash it according to the bottle maker’s food-contact instructions. Separate only the cap, valve, and seals the maker says are removable.
Check for:
- a nozzle not fully closed;
- grit or drink powder under the valve;
- a cross-threaded or loose cap;
- a missing, twisted, swollen, or damaged seal;
- cracks in the cap or bottle neck;
- a bottle squeezed by a cage that is too tight or poorly shaped;
- overflow caused by filling above the marked level;
- leakage only when the bottle lies sideways.
Do not assume every cap fits every bottle from the same brand. Replace damaged food-contact parts rather than gluing a drinking valve.
Rinse before scrubbing
Use a gentle flow of clean water to soften and carry away the drink. Start above the spill and work downward. Avoid directing water into headset, bottom-bracket, hub, freehub, pedal, cable-port, or electronic openings.
Trek’s current owner guidance recommends water or mild detergent with a non-abrasive sponge and warns against pressurised water and harsh chemicals. Follow the instructions for your exact frame, finish, components, and electronics.
If the drink reached a disc rotor or rim-brake track, do not spread it with a dirty sponge. Use the brake maker’s cleaning procedure and clean lint-free material reserved for brakes. Pads that are contaminated or braking that remains weak, noisy, or inconsistent need proper inspection and may need replacement.
Wash from clean areas toward dirty ones
Mix only the amount and concentration of mild detergent allowed by the bike maker. Use separate tools for frame, drivetrain, and brakes.
- Wash the top tube, head tube, and upper frame first.
- Clean around the bottle bosses and cage with a soft brush.
- Work down the seat tube and down tube.
- Clean the crank exterior, chainstay, and derailleur surfaces without forcing water into pivots or bearings.
- Leave the chain, cassette, jockey wheels, and oily areas for the drivetrain tool.
Do not use kitchen scouring pads, magic erasers, acetone, fuel, strong alkaline cleaner, or an unknown solvent on paint, clear coat, carbon, decals, seals, or anodised parts. A product safe for one bare metal part may damage another finish.
If sugar has dried inside an inaccessible frame port or electronic component, do not flood it. Ask the bicycle or component maker for the correct access and cleaning procedure.
Rinse and dry deliberately
Rinse with low-pressure water until no slippery soap or sticky residue remains. Dry with clean towels, then inspect:
- bottle bosses, bolt heads, and cage feet;
- frame junctions and drain holes;
- cable and hose entry points;
- front-derailleur clamp or mount;
- bottom-bracket exterior;
- chainstay protector and hidden edge;
- brake caliper and wheel surfaces;
- electronic connectors and charging-port covers.
Do not use high-pressure compressed air to drive water deeper into seals. Let the bicycle finish drying in a ventilated space.
If the chain was washed or soaked, use the chain-lubricant maker’s cleaning and reapplication process after it is dry. Apply only to the chain rollers, wipe the exterior, and protect brake surfaces. More chain lubricant is not better explains the clean finish you want.
Check the cage, not only the bottle
A correctly closed bottle can leak if it rattles, is crushed, sits at an angle, or repeatedly hits a frame or bag. With the bottle empty, check:
- cage bolts are secure to the frame maker’s torque;
- the cage is not cracked, bent, or sharply worn;
- the bottle inserts and releases without extreme force;
- the cap clears the frame, bag, and pump;
- the bottle cannot jump upward on a gentle pull;
- an adapter or side-entry cage is installed in its approved orientation.
Do not overtighten cage bolts to stop a rattle. Carbon frames, rivnuts, and threaded bosses can be damaged. Use only approved washers, thread treatment, and torque.
Run a no-drip test off the bicycle
Fill the cleaned bottle with plain water. Close it exactly as intended and hold it over a sink in each riding orientation. Squeeze with normal drinking pressure and check the nozzle, cap thread, seal, and bottle body separately.
If it leaks, replace the correct seal, cap, or bottle. If it stays dry off-bike but leaks on rough roads, inspect cage retention and bottle deformation. Use plain water in that bottle until the problem is solved; it is easier to clean and easier to identify.
Before riding, squeeze both brake levers firmly while stationary, check wheel and brake security, then perform a low-speed brake test away from traffic. Stop for reduced braking, new noise, or residue on a braking surface.
Your next step
Wash the spill now, then perform the plain-water sink test. Replace the leaking part before mixing another carbohydrate drink, and add a quick frame rinse to your five-minute post-ride care routine.
Sources and further reading
- Trek: current bicycle owner manual, cleaning and service safeguards
- Trek: bicycle washing, brake-surface, and chain-care guidance
- r/cycling reader context: repeated sports-bottle leakage leaving carbohydrate drink on a bicycle — used as a current maintenance signal; product-specific causes in replies were not treated as verified defects.