How to tell if your rear derailleur hanger is bent
Poor shifting after a fall may be a bent derailleur hanger. Check the wheel first, recognise the warning signs, and know when to stop riding instead of adjusting around the damage.
 Field guide / bent-rear-derailleur-hanger
Before you buy
Check the starter kit first
Print the one-page buying brief for helmet, lights, water, phone, and repair compatibility before comparing upgrades.
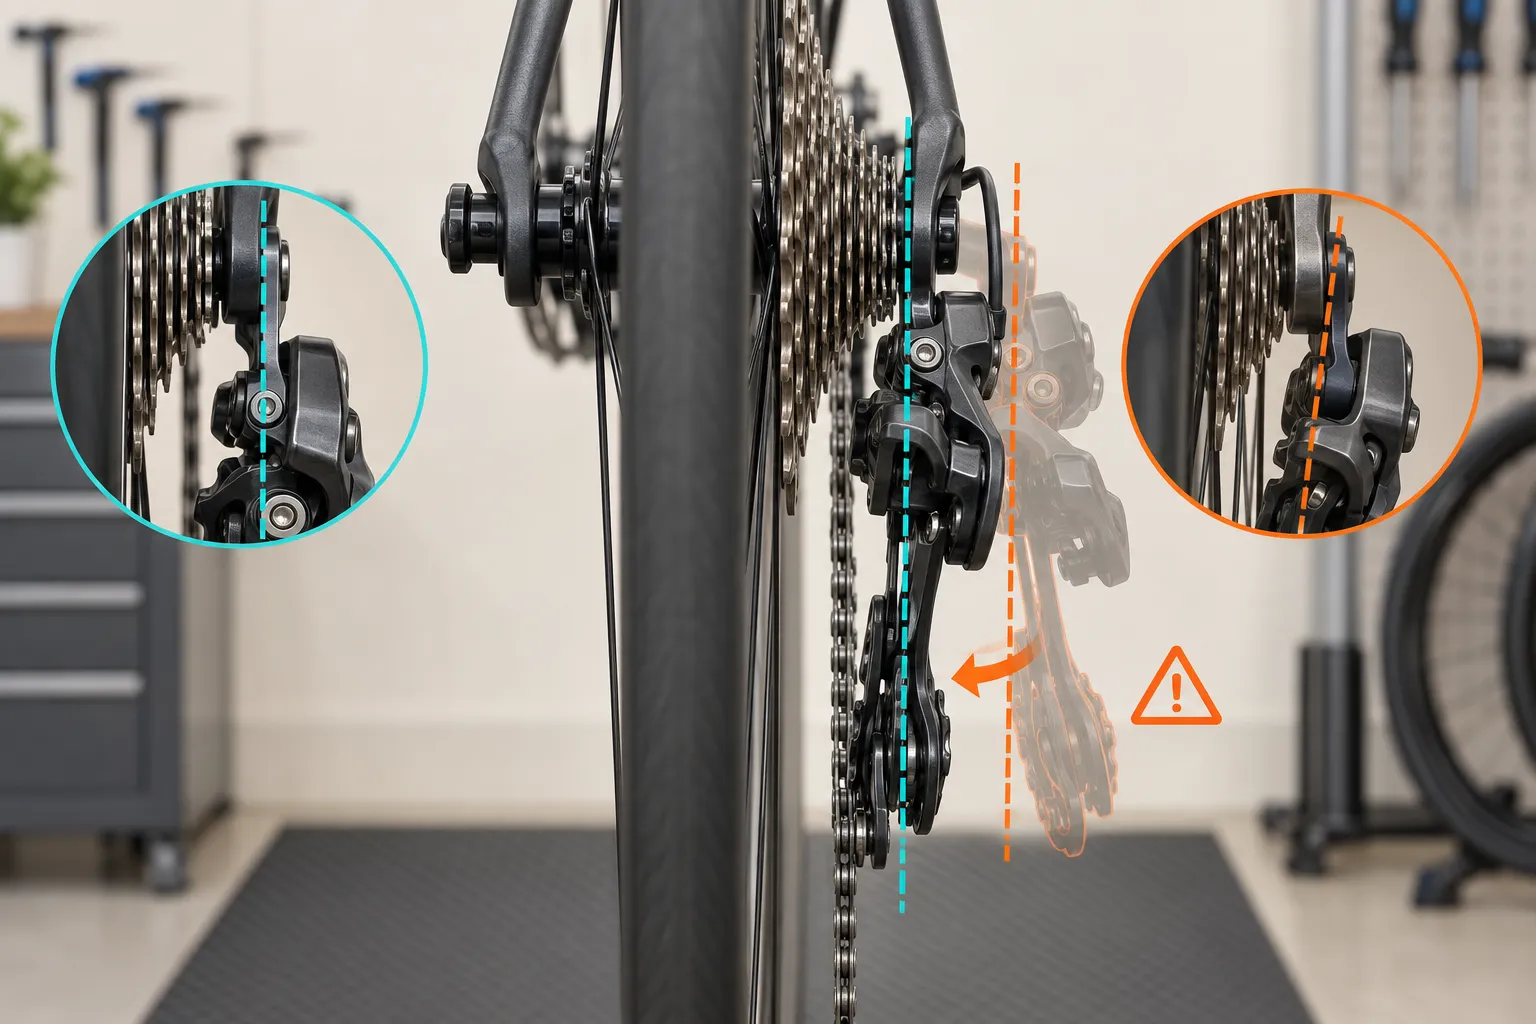
A rear derailleur hanger is suspect when shifting becomes poor immediately after the bike falls onto its drive side, the derailleur sits closer to the spokes, or indexing seems correct at one end of the cassette but wrong at the other. Looking from behind can reveal a large bend, but only an alignment gauge can measure it reliably.
The short answer: first make sure the rear wheel is fully seated and secured. Then inspect the hanger, derailleur, and frame for damage. Do not use the barrel adjuster or limit screws to disguise a derailleur that is moving toward the spokes. If clearance is unsafe or the cause is uncertain, do not ride the bike to the shop.
Why a small part causes a large problem
The hanger connects the rear derailleur to the frame. On many modern bikes it is a replaceable part intended to take damage before the frame does. A drive-side fall, transport knock, or impact can move it out of the plane of the rear wheel.
Recent r/bikewrench questions show the recurring pattern: a first-time owner noticed a visibly crooked derailleur after shipping, while another rider found the derailleur near the spokes after the bike fell over. Those threads are diagnostic prompts, not proof about your bike; photos can hide wheel seating, camera angle, and damage elsewhere.
Shimano’s rear-derailleur service guidance says a derailleur will not shift properly if the hanger is not straight and specifies checking it with an alignment tool. Park Tool similarly identifies hanger misalignment as a common cause of shifting trouble that cannot normally be corrected by indexing alone.
Check the wheel before blaming the hanger
A wheel installed at an angle can make the cassette and derailleur relationship look wrong.
- Stop riding and shift away from the largest rear sprocket if it can be done without forcing the system.
- Inspect the axle, dropout, hanger, derailleur, spokes, and chain without turning the cranks near your fingers.
- Reseat the wheel according to the bike and axle maker’s instructions.
- Secure the quick release or thru-axle to the specified method and torque.
- Spin the wheel and verify that it is centred normally in the frame and that the brake behaves correctly.
If the wheel will not seat, the axle will not thread normally, or a dropout looks damaged, stop. That is no longer a simple indexing problem.
Signs that point toward hanger misalignment
No single symptom proves the diagnosis, but the combination matters:
- shifting deteriorated immediately after a drive-side impact;
- the derailleur cage appears to lean relative to the cassette when viewed from behind;
- one part of the cassette shifts acceptably while another part rattles or hesitates;
- the upper pulley no longer tracks beneath the selected sprocket;
- the chain wants to move beyond the largest sprocket;
- the derailleur sits unusually close to the spokes;
- normal barrel-adjuster changes move the problem instead of solving it.
A bent derailleur cage, loose derailleur mounting bolt, worn chain or cassette, sticky cable, electronic setup error, or damaged frame can create similar symptoms. See why a chain skips under load if the problem occurs only while pedalling hard rather than during the shift itself.
What not to adjust first
The barrel adjuster changes cable tension; it does not straighten a hanger. The high and low limit screws restrict derailleur travel; they do not align the derailleur with the cassette.
Turning those controls at random can erase the original setup and create a second fault. Most importantly, moving the low limit to obtain the largest sprocket while the derailleur is bent inward can reduce spoke clearance.
Do not push the derailleur by hand, pull it outward by the cage, or bend a hanger with an adjustable wrench based only on how it looks. The hanger must be compared with the wheel plane at several positions. Improvised leverage can damage threads, the derailleur, or an integrated frame dropout.
The conclusive check uses an alignment gauge
A derailleur hanger alignment gauge threads into the hanger in place of the derailleur. The tool compares the hanger plane with the same reference point on the wheel rim at different clock positions. Using the same spot on the rim removes much of the error from a wheel that is not perfectly true.
This is precise work because a small angular error at the hanger becomes a larger side-to-side difference near the rim and cassette. The repair also depends on hanger material, design, previous impacts, and whether the hanger is replaceable.
For a beginner, a shop measurement is often cheaper than buying a quality gauge for one uncertain repair. If you intend to learn the job, follow the tool maker’s complete method and the bicycle maker’s instructions rather than a short social-media clip.
Straighten or replace?
An intact, replaceable hanger with modest misalignment can often be measured and realigned. Replace it when it is cracked, severely deformed, has damaged threads, has failed during alignment, or the manufacturer requires replacement. Repeatedly bending the same part back and forth is not a sensible test.
Replacement is not simply “find one that looks close.” Hanger shapes and mounting details vary widely. Identify the exact frame brand, model, year, and hanger standard. Keep the old part for comparison. A new hanger should still be checked for alignment on the specific frame, then the derailleur limits and indexing must be verified.
If the hanger is integrated into the frame, or the dropout itself has moved, use an experienced mechanic or frame specialist. Material and construction determine whether a frame repair is possible.
A safe decision sequence
| What you find | What to do |
|---|---|
| Wheel was not seated; shifting is normal after correct installation | Complete a full brake and shift check before riding |
| Large visible lean or derailleur close to spokes | Do not ride; arrange transport and gauge inspection |
| Poor shifting after an impact but no obvious lean | Have the hanger measured before replacing drivetrain parts |
| Cracked hanger, damaged threads, or loose mounting interface | Replace or repair correctly before riding |
| Bent frame dropout or uncertain carbon-frame damage | Stop and use a qualified frame or bike professional |
| Hanger checks straight | Diagnose cable friction, derailleur condition, indexing, chain, and cassette |
After any repair, turn the cranks by hand in a stand, shift one gear at a time, inspect spoke clearance in the largest sprocket, and verify both limit settings. Then perform a low-speed test in a traffic-free area.
Your next step
Think back to the moment the shifting changed. If there was a fall, transport knock, or drive-side impact, stop adjusting cable tension and have the wheel seating and hanger alignment checked. Photograph the hanger and frame details before ordering a replacement, and bring the exact bike model and old hanger to the shop.