Air bubbles through a tubed tyre sidewall: where is the puncture?
Understand why a punctured inner tube can vent through a tyre casing, then remove the wheel and locate the real failure before fitting another tube.
 Field guide / air-bubbles-through-tubed-tyre-sidewall
Before you buy
Check the starter kit first
Print the one-page buying brief for helmet, lights, water, phone, and repair compatibility before comparing upgrades.
If a bicycle uses an inner tube, the tyre itself is not the airtight chamber. A punctured tube can release air into the space between tube, tyre, and rim. That air then escapes wherever the tyre casing, bead, valve hole, or rim joint offers a path—sometimes as bubbles across a wet sidewall.
The short answer: sidewall bubbles tell you where loose air left the wheel, not necessarily where the tube was punctured. Stop riding, remove the tube, find and mark its actual leak, align that point with the tyre and rim, and inspect all three before installing a replacement or approved patch.
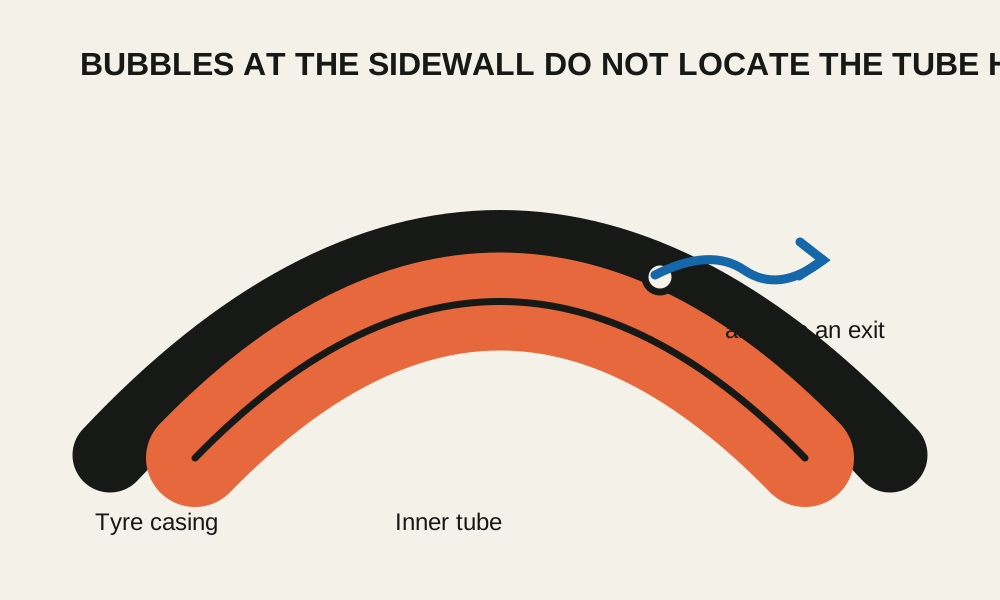
Why the bubbles can appear far from the hole
A tube-type system contains several separate layers:
- the inner tube holds pressure;
- the tyre casing carries load and protects the tube;
- the bead retains the tyre on the rim;
- rim tape separates the tube from spoke holes and sharp rim features.
When the tube loses air, the tyre and rim can briefly contain that loose air. A tight tubeless-ready tyre may slow its escape even though a tube is installed. Water on the casing then makes the exit visible as bubbles.
Tyre fabric is not necessarily airtight without a tubeless liner and sealant. The escaping air may migrate through casing pores, around the bead, beside the valve, or through spoke holes. None of those exit points proves the tube failed there.
There is also a harmless-looking version after tyre installation: air trapped between tube and tyre during inflation can seep out while the tube itself still holds pressure. The deciding evidence is whether the wheel loses pressure and whether the removed tube has a leak—not the mere sight of a few bubbles.
Treat a real pressure loss as a puncture
If the tyre becomes soft while riding, slow smoothly and stop away from traffic. Do not keep riding to see whether the bubbles stop. A flat tube can move inside the tyre, damage the valve, unseat the bead, or allow the rim to strike the ground.
Before removing the tyre, mark the valve position on the tyre with removable tape or note the printed logo’s position. Keeping tyre and tube orientation lets you map the tube hole back to the casing and rim.
Park Tool recommends inspecting the tube, tyre, rim, and rim strip whenever repairing a flat. Replacing only the tube can leave the thorn, glass, damaged tape, or sharp edge ready to puncture the next one.
Find the inner-tube leak away from the wheel
Remove the wheel and tyre according to the bicycle, wheel, and tyre instructions. Avoid levering against a carbon rim unless the maker permits the tool and method.
Inflate the removed tube just enough to take shape. Work methodically around it:
- Listen and feel for escaping air.
- If necessary, submerge short sections in water and watch for a repeatable stream of bubbles.
- Mark the hole away from the repair area.
- Check the valve core, valve base, and tube seam as well.
- Deflate the tube before inspecting it closely.
Do not inflate an unsupported tube to riding pressure. Park Tool suggests expanding it for leak finding, but a tube outside the tyre grows dramatically and can rupture if abused.
Let the hole pattern guide the inspection
The shape and location of the tube damage narrows the search.
- One small hole on the road-facing side: look for a thorn, wire, flint, or glass in the tread.
- Two parallel slits: suspect a pinch impact; inspect tyre pressure choice, casing, and rim.
- Hole on the rim-facing side: inspect rim tape, spoke holes, burrs, and the valve hole.
- Damage beside the valve: check whether the valve sat crooked, the tyre moved at low pressure, or the valve hole has a sharp edge.
- Long tear or shredded area: look for a blowout, badly seated bead, casing failure, or trapped tube. Replace rather than assuming a small patch is enough.
Align the marked tube with the wheel using the valve as the reference. Inspect the matching area inside and outside the tyre. Then inspect the matching rim section.
Wear gloves or use a cloth when sweeping the tyre interior; an embedded wire or glass shard can cut a fingertip. Flex a tread cut gently so hidden debris becomes visible, but do not pull casing threads or enlarge damage.
Decide whether the tyre can be reused
A simple tread puncture with an intact casing may need only debris removal and a sound tube. A sidewall cut, exposed or broken casing cord, damaged bead, bulge, delamination, or tube-sized opening is different.
A temporary tyre boot can support some casing cuts only as a get-home measure when the tyre maker and situation allow it. Park Tool warns that a boot does not restore the original casing strength. Replace the tyre before normal riding.
Use the road-bike tyre sidewall guide when there is visible damage. Do not assume “tubeless-ready” means a damaged tyre should be converted to tubeless. Tubeless setup still requires an approved rim, compatible tyre, correct tape and valve, permitted pressure, and an undamaged casing.
Reinstall without causing the next flat
After removing the cause:
- Centre intact rim tape over every spoke hole.
- Put a little air in the replacement tube so it holds shape.
- Insert the valve straight, then place the tube without twists.
- Mount the tyre without trapping the tube under either bead.
- Inflate in stages and inspect the bead line on both sides.
- Stay within the tyre and rim pressure limits.
After inflation, squeeze the tyre all the way around and check that no tube is visible. Test the wheel and brake installation before riding. Then complete a short low-speed check close to home.
Practise this sequence before the roadside version is urgent with one puncture repair at home.
Your next step
Do not chase the sidewall bubble. Remove and test the tube, mark its actual hole, then inspect the corresponding tyre and rim locations. Keep the failed tube until the cause is identified; it is the best map you have.
Sources and further reading
- Park Tool: tyre and inner-tube removal, leak patterns, and complete wheel inspection
- Park Tool: temporary casing-boot limits during a ride
- Schwalbe: tyre dimensions, rim matching, and pressure considerations
- r/bikewrench reader context: bubbles appearing through a wet tyre while an inner tube was fitted — used as a current diagnostic-question signal; the specific wheel was not assessed from the post.