How to size an integrated road-bike cockpit before buying
Compare hand coordinates, stem angle, bar reach, width, spacers, routing, and steerer compatibility before replacing an adjustable bar and stem.
 Field guide / size-integrated-road-bike-cockpit-before-buying
A one-piece cockpit labelled “100 × 400 mm” does not necessarily place your hands where a 100 mm stem and 400 mm separate bar do. Stem angle, handlebar reach, hood placement, flare, frame stack, top cover, and spacers all change the result.
The short answer: record the horizontal and vertical coordinates of your current bar and hoods from the bottom bracket, plus width at the hoods and drops. Then obtain the candidate cockpit’s dimension drawing and approved spacer arrangement. If the maker does not publish stem angle, bar reach, width measurement, steerer interface, or routing compatibility, do not buy it on the stem-length label alone.
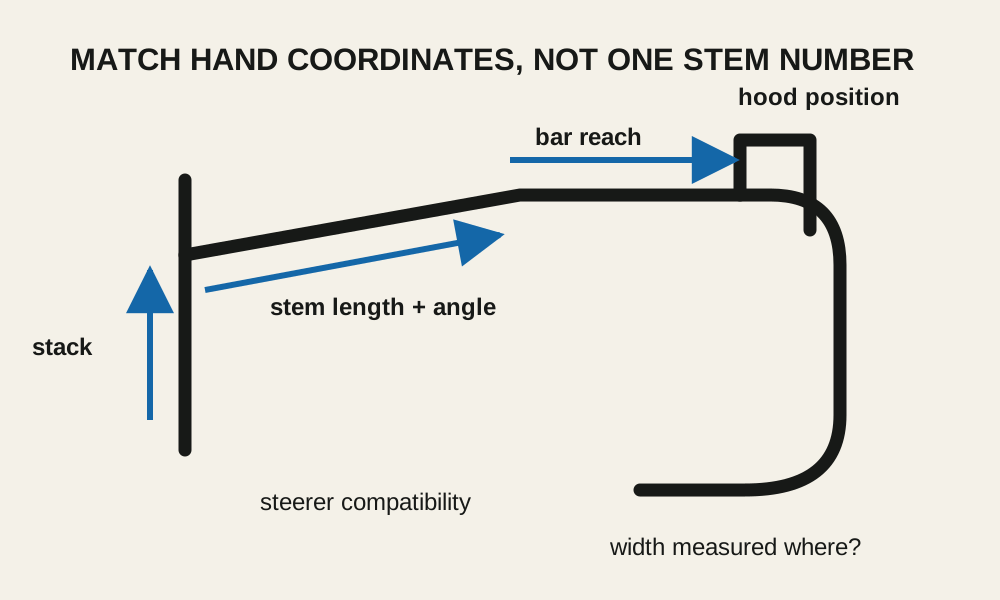
Start with the position that already works
If your present bar and stem are comfortable and controllable, preserve their outcome rather than copying their labels.
Put the bicycle on level ground. Record:
- bottom-bracket centre to the centre of the handlebar top, horizontally and vertically;
- bottom-bracket centre to a repeatable point on each hood;
- bar-top width at the maker’s measurement points;
- hood-to-hood width where your hands actually sit;
- drop width and flare;
- stem length and angle;
- handlebar reach and drop;
- top-cover and spacer stack;
- hood position and rotation;
- saddle height, setback, and angle so the reference fit remains complete.
BMC’s integrated-cockpit manual uses bottom-bracket-to-handlebar stack and reach coordinates and recommends starting from an existing fit or a qualified fit assessment. That is more transferable than “my stem is 100 mm.”
Photograph the bike square-on from the side and front. Write down exactly where each measurement began and ended.
Decode every candidate dimension
Ask for the manufacturer’s drawing, not a reseller’s shorthand.
Stem length and angle
Stem length is usually measured centre-to-centre, but proprietary designs may use an “effective” length. Angle changes both reach and height. Two 100 mm units at different angles do not finish at the same point.
The current Columbus one-piece range, for example, publishes both length options and fixed angles. Its own guidance says the angle and length must be chosen at purchase because the one-piece unit cannot be adjusted like a separate stem.
Handlebar reach and hood position
Handlebar reach is the forward distance from the bar centre to the bend where controls mount. A short-reach and long-reach bar on the same stem put the hoods in different places. Hood body shape and mounting position add another change.
Do not rotate the bar or lever beyond its approved marks to recover a bad cockpit choice. Brake lever access from the hoods and drops matters more than making a photograph match.
Width and flare
“400 mm” can mean centre-to-centre at the hoods, at the bar ends, or another maker-defined point. A flared bar may be narrow at the hoods and substantially wider in the drops. Confirm both numbers and the measurement method.
Stack, spacers, and top cover
One-piece systems often require model-specific top covers and shaped spacers to preserve routing and steering support. Count only spacer arrangements approved for the frame and cockpit. Do not use a taller stack than the fork steerer and frame maker permit.
Check whether the part fits the bicycle at all
Fit coordinates are irrelevant if the system is mechanically incompatible. Confirm:
- steerer diameter and shape;
- frame and fork interface;
- required compression plug and top-cap system;
- top-cover and spacer family;
- maximum spacer height;
- internal brake-hose and shift-cable path;
- mechanical or electronic shifting support;
- hydraulic or cable-brake support;
- hose exit side and local brake orientation;
- computer, light, and accessory mount limits;
- approved fasteners, torque values, and tightening sequence.
Fully internal hoses may need disconnection and a new brake bleed when the cockpit changes. Mechanical housing may need complete replacement. Include those consumables and labour in the true price.
A cockpit that physically clamps to a round steerer is not automatically compatible with the frame’s headset cover, routing, or fork warranty.
Build a comparison sheet before ordering
Use one row for your current setup and one for each candidate:
| Coordinate or constraint | Current bike | Candidate | Verified source |
|---|---|---|---|
| Bar-centre reach from bottom bracket | measured | calculated/published | maker drawing |
| Bar-centre stack from bottom bracket | measured | calculated/published | maker drawing |
| Hood reach and height | measured | test or estimate | fitter/shop |
| Width at hoods / drops | measured | published | maker drawing |
| Stem angle and effective length | marked | published | maker drawing |
| Approved spacer range | current manual | published | frame/cockpit manual |
| Routing and steerer compatibility | confirmed | confirmed | both makers |
Treat a blank as a blocker, not an invitation to assume. Ask the maker or an authorised dealer in writing.
Prototype the position with adjustable parts
If possible, test the target using a conventional stem and bar before buying the integrated version. Small reversible spacer, stem, and hood changes can reveal whether the hand coordinates work over real rides.
Use the position for the riding you actually do: braking on descents, looking behind, riding in the drops, long seated climbs, and ordinary endurance time. A ten-minute parking-lot ride cannot validate a fixed cockpit for a four-hour route.
Do not slide the saddle forward to compensate for a cockpit that is too long. Saddle position belongs to pedalling support; cockpit reach belongs at the front of the bicycle.
For a first bike, the cost of replacing a proprietary cockpit is one reason adjustability matters.
Price the reversal path
Before buying, answer:
- Can the cockpit be returned after controls are mounted or hoses routed?
- Is another size actually in stock?
- Must brake hoses be replaced or shortened again?
- Is a new bleed required?
- Can the steerer still accept a different approved cockpit later?
- Will cutting the steerer remove your ability to raise the bars?
- What happens to the frame or component warranty after third-party installation?
Never cut a steerer merely to make the new setup look finished before the fit is proven. That change may be irreversible.
Route the purchase through the fit decision
If the cockpit is part of a complete-bike choice, ask the shop to quote every available width and stem-length combination for your frame size. Some brands tie one cockpit size to each frame size; others allow a swap before delivery.
Use the road-bike buying checklist to compare the total cost, test-ride evidence, brake access, and service path. A lighter, cleaner front end is not an upgrade if it locks in the wrong position.
Your next step
Measure bottom-bracket-to-bar and bottom-bracket-to-hood coordinates on your current bike. Send that sheet to the cockpit maker or fitter and request a dimensioned, approved configuration. Do not order until every compatibility and reversal question has an answer.
Sources and further reading
- BMC Roadmachine integrated cockpit manual: handlebar stack and reach measurement
- ROSE: one-piece cockpit owner manual
- Columbus: published cockpit lengths, angles, spacer, routing, and torque guidance
- r/cycling reader context: uncertainty created when a one-piece cockpit omits the angle needed to reproduce a fit — used as a current buying-question signal; the rider’s fit was not assessed.