How to remove a stuck quill stem without damaging the bike
Release the expander wedge first, distinguish a stuck wedge from a corroded quill, and escalate safely before force damages an older bike's stem or fork.
 Field guide / how-to-remove-stuck-quill-stem
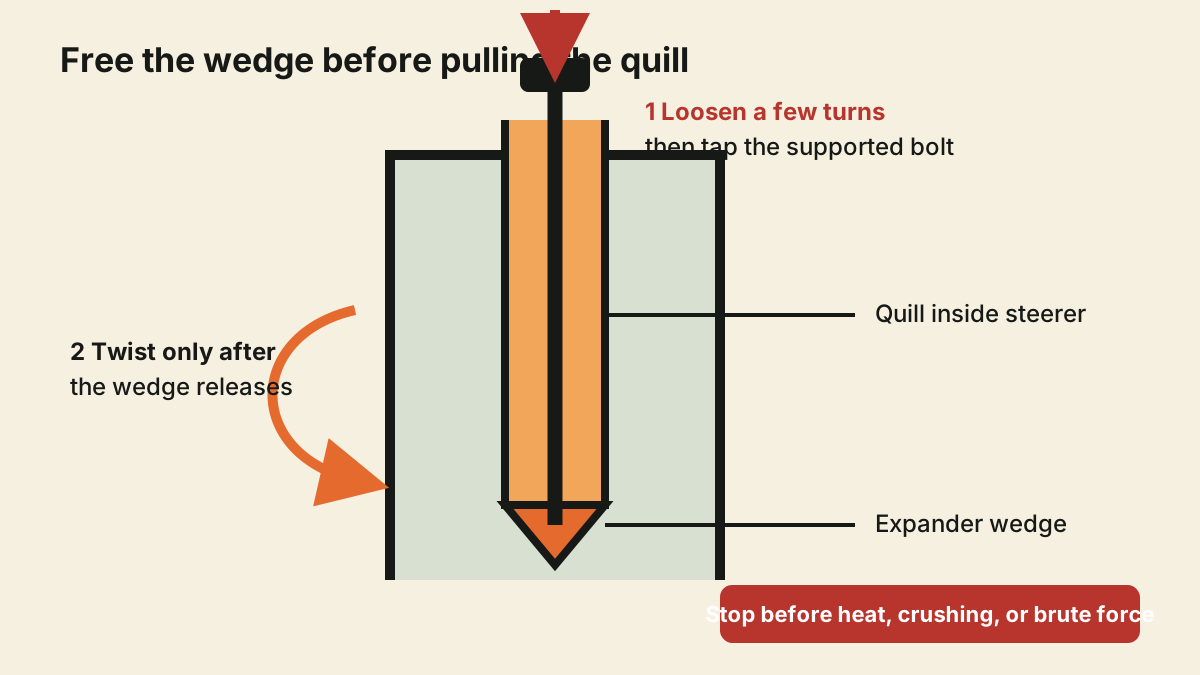
A quill stem does not come out simply because its top bolt is loose. That bolt pulls an expander wedge or cone against the inside of the fork steerer. First loosen the bolt a controlled amount and release the expander; only then should the stem twist and lift. If it still will not move, corrosion may have seized the quill to the steerer and the job needs a slower escalation.
The short answer: identify the stem as a quill, keep the binder bolt safely engaged by several threads, use the manufacturer or Park Tool method to tap the bolt and free the wedge, then test for gentle rotation. Do not keep hammering, clamp the stem in a vice, heat an assembled fork, or use the front wheel as a high-force lever. A severely seized stem is a shop job.
Confirm that it is a quill stem
A current r/bicycling repair question described an older handlebar assembly with one vertical Allen bolt that would not pull out after the bolt was loosened. That pattern commonly indicates a quill stem, but identify the actual system before applying any method.
A quill stem usually has:
- one vertical binder bolt entering the top;
- a long shaft disappearing inside a threaded fork steerer;
- a headset locknut visible around the stem; and
- no side bolts clamping the stem around the outside of the steerer.
A threadless stem clamps around the outside of the steerer and uses the top cap only to set headset preload. Treating a threadless top-cap bolt like a quill expander is wrong and can damage the headset setup. Use the handlebar-height guide if the system is uncertain.
Decide what is actually stuck
There are three different jobs riders often combine:
- Releasing the expander wedge or cone so the quill is no longer locked.
- Breaking a corrosion bond between the quill and the inside of the steerer.
- Removing the handlebar from the stem, which may require loosening a separate clamp, removing controls, and feeding a drop bar through a non-removable clamp.
Do not strip the bar, tape, cables, and controls until you know which part needs to move. Photograph bar roll, lever position, cable routing, stem height, and alignment before disassembly.
Release the expander first
Park Tool’s quill-stem procedure loosens the binder bolt two turns. If the stem remains locked, the bolt is lightly struck with a mallet and punch to break the wedge free.
The important controls are:
- use the correct fully seated tool so the bolt head is not rounded;
- loosen only enough to leave safe thread engagement;
- support the bicycle securely;
- protect the bolt head with the appropriate punch or method;
- use a light, square tap rather than repeated heavy blows; and
- stop once the bolt drops or the wedge releases.
Do not completely remove the bolt and then strike loose internal parts blindly. Do not hit a carbon component, integrated system, or visibly damaged assembly.
After the wedge releases, hold the fork or wheel only firmly enough to test whether the bars and stem rotate with modest hand force. Do not wrench violently against the spokes, brake rotor, rim, or dropouts.
If the wedge released but the quill is still seized
Corrosion between aluminium and steel is common on older, wet-stored bicycles. Park Tool treats a seized quill as a separate repair problem because escalating force can sacrifice the stem, fork, or both.
Start with evidence:
- inspect the visible quill for bubbling, white aluminium corrosion, rust, cracks, or previous tool marks;
- look through accessible openings for the wedge position;
- identify the frame, fork, and stem materials; and
- decide whether preserving the parts matters more than the labour involved.
A compatible penetrating product may be applied sparingly where the quill enters the steerer and, when accessible, from below. Protect tyres, brake pads, rims, rotors, bearings, paint, and flooring. Give it time to work. General water-displacing spray is not automatically the correct penetrant or assembly lubricant.
Try modest alternating rotation only after the expander is free. If the stem does not begin to move, stop. More leverage can twist the handlebar, damage the fork, or turn a recoverable restoration into a replacement.
Know where home repair should end
Move the job to a qualified shop when:
- the binder bolt or its socket is damaged;
- the wedge will not release with the normal controlled method;
- corrosion is severe or the materials are uncertain;
- the stem rotates only with extreme force;
- the fork steerer, crown, headset, or handlebar shows damage;
- chemical, cutting, drilling, clamping, or heat-based extraction is being considered; or
- the bicycle has sentimental or collector value.
Advanced removal may destroy the stem to save the fork. That can be a sensible trade, but it requires controlling swarf, chemicals, heat, clamping loads, and cutting depth around a safety-critical steerer. It is not a beginner continuation of “tap it harder.”
Clean and inspect before reinstalling
Once removed, inspect the full quill, wedge, bolt, handlebar clamp, and visible steerer. Surface dirt is different from deep pitting, cracking, deformation, or thread damage. Replace questionable hardware with an exactly compatible stem or bolt assembly.
Park Tool’s installation guidance calls for grease on the binder bolt, wedge, quill, and inside the steerer for the common metal system it demonstrates. Follow the exact component instructions when they differ. Keep lubricant off the handlebar-to-clamp gripping surface unless the maker specifies otherwise, and away from every brake surface.
On reassembly:
- Keep the complete minimum-insertion or maximum-height mark inside the steerer.
- Restore bar roll and control position from the recorded baseline.
- Align the stem with the front wheel.
- Tighten the binder and bar-clamp fasteners to documented values and sequence.
- Hold the wheel and test that the stem cannot rotate independently.
- Check headset adjustment, cable freedom through full steering, and brake operation.
If the goal was only a more comfortable position, confirm the result with a short test ride rather than raising the quill to its limit immediately.
Your next step
Photograph the top bolt and the side of the headset, then positively identify quill versus threadless. If it is a quill, release the wedge using the documented two-turn-and-controlled-tap method. If the wedge releases but the stem remains fixed, stop escalating force and price a professional extraction before any part is sacrificed.
Sources and further reading
- Park Tool: quill-stem removal and installation
- Park Tool: seized seatposts and stems
- r/bicycling reader context: an older quill stem that would not pull free — used as an editorial problem signal; individual repair comments were not treated as instructions.