Electronic front derailleur grinds but will not shift to the small ring
Reduce chain load, check rear-gear position and system status, inspect derailleur mounting and chainrings, then use the exact maker procedure instead of forcing the motor.
 Field guide / electronic-front-derailleur-grinds-wont-shift-small-ring
A powered front derailleur that makes a long motor or grinding sound but leaves the chain on the large ring is not asking for more button presses. It may be trying to complete a shift while chain load, rear-gear logic, alignment, mounting, chainring condition, adjustment, or an electrical fault prevents it.
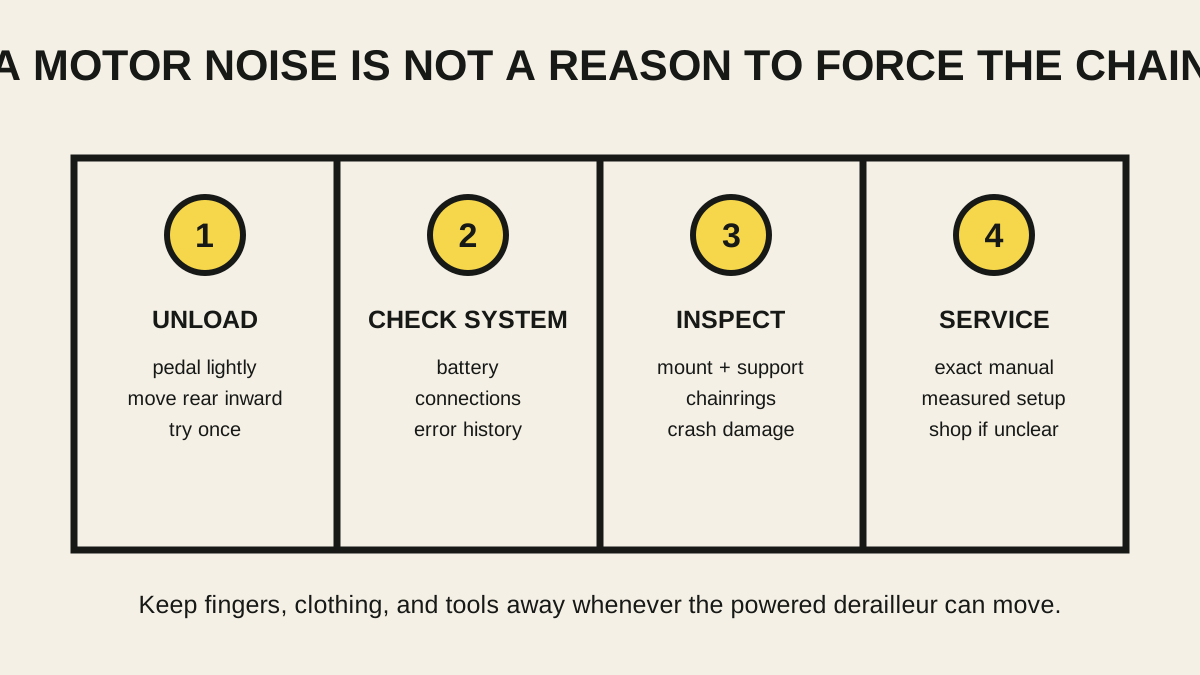
The short answer: stop forcing the shift. While pedalling lightly in a safe setup, move the rear derailleur away from an extreme cross-chain position and try once. If it still fails, check battery and recorded errors, then inspect the front derailleur mount, support screw or plate, height, angle, chainrings, crank security, and damage. Use the exact component manual or a qualified shop for measured adjustment.
Start with the exact system
A recent r/bikewrench discussion described a Shimano 105 Di2 front derailleur that intermittently refused to move the chain from the large ring while making a prolonged noise. The question is useful, but a video cannot distinguish alignment, load, setup, chainring, connection, or internal faults.
Record:
- shift-lever, front-derailleur, rear-derailleur, battery, crank, and chainring model numbers;
- bicycle make, model, year, and any recent component changes;
- firmware or app version only where the maker supports checking it;
- whether failure occurs in every rear gear or only at one end;
- whether it began after an impact, wash, transport, wheel removal, battery event, or service;
- whether the front derailleur visibly moves, stalls, returns, or never starts.
Do not assume every Di2 generation uses the same wiring, battery, buttons, adjustment mode, or reset process.
Rule out an overloaded or inhibited shift
Front shifting needs the chain to move, but high pedal force can prevent a clean lateral transfer. In a safe, traffic-free test or work stand:
- Pedal forward with very light pressure.
- Move the rear derailleur away from the smallest sprockets if the system is heavily cross-chained on the large ring.
- Request one front downshift.
- Stop immediately if the chain jams, falls inward, or the derailleur contacts the crank or ring.
Do not shift by hand, pry the cage, or pull the chain while the electronic system is awake. Shimano’s FD-R7150 dealer manual warns that the motor can continue until it reaches its commanded position and can injure fingers caught in the mechanism.
If the shift works only when almost unloaded, the system still needs inspection. Normal front shifting should not depend on a roadside ritual or repeated motor stalls.
Check system status before mechanical adjustment
Follow the exact user manual to check:
- battery charge;
- supported connection status;
- error or maintenance messages;
- correct shift mode and button assignment;
- firmware status through the approved application or dealer tool;
- whether every other shift command operates normally.
Do not repeatedly disconnect waterproof electronic connectors. Shimano instructs users not to connect and disconnect E-TUBE wires unnecessarily and specifies the correct plug tool for service. A connector can look seated while requiring model-specific inspection.
A healthy battery display does not prove the mechanical setup is correct. Conversely, moving limit or adjustment screws will not fix a damaged connection or system error.
Inspect the mechanical installation
With the system unable to move accidentally, use bright light and the exact dealer manual. Check for:
Loose or rotated derailleur
The cage should sit at the specified height and orientation relative to the large chainring. A loose fixing bolt, missing support plate, wrongly set support screw, or rotated braze-on mount can let the derailleur deflect under motor force.
For Shimano FD-R7150, the dealer manual treats the support plate, support screw, installation position, electrical connection, and adjustment as a defined sequence. Do not copy a clearance from an older mechanical derailleur.
Bent, loose, or wrong chainrings
Rotate the crank slowly and watch the large ring relative to the cage. Stop for lateral wobble, loose chainring hardware, impact damage, a reversed or incompatible ring, or unusual crank movement. Matched front-shift rings and correct orientation matter.
Chain and crank faults
Confirm the correct chain family, direction where applicable, wear condition, stiff links, and adequate lubrication. Check the crank for play and the chain for damage caused by previous failed shifts.
Crash or transport damage
Even without a riding crash, a bicycle can receive a side impact in storage or transport. Inspect the cage, mounting tab, wiring, frame around the mount, and chain catcher. Do not straighten a carbon frame mount or powered derailleur by eye.
Use adjustment mode only with the correct instructions
Electronic micro-adjustment is not a universal “move it until quiet” process. The specified gear combination, button sequence, clearance, and confirmation differ by generation and component.
For FD-R7150, Shimano’s current dealer manual includes a dedicated adjustment procedure and states that the manual is intended primarily for professional bicycle mechanics. It tells users who are not trained and who find the instructions unclear to stop and contact the place of purchase or a distributor.
That is a sensible boundary when:
- the derailleur mount or support plate must be repositioned;
- electrical wires require disconnection;
- the cage may contact the chainring or crank;
- the correct model procedure cannot be confirmed;
- the system reports an error;
- adjustment does not remain stable through a crank rotation.
Do not use a mechanical front-derailleur video, an older Di2 junction-box procedure, or a rear-derailleur protection reset merely because the screen or button looks familiar.
Read the symptom pattern
| Pattern | Checks to prioritise |
|---|---|
| Fails only under hard pressure | Shift technique, setup, cage position, ring condition |
| Fails only in smallest rear sprockets | Cross-chain logic, programmed mode, adjustment, compatibility |
| Motor runs but cage barely moves | Mounting, obstruction, damage, internal service |
| Cage moves but chain stays on large ring | Cage position, ring orientation/condition, chain compatibility |
| Works after charging, then returns | Battery health, connections, system diagnostics |
| Began after impact or travel | Cage, mount, support plate, wire, ring, frame tab |
| Chain falls toward frame | Stop; do not continue test shifting |
These are triage categories, not remote diagnoses. More than one fault can exist.
Do not use these shortcuts
- Do not hold the shift button while the motor grinds.
- Do not bend the cage by hand.
- Do not spray lubricant or solvent into the derailleur motor or connectors.
- Do not pressure-wash the components.
- Do not loosen every screw to “reset” it.
- Do not test by standing and applying full power.
- Do not keep riding because the rear gears still work.
A failed downshift can leave you overgeared before a climb; a misadjusted cage can drop the chain against the frame. Arrange a repair before the next consequential ride.
Give the shop a useful fault report
Send:
- all component model numbers;
- a short video from a safe work-stand test;
- the rear sprocket used during failure;
- exact app or error messages;
- when the symptom began;
- impact, transport, wash, and service history;
- whether the chain or cage contacts anything.
Ask for the diagnosed cause and measured setup, not only “an adjustment.” If the bicycle has already been checked without reproducing the fault, request a test under the same gear, battery, and load conditions that trigger it.
Your next step
Do one light-load test away from the smallest rear sprockets. If the shift fails, stop. Photograph the mount and chainrings, record every model number and system message, and open the exact user and dealer manuals before deciding whether the next step is documented adjustment or professional service.
Sources and further reading
- Shimano FD-R7150 dealer manual: safety, installation, adjustment, and maintenance
- Shimano manuals and technical documents search
- r/bikewrench reader context: electronic front derailleur intermittently grinding without shifting down — used as a troubleshooting-demand signal; comments and video were not treated as a verified diagnosis.