Can you copy a road-bike fit to a triathlon bike?
Use your road-bike measurements as evidence, not a template: a triathlon bike changes the contact points, hip position, steering, braking, and fit coordinates.
 Field guide / copy-road-bike-fit-to-triathlon-bike
Before you view or pay
Check fit, condition, and starter gear first
Use the buying checklist to choose the right path: used-bike viewing, first-bike fit and type, hidden repair costs, or starter gear.
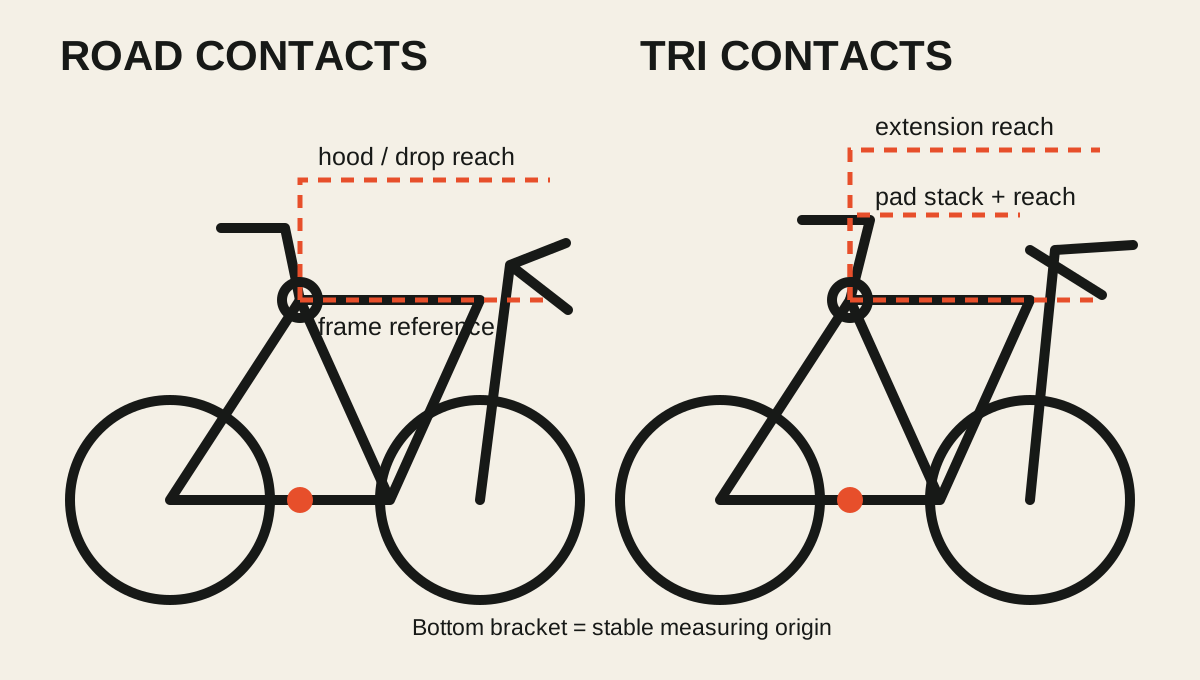
You cannot copy a road-bike fit to a triathlon bike by matching frame size, saddle height, or frame reach. The road fit is useful evidence about your body and current contact points, but a tri bike puts your elbows on pads, moves your hands to extensions, and usually rotates the riding position around the bottom bracket.
The short answer: record the road position, then size the tri bike with tri-specific coordinates—especially pad stack, pad reach, saddle position, and the adjustment range around them. A road-bike “medium” does not predict a tri-bike “medium,” and frame reach is not the same as reach to the arm pads or extension grips.
What transfers from the road bike
Bring these measurements to the tri-bike decision:
- saddle height, measured with the same method and saddle reference point;
- saddle model, tilt, and the point where you actually sit;
- cleat position and crank length;
- current discomfort, numbness, or movement under effort;
- how long you can hold the hoods and drops comfortably;
- your road-bike stack and reach, plus the fitted spacers and stem;
- any fit report, flexibility notes, injury constraints, and event goal.
These facts establish a starting envelope. They do not establish the finished tri position. Even “saddle height” can change when the saddle shape, effective seat angle, crank length, or where you sit changes.
If you have a professional report, use the fit-report shortlisting guide before comparing model names.
What does not copy directly
Frame size labels
Size names are brand-specific. Compare each exact model’s chart and adjustment range. A smaller frame with a highly adjustable cockpit may cover the same pad coordinates as a larger frame, but with different handling, base-bar height, and storage clearance.
Road frame reach
Frame reach ends at the top of the head tube. Your tri contact point is farther forward at the arm pads and extension grips. Comparing a road frame’s reach with a tri frame’s reach and concluding that your arms will be “100 mm short” mixes unlike measurements.
Saddle setback
Tri positions commonly move the rider farther forward to support an aerodynamic torso while preserving a workable hip relationship. Canyon’s current comparison explains that its tri geometry positions the rider farther forward than its time-trial geometry to support running after the bike. Do not force the road saddle setback onto that system.
Handlebar drop
On a road bike, your hands support and control you at the hoods or drops. On a tri bike, your skeleton is supported at the elbows while your hands rest farther forward. The same vertical drop can feel and function completely differently.
Compare the coordinates that matter
Ask the manufacturer or fitter for the following ranges for the exact frame size and cockpit:
| Coordinate | What it describes | Why it matters |
|---|---|---|
| Pad stack | Vertical distance from bottom bracket to pad surface | Determines how low your supported torso can sit |
| Pad reach | Horizontal distance from bottom bracket to a defined pad point | Determines where your elbows are supported |
| Pad width | Centre-to-centre elbow support range | Affects comfort, breathing, and control |
| Extension reach | Pad or bottom-bracket reference to the grips | Determines wrist and hand position |
| Base-bar position | Brake-hand contact point | Determines control outside the aero position |
| Saddle range | Height, setback, tilt, and rail support | Must accommodate your pedalling position safely |
Confirm how each brand defines the reference point. “Pad reach” may be measured to the pad centre, rear, or another published point. A number without its definition is not comparable.
Build an adjustment budget, not one perfect coordinate
A viable size should place your predicted position comfortably inside the available range—not at every maximum or minimum. Keep room to:
- raise the pads for early training or a longer event;
- move the pads fore and aft without buying a new proprietary cockpit;
- adjust extension length and angle;
- keep the saddle clamp inside the marked rail area;
- carry hydration without blocking adjustments;
- reach the base-bar brakes securely;
- change the fit after several weeks of adaptation.
An integrated cockpit with one mathematically possible setting can still be a poor purchase. Price every required riser, bracket, extension, bridge, saddle-post head, and alternative stem before paying.
Test the position in stages
- Set a conservative pad height and reach inside the approved adjustment range.
- Confirm you can mount, steer, look ahead, change line, and reach the brakes without panic.
- Ride short, flat, low-traffic sessions on the base bar and then brief aero intervals.
- Increase continuous aero time before lowering or lengthening the position.
- Check breathing, neck vision, saddle pressure, hands, feet, knees, and control after—not only during—the ride.
- Test hydration, nutrition, shifting, cornering, and a safe emergency transition to the brakes.
- Only then test the duration and intensity required by the event.
Canyon’s Speedmax manual says the position must remain controllable and sustainable for the full training or competition section. It also recommends a long test ride away from traffic after changes. That is a better acceptance test than whether the silhouette looks fast.
If you are only exploring the position, start with the beginner clip-on aero-bar guide and check that your road bike and event rules allow the setup.
When to delay the purchase
Pause when:
- the seller provides only frame stack and reach, not pad coordinates;
- the cockpit is already at an adjustment limit in the proposed setup;
- you cannot verify the exact cockpit generation and included hardware;
- the saddle needs to clamp beyond its rail marks;
- you cannot see ahead or reach the brakes confidently;
- pain or numbness is being treated as normal adaptation;
- the event has equipment rules you have not checked;
- the proposed size comes from an AI comparison with no coordinate definitions.
For a first half-distance event, a correctly fitted road bike may still be the calmer choice. Use the road-bike or tri-bike guide to separate race speed from training, group-riding, handling, and budget needs.
Your next step
Create two columns: your measured road contact points and the tri bike’s published adjustment ranges. Do not select a size until pad stack, pad reach, base-bar control, and saddle range all have usable margin. If those numbers are unavailable, book a tri-specific pre-fit before ordering.
Sources and further reading
- Canyon: current beginner tri-bike guide on fit range, adjustability, and handling
- Canyon Speedmax manual: sustainable position, control, braking, and staged practice
- Canyon: road, triathlon, and time-trial positions are not interchangeable
- r/bikefit reader context: trying to translate road-bike measurements directly to a tri-bike size — used as a current sizing-question signal; suggested sizes and AI calculations in the thread were not treated as fit evidence.