Should you buy a dedicated bike for your smart trainer?
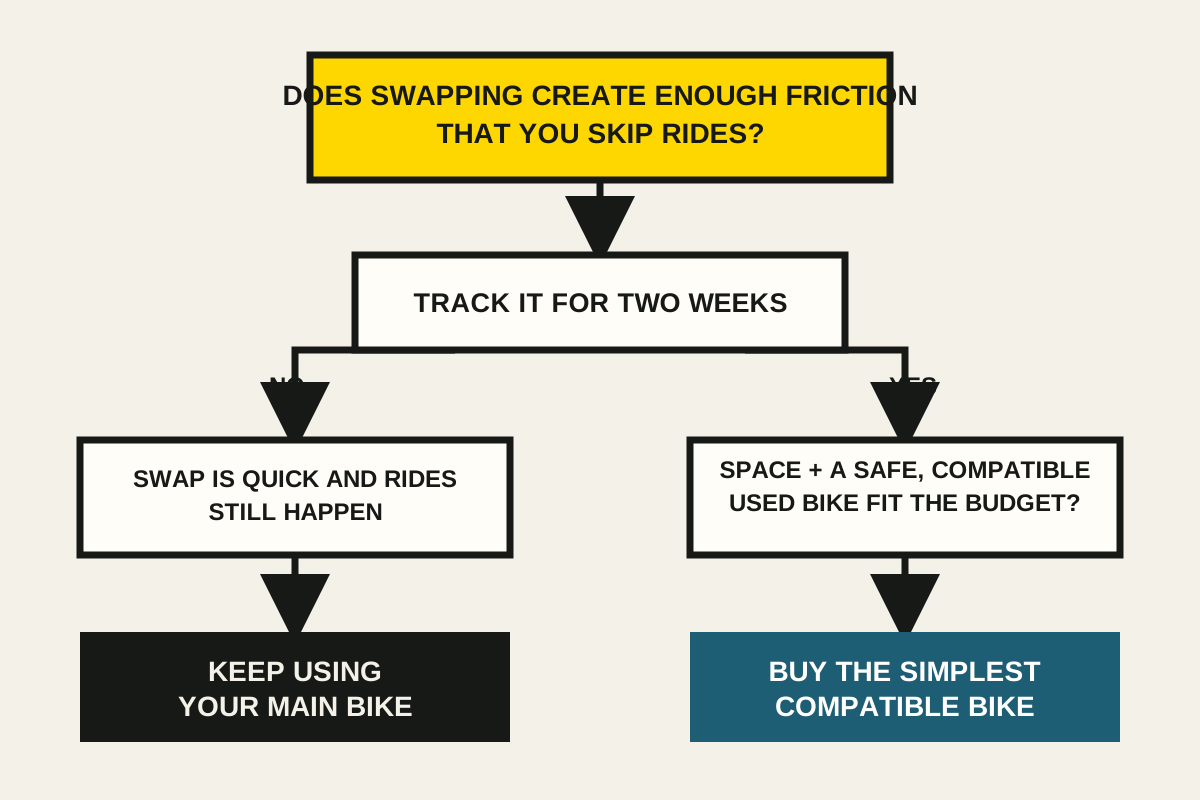
A cheap trainer bike is worth buying when swapping your main bike creates enough friction that indoor or outdoor rides stop happening.
 Siklist answer / should-you-buy-a-dedicated-bike-for-your-smart-trainer
The short answer: buy a dedicated trainer bike if swapping your main bike is already causing you to skip indoor sessions or leave the trainer bike-mounted on days when you would rather ride outside. If both kinds of ride still happen, keep your money and use the bike you own.
That distinction matters. A second bike does not make the workout better by itself. It removes a small, repeated obstacle: wheel off, adapters in the right order, chain on the cassette, dirty hands, then the whole process again before an outdoor ride.
For one rider, that is a calm two-minute job. For another, it is exactly enough annoyance to turn “I can squeeze in 40 minutes” into “maybe tomorrow.” The price of the second bike should be judged against the rides that friction is costing you—not against an imaginary perfect pain-free setup.
Run the two-week friction test
Before buying anything, use your current bike for two weeks and record three things:
- How long the complete swap takes—from “I want to ride” to pedalling, including finding adapters, cleaning the bike, and pairing the trainer.
- How many indoor rides you postpone because the bike is outside-ready.
- How many outdoor rides you skip because the bike is already on the trainer.
Do not time only the neat mechanical part. The relevant number includes the hunt for the thru-axle adapter, the chain mark on your hand, and the five minutes spent talking yourself into beginning.
If no ride disappears, you do not have a problem worth €150–€200. If rides repeatedly disappear, a permanent setup is not indulgence; it is a practical way to protect the habit.
Compare the three sensible options
| Option | Best when | Main drawback |
|---|---|---|
| Use your main bike | Space is tight, trainer use is seasonal, and swapping does not change your behaviour | Repeated setup, cleaning, and outdoor-readiness friction |
| Buy a cheap used bike or frameset | You already own a trainer and want a permanent, low-cost setup | Compatibility checks, fit changes, cassette/adapter costs, and storage |
| Buy a dedicated smart frame or smart bike | More than one rider needs quick fit changes, or indoor training is a major long-term activity | Far higher cost and a closed compatibility ecosystem |
For the situation behind this question—a trainer already owned, used bikes available around €150, and a genuine worry that laziness will choose neither ride—the used bike is the most rational upgrade after the two-week test confirms the friction.
What a €150–€200 trainer bike actually needs
It does not need to be fast, light, aerodynamic, fashionable, or even pleasant to carry upstairs. On a direct-drive trainer, its rear wheel will not be used. Premium tyres, deep wheels, and a high-end groupset do not improve an ERG workout.
It does need four less glamorous things:
- A sound frame and fork with no cracks, severe corrosion, or suspicious damage.
- A frame size that lets you reproduce a comfortable saddle and handlebar position.
- A drivetrain that works with the trainer’s cassette or virtual-cog system.
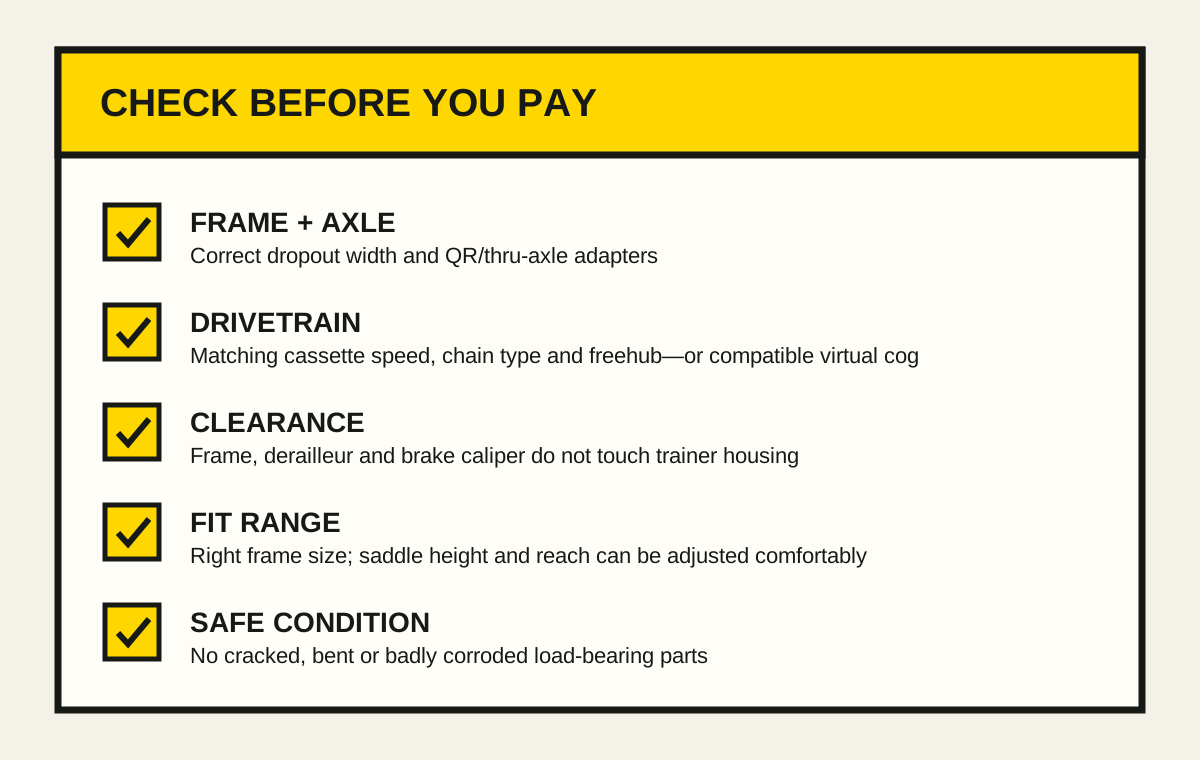
- The correct rear dropout spacing, axle type, adapters, and physical clearance for your specific trainer.
Buying only a frame or a bike with a damaged rear wheel can be economical, but do not confuse “not roadworthy” with “safe under load.” A bent or cracked frame is not made safe by removing the rear wheel. If you cannot confidently inspect a used bike, budget for a mechanic to do it.
Compatibility is where cheap bikes become expensive
Before visiting a seller, find the exact support page or manual for your trainer and write down:
- Supported dropout widths: for example 130/135 mm quick release or 142/148 mm thru-axle.
- Which end caps, spacers, or axle adapters are required.
- Cassette speed and freehub type.
- Known frame, derailleur, or disc-caliper clearance restrictions.
- Whether the bicycle manufacturer allows the frame on a stationary trainer.
This is model-specific. Garmin’s Tacx fitment guide, for example, lists different hardware for 130/135 mm quick release and several thru-axle standards, and warns that the frame must not touch the trainer housing. Zwift’s Hub compatibility page similarly lists supported axle widths and says not to force a frame onto the trainer.
The rear derailleur must index across a normal cassette system, but the trainer cassette does not have to copy your outdoor bike’s largest sprocket exactly. It does need the correct number of speeds and a compatible chain/freehub arrangement. Zwift warns that the wrong cassette speed can damage the bike in its cassette selection instructions.
A compatible virtual-cog setup can make an older bike easier to use across drivetrain generations, but it is not universal. Zwift’s current Cog compatibility list excludes some freehub and chain systems and only supports listed trainers. Check the exact trainer before treating a single cog as the solution.
The fit should be close, not cosmetically identical
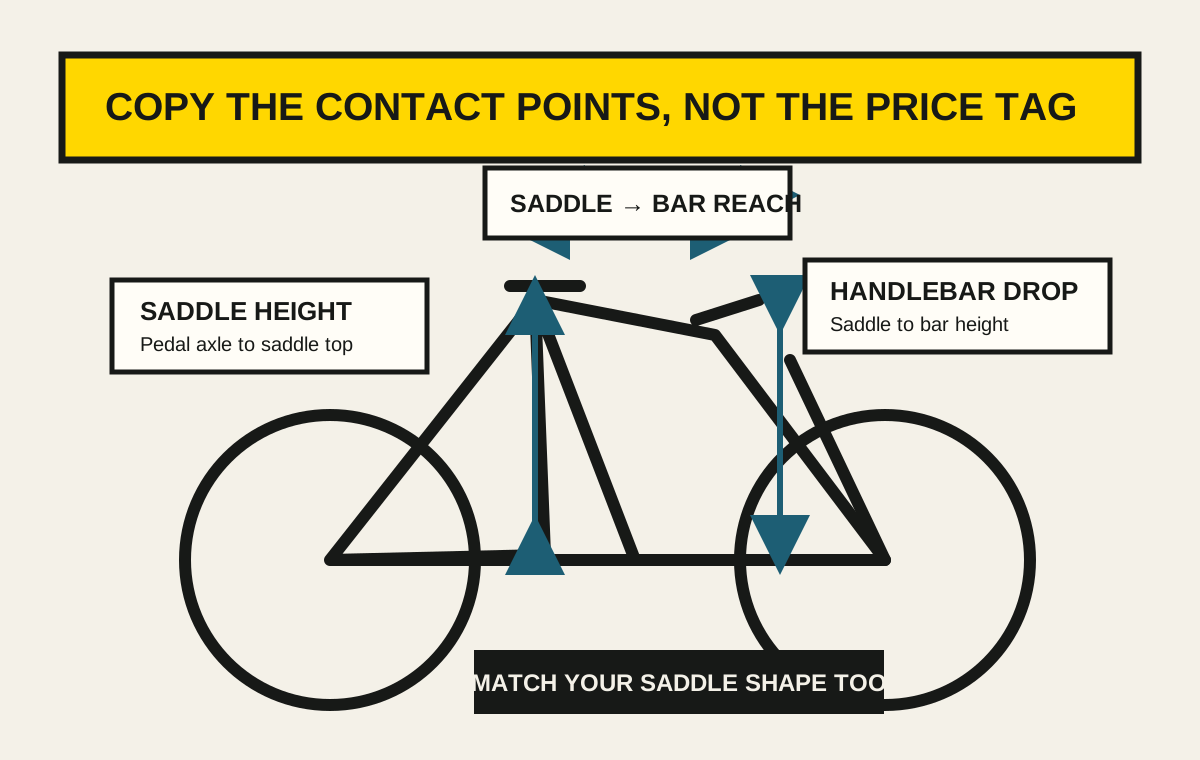
Start with a used bike in the right broad size range. Then reproduce the contact points that determine comfort:
- Saddle height.
- Saddle setback.
- Saddle shape and tilt.
- Reach from saddle to handlebars.
- Handlebar height relative to the saddle.
You can measure those five things on your outdoor bike with a tape measure and a level, then move the trainer bike toward the same position. The frame model and the number printed on its seat tube do not need to match.
Indoor fit can reasonably be a little more upright because the bike does not move beneath you and there are fewer natural coasting breaks. But “indoor is different” is not permission to tolerate knee, back, hand, or saddle pain. If a cheap frame cannot reach a comfortable position with ordinary stem, spacer, seatpost, and saddle adjustments, it is the wrong cheap frame.
Remember the hidden costs
A €150 bike can become a €350 project through small mismatches. Price these before committing:
- The right cassette, freehub body, or virtual cog.
- Axle adapters or end caps.
- A fresh chain if the old one skips on the trainer cassette.
- A saddle, stem, seatpost, or handlebars needed to make the fit comfortable.
- Pedals.
- A sweat guard, mat, fan, and basic cleaning supplies.
- Mechanic inspection or labour.
Brakes are not used while a correctly mounted direct-drive bike is stationary, but leave the bike safe to handle and clearly mark it as trainer-only if it is not roadworthy. Do not casually roll outside on a bike with missing, disconnected, or non-working controls.
A practical recommendation
Measure the full swap time and count lost rides for two weeks.
If you miss nothing, continue using your main bike. Store the adapters together, keep a pair of disposable gloves nearby, and make the swap routine boring.
If you skip two or more realistic ride opportunities because of the swap, look for the simplest safe used bike that:
- Fits your body closely enough to reproduce the contact points.
- Is explicitly compatible with your trainer’s axle and frame-clearance requirements.
- Works with the trainer cassette or a supported virtual cog.
- Stays within budget after adapters, drivetrain parts, fit changes, and inspection.
That is the answer: do not buy a second bike because dedicated setups are theoretically nicer. Buy one when the small inconvenience of sharing a bike is measurably choosing your workouts for you.